Making Self Portraits With Stable Diffusion and LoRA
Over the last few months, products like Lensa and AvatarAI have exploded onto the scene, generating artistically rendered portraits and selfies. They range from hyper-realistic photographs that are hard to differentiate from real to highly stylized paintings and illustrations which take a look and feel of a variety of mediums.
As an artist, these products are super interesting to me. I love how they enable and democratize the ability to remix images into different styles. However, using these products feels more like applying an Instagram filter than actual creation. So I’m left wondering: how do they work? How can you take a few photos and generate something new and unique from them? How can I use these techniques to apply my own unique artistic spin?
In this post, we will explore the easiest way to generate your own custom avatars and selfies, using an open-source image generation model named Stable Diffusion and fine-tuning it with a technique named LoRA (aka. Low-Rank Adaptation).
Stable Diffusion
Stable Diffusion is an open-source image generation AI model, trained with billions of images found on the internet. While there are many advanced knobs, bells, and whistles — you can ignore the complexity and make things easy on yourself by thinking of it as a simple tool that does one thing.
Describe what you want to see, then click the generate button! Easy peasy.
The easiest way to get started with Stable Diffusion is to head over to Replicate and click the submit button. You’ll notice there are several fields to play with, I suggest sticking to just changing the prompt to get a feel for what you can make.
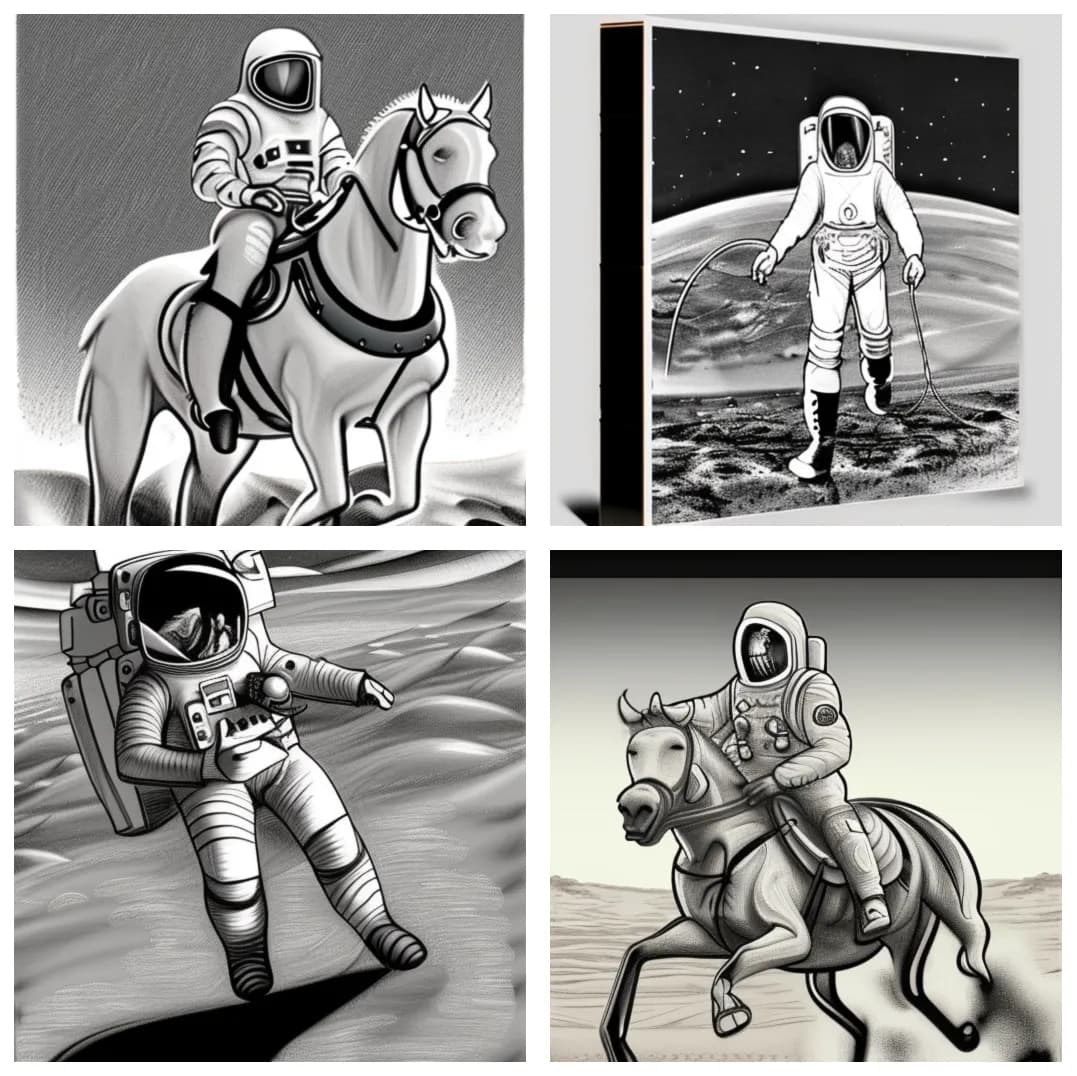
I generated these images using the text astronaut riding a horse on mars, drawing, sketch, pencil. You can see all of the other parameters and recreate something similar by visiting this Replicate link https://replicate.com/p/h6h4e3remjcn5i4by35qyzucbe
At the bottom, there is a Tweak It button that will copy all of the same parameters, giving you the ability to fork my generation.
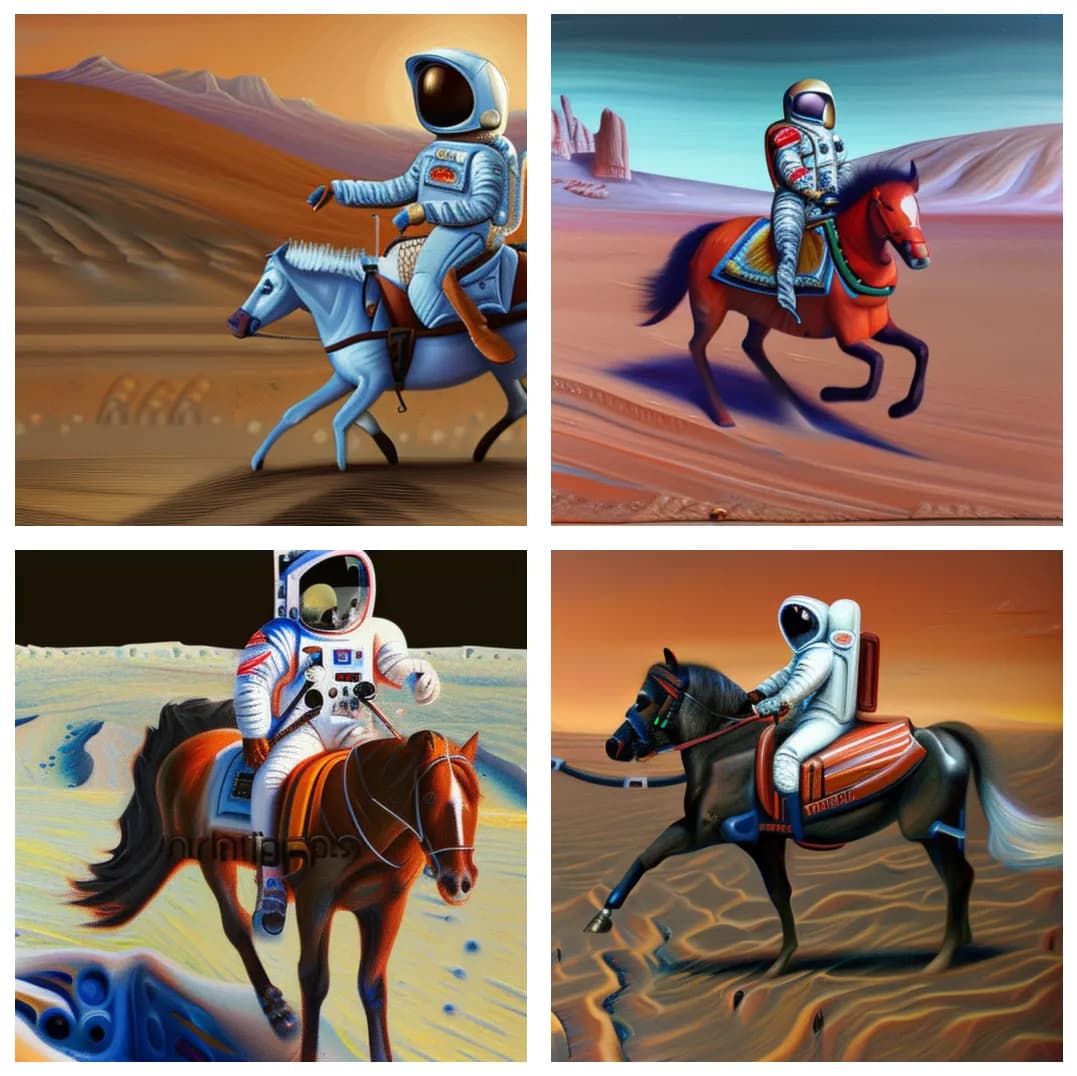
So that’s all cool, but can it do different styles? You betcha! I generated the following images using the prompt astronaut riding a horse on mars, painting, impressionistic style, oil, highly detailed. I added words like painting, impressionistic style, and oil to create a result that had a different look and feel. Also, here’s a link for you to inspect/tweak the parameters on your own: https://replicate.com/p/dc5qehlh3nc6vmttezm3jwreq4
This is all great, but because it is trained on a small 2-billion-image subset of imagery on the internet, it doesn’t know how to represent many people, places, or things. It does a fantastic job with landscapes, patterns, and such — but what happens if I try to generate a Jake Dahn riding a horse on mars, drawing, sketch, pencil? It clearly has no idea who I am 🤣 https://replicate.com/p/ixfnjezokrgq7ly23rdhl427cq
Fine Tuning Stable Diffusion with LoRA (Low-Resource Adaptation)
Awesome, so as demonstrated above, we can pretty quickly generate some neat imagery, but how do I generate images of myself using Stable Diffusion?
In the AI space, there’s an emerging mental model pattern where you take a large base model (like Stable Diffusion) and fine tune on top of it. Basically, taking a massively capable off-the-shelf free and open source AI model and customizing them on your own data.
There are many techniques for performing this sort of fine-tuning. At the time of writing, the most popular technique is called DreamBooth. There’s also Textual Inversion, LoRA, and more! Each technique seems to have somewhat similar results, but the technical decisions and tradeoffs made behind the scenes can actually yield quite different artifacts.
For example, DreamBooth takes a long time to train, and it outputs a large multi-gigabyte .ckpt model checkpoint file. ~25-35 minutes to train on an Nvidia T4, and ~10-15min to train on a Nvidia A100. So far, in my experience, DreamBooth gives the best results, but it's also the most resource intensive, and the checkpoint files are kind of painful to work with because they are so large.
LoRA yields similar results as DreamBooth, but it only takes 5-7 minutes to train, and it produces a much more portable 10-15MB .safetensors weights file. I've heard they can sometimes balloon up to 200MB, but I haven't seen that happen yet. In addition to the small file size portability, you can also mix and match multiple LoRA concepts, objects, and styles into a single prompt 🤯. This makes it much more akin to a "brush" in a painting app, where you can mix and match different styles and objects to create a unique image.
That means I can generate a photo of myself in the style of a van Gogh painting, Pixar character, anime character, etc.
So without further ado, let’s train some LoRA weights based on photos of me!
1. Select Images for your Image Training Set
Now, before we proceed, I think it’s important to note that at the time of writing this post, training LoRA weights feels more like an art than a science. Everything I am sharing is open for interpretation, I’m not showing you THE way, I’m showing you A way. You are the hacker/artist, you do you. If you have any ideas for improvements I should make, or suggestions of things to try in the future, I would love to hear from you!
I have read a bunch of advice from strangers on the internet claiming many things you MUST do. Things like “you must use images that have varied lighting and environmental conditions.” Advice like “you must limit recurring patterns, or they will appear in every image generation.” The Replicate blog post about LoRA also says that it’s better at style, worse at faces, but it honestly works pretty well for my face.
So far, in my experience, most of these things don’t seem to matter 🤷♂️
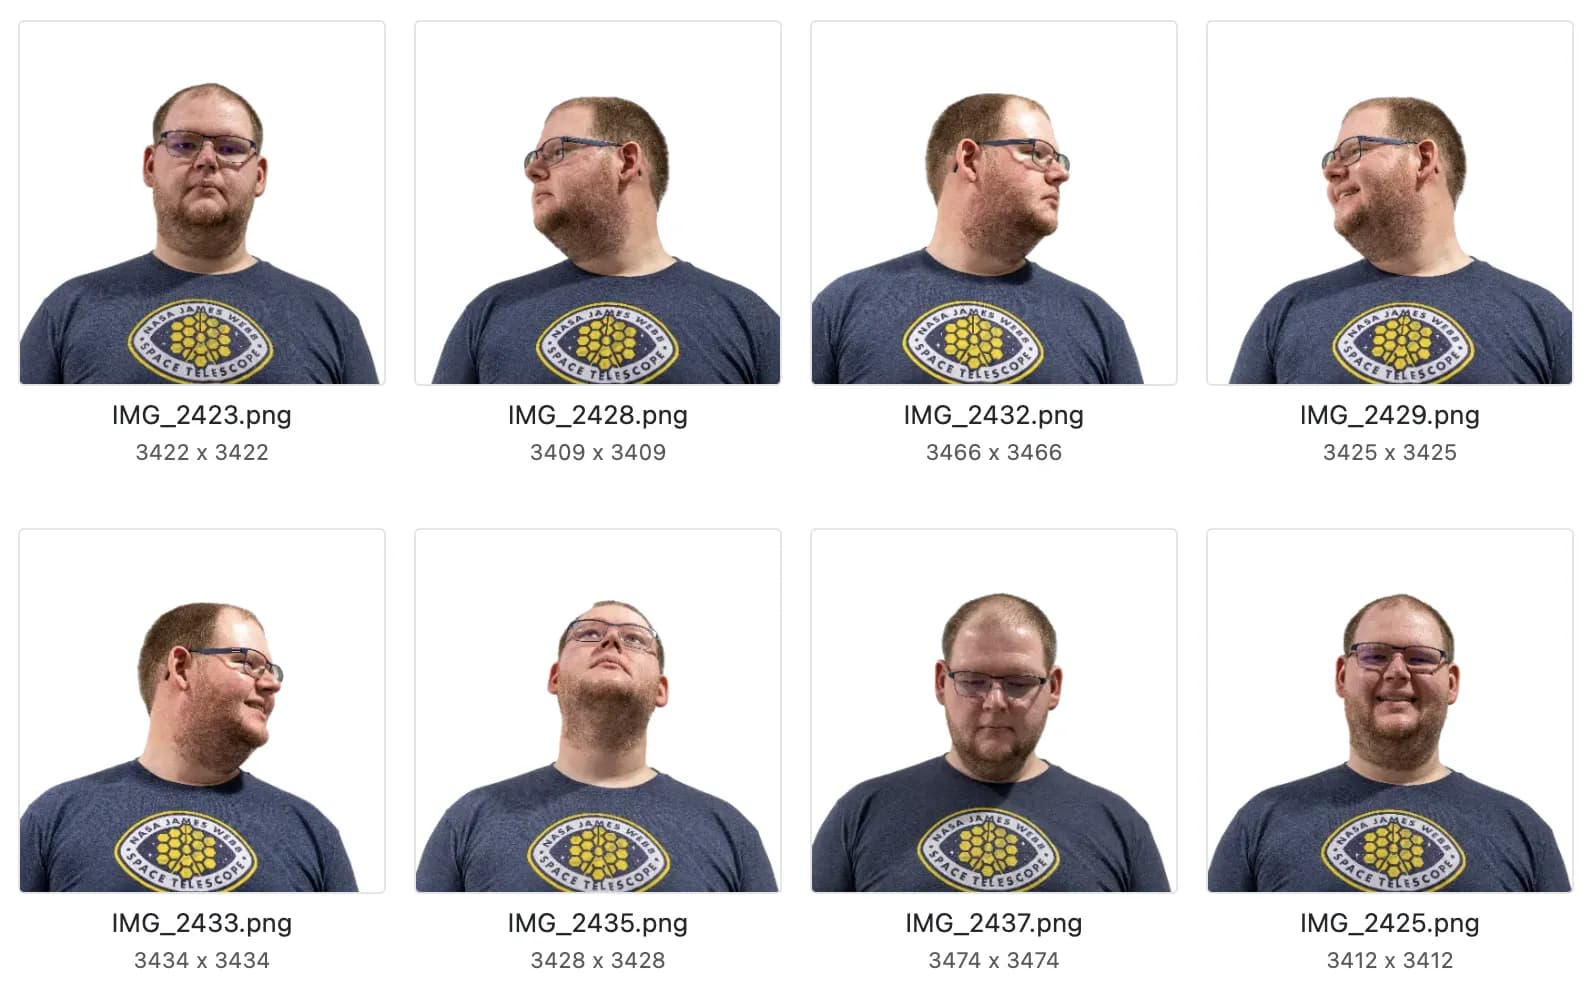
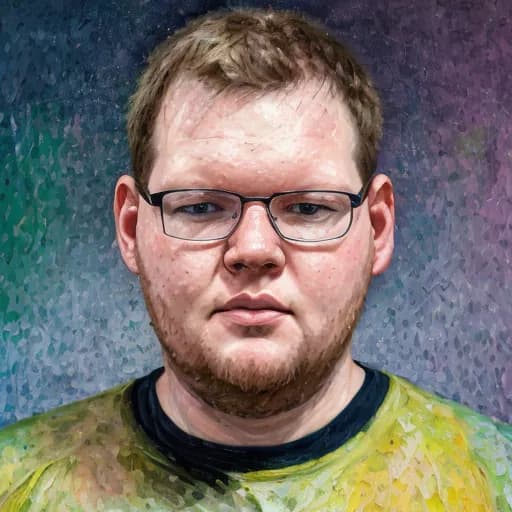
Today we will keep it simple by using eight square-cropped transparent PNG photos I took of myself. I used Photoshop to quickly crop and cut out the background scenery from my photos. However, to get started quickly, I recommend using the free browser-based tool birme.net to perform cropping. Transparency doesn’t seem to matter all that much, but I haven’t done a rigorous side-by-side experiment yet.
I took the following photos with a camera on a tripod in a well-lit room. My goal was to capture my face while looking up/down/left/right, both smiling and not smiling. I’ve read many recommendations about using different lighting, scenes, and environments for these training photos — but these simple portraits seem to work reasonably well.
2. Prepare Instance Data .ZIP File
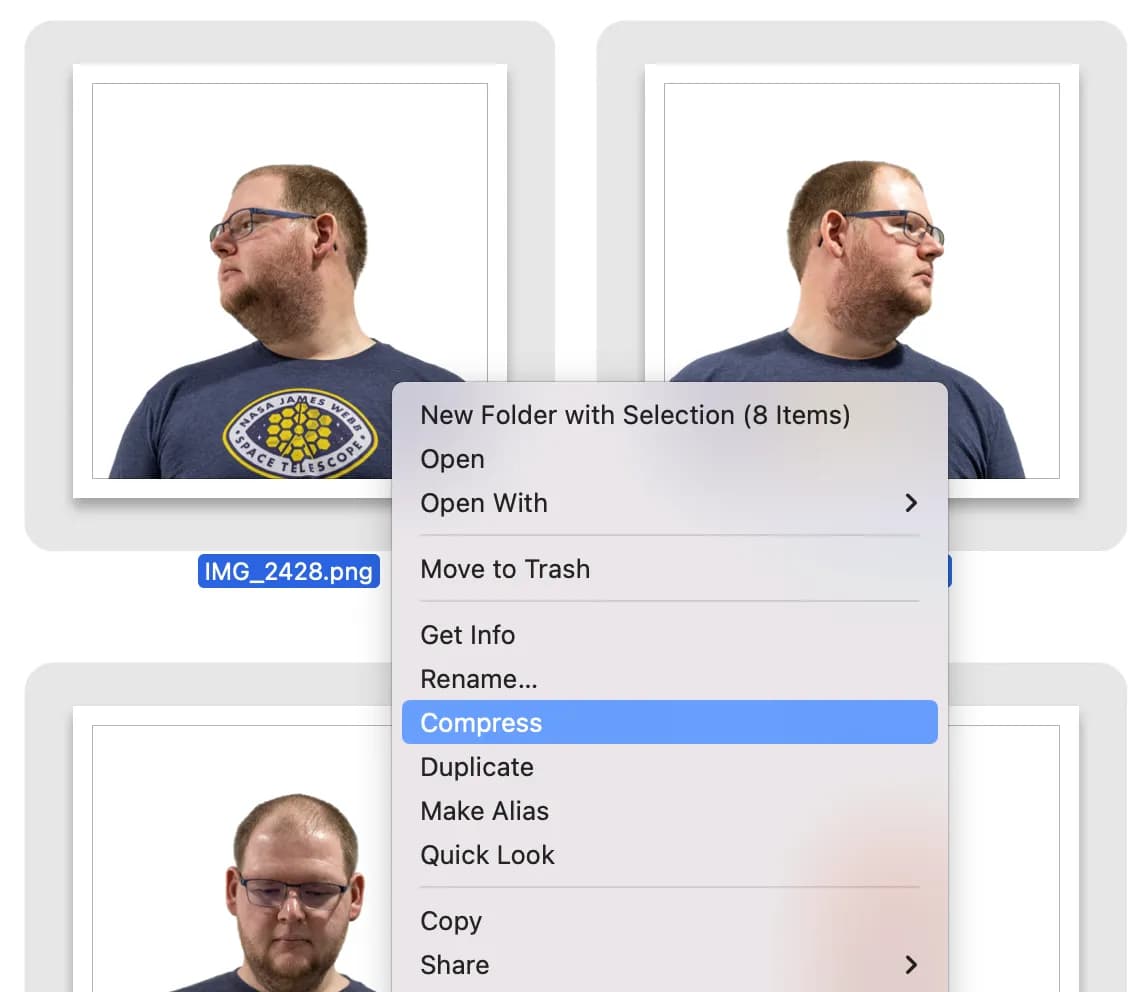
Now that you’ve selected the photos you’d like to train with, we’ll need to prepare them to be uploaded by compressing them into a .zip file.
On MacOS, you can do this by selecting the image files in Finder → right click → "Compress"
3. Upload and Train
To continue following along, you’ll want to first head over to Replicate and create an account. Replicate is by far the easiest way to train LoRA weights for Stable Diffusion. Their web UI allows you to drag and drop your .zip file and kick things off in a single form.
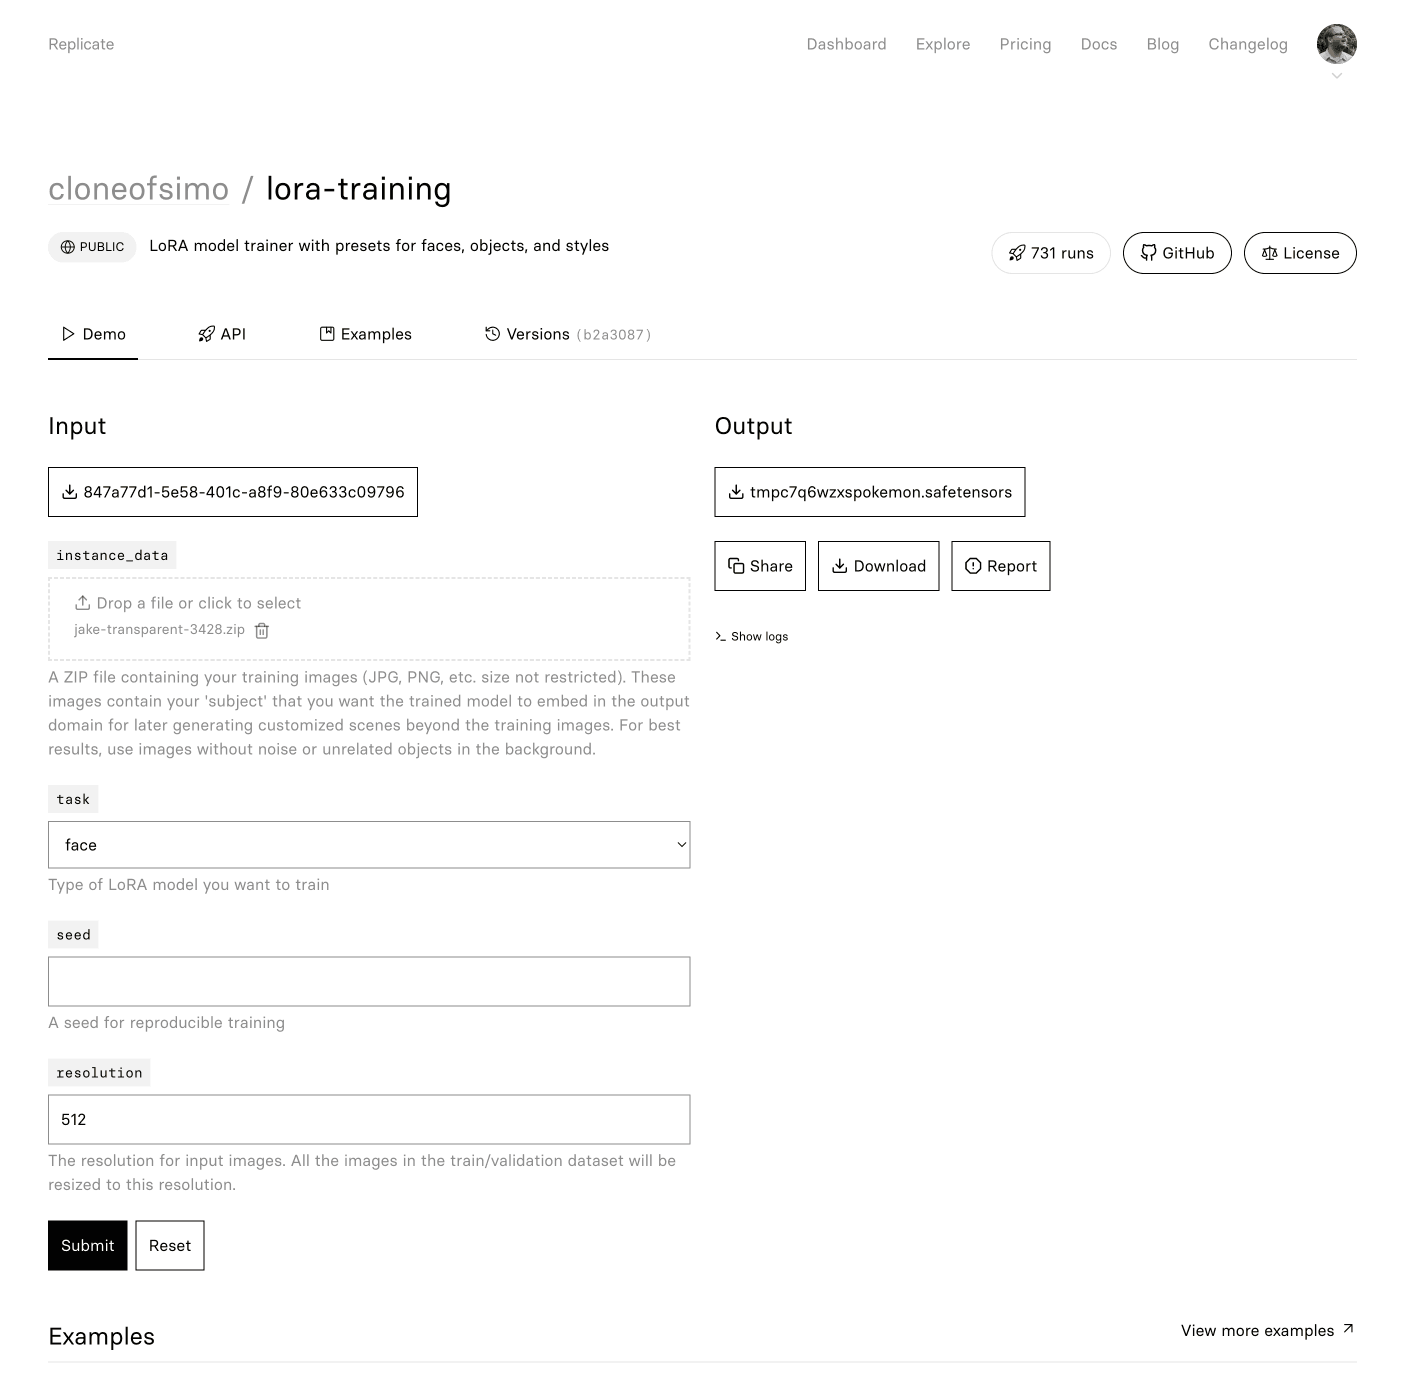
Head over to https://replicate.com/cloneofsimo/lora-training
Then drag and drop your .zip file to the instance_data drag+drop form field.
In the screenshot below, you can see that I’ve chosen a file named jake-transparent-3428.zip for my instance_data field. In general, it’s always helpful to name your Replicate uploads with descriptive file names, as it will help you make sense of what you’re looking at when reviewing results.
At the time of writing, the task field allows you to train for face, object, and style. I’m a little vague on what the underlying difference is between these task templates, but I believe these to be true:
face- Using thefaceoption requires all input images to have a human face and only one per image. This won’t work well for pets/animals.object— Using theobjectoption should work best for objects, animals, pets, etc.style— Using thestyleoption works best in transferring the visual style onto other imagery.
Ignore the seed field, and leave the resolution at 512.
Go ahead and click submit!
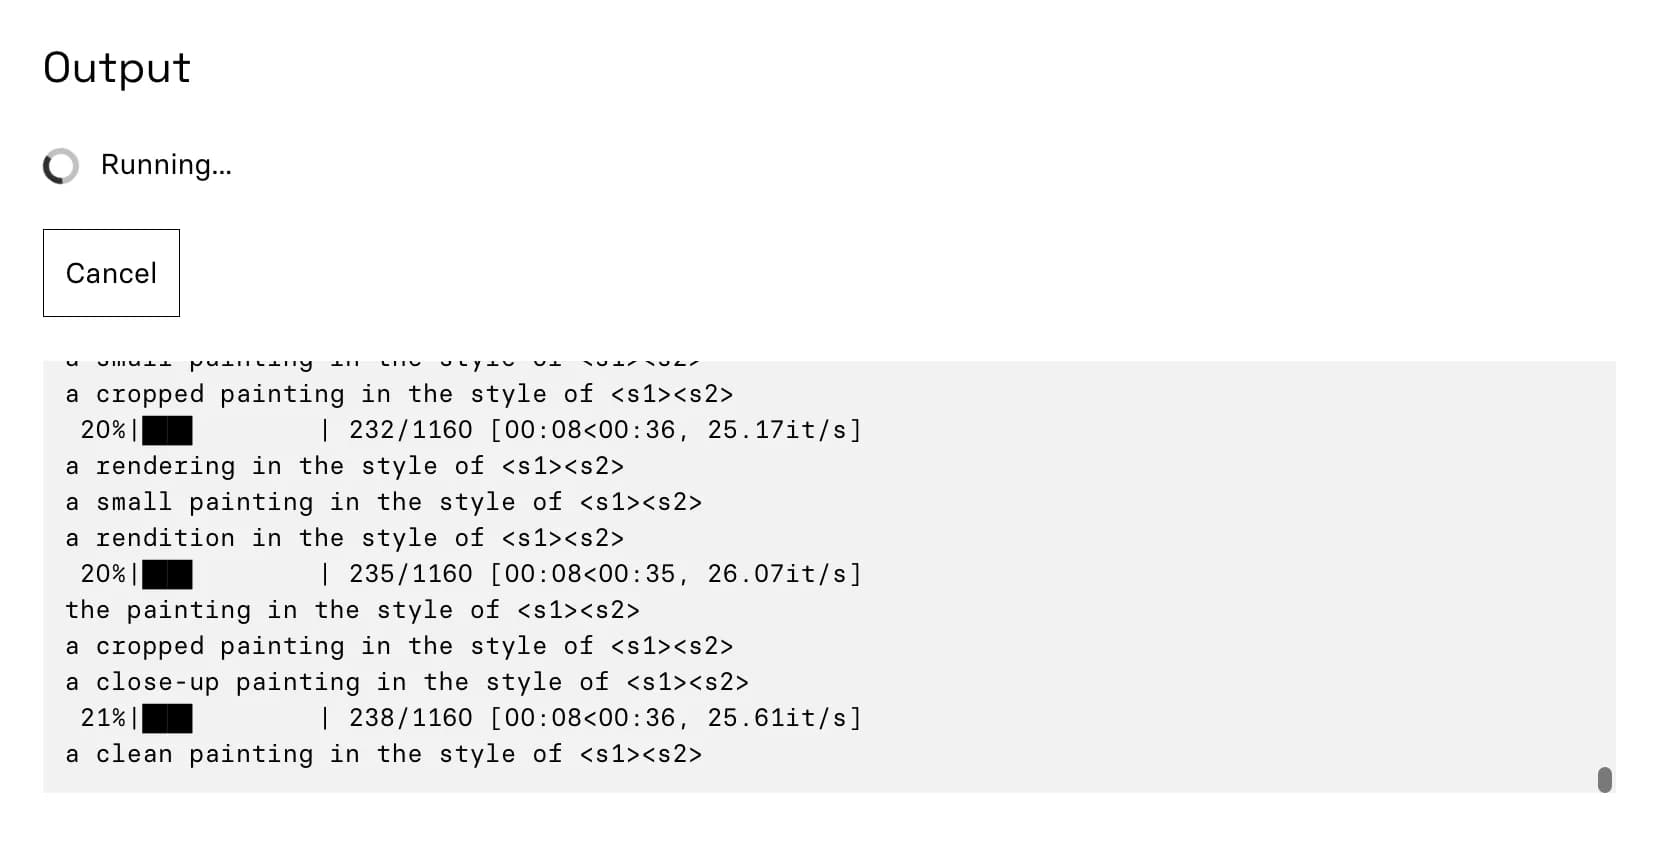
The training run will take ~7 minutes to complete. Grab some coffee ☕ or tea 🍵. You’ll start to see output scrolling by that looks like this:
4. Downloading Your Weights
🎉 Awesome, your weights are done training! You should see something like:

The output is a single .safetensors LoRA weights file. Click the download button to save the weights somewhere that future-you can find. You will also want to save the weights URL by right-clicking the .safetensors button and then clicking Copy Link — make sure to save this URL somewhere readily accessible. You’ll be using the URL in the next step.
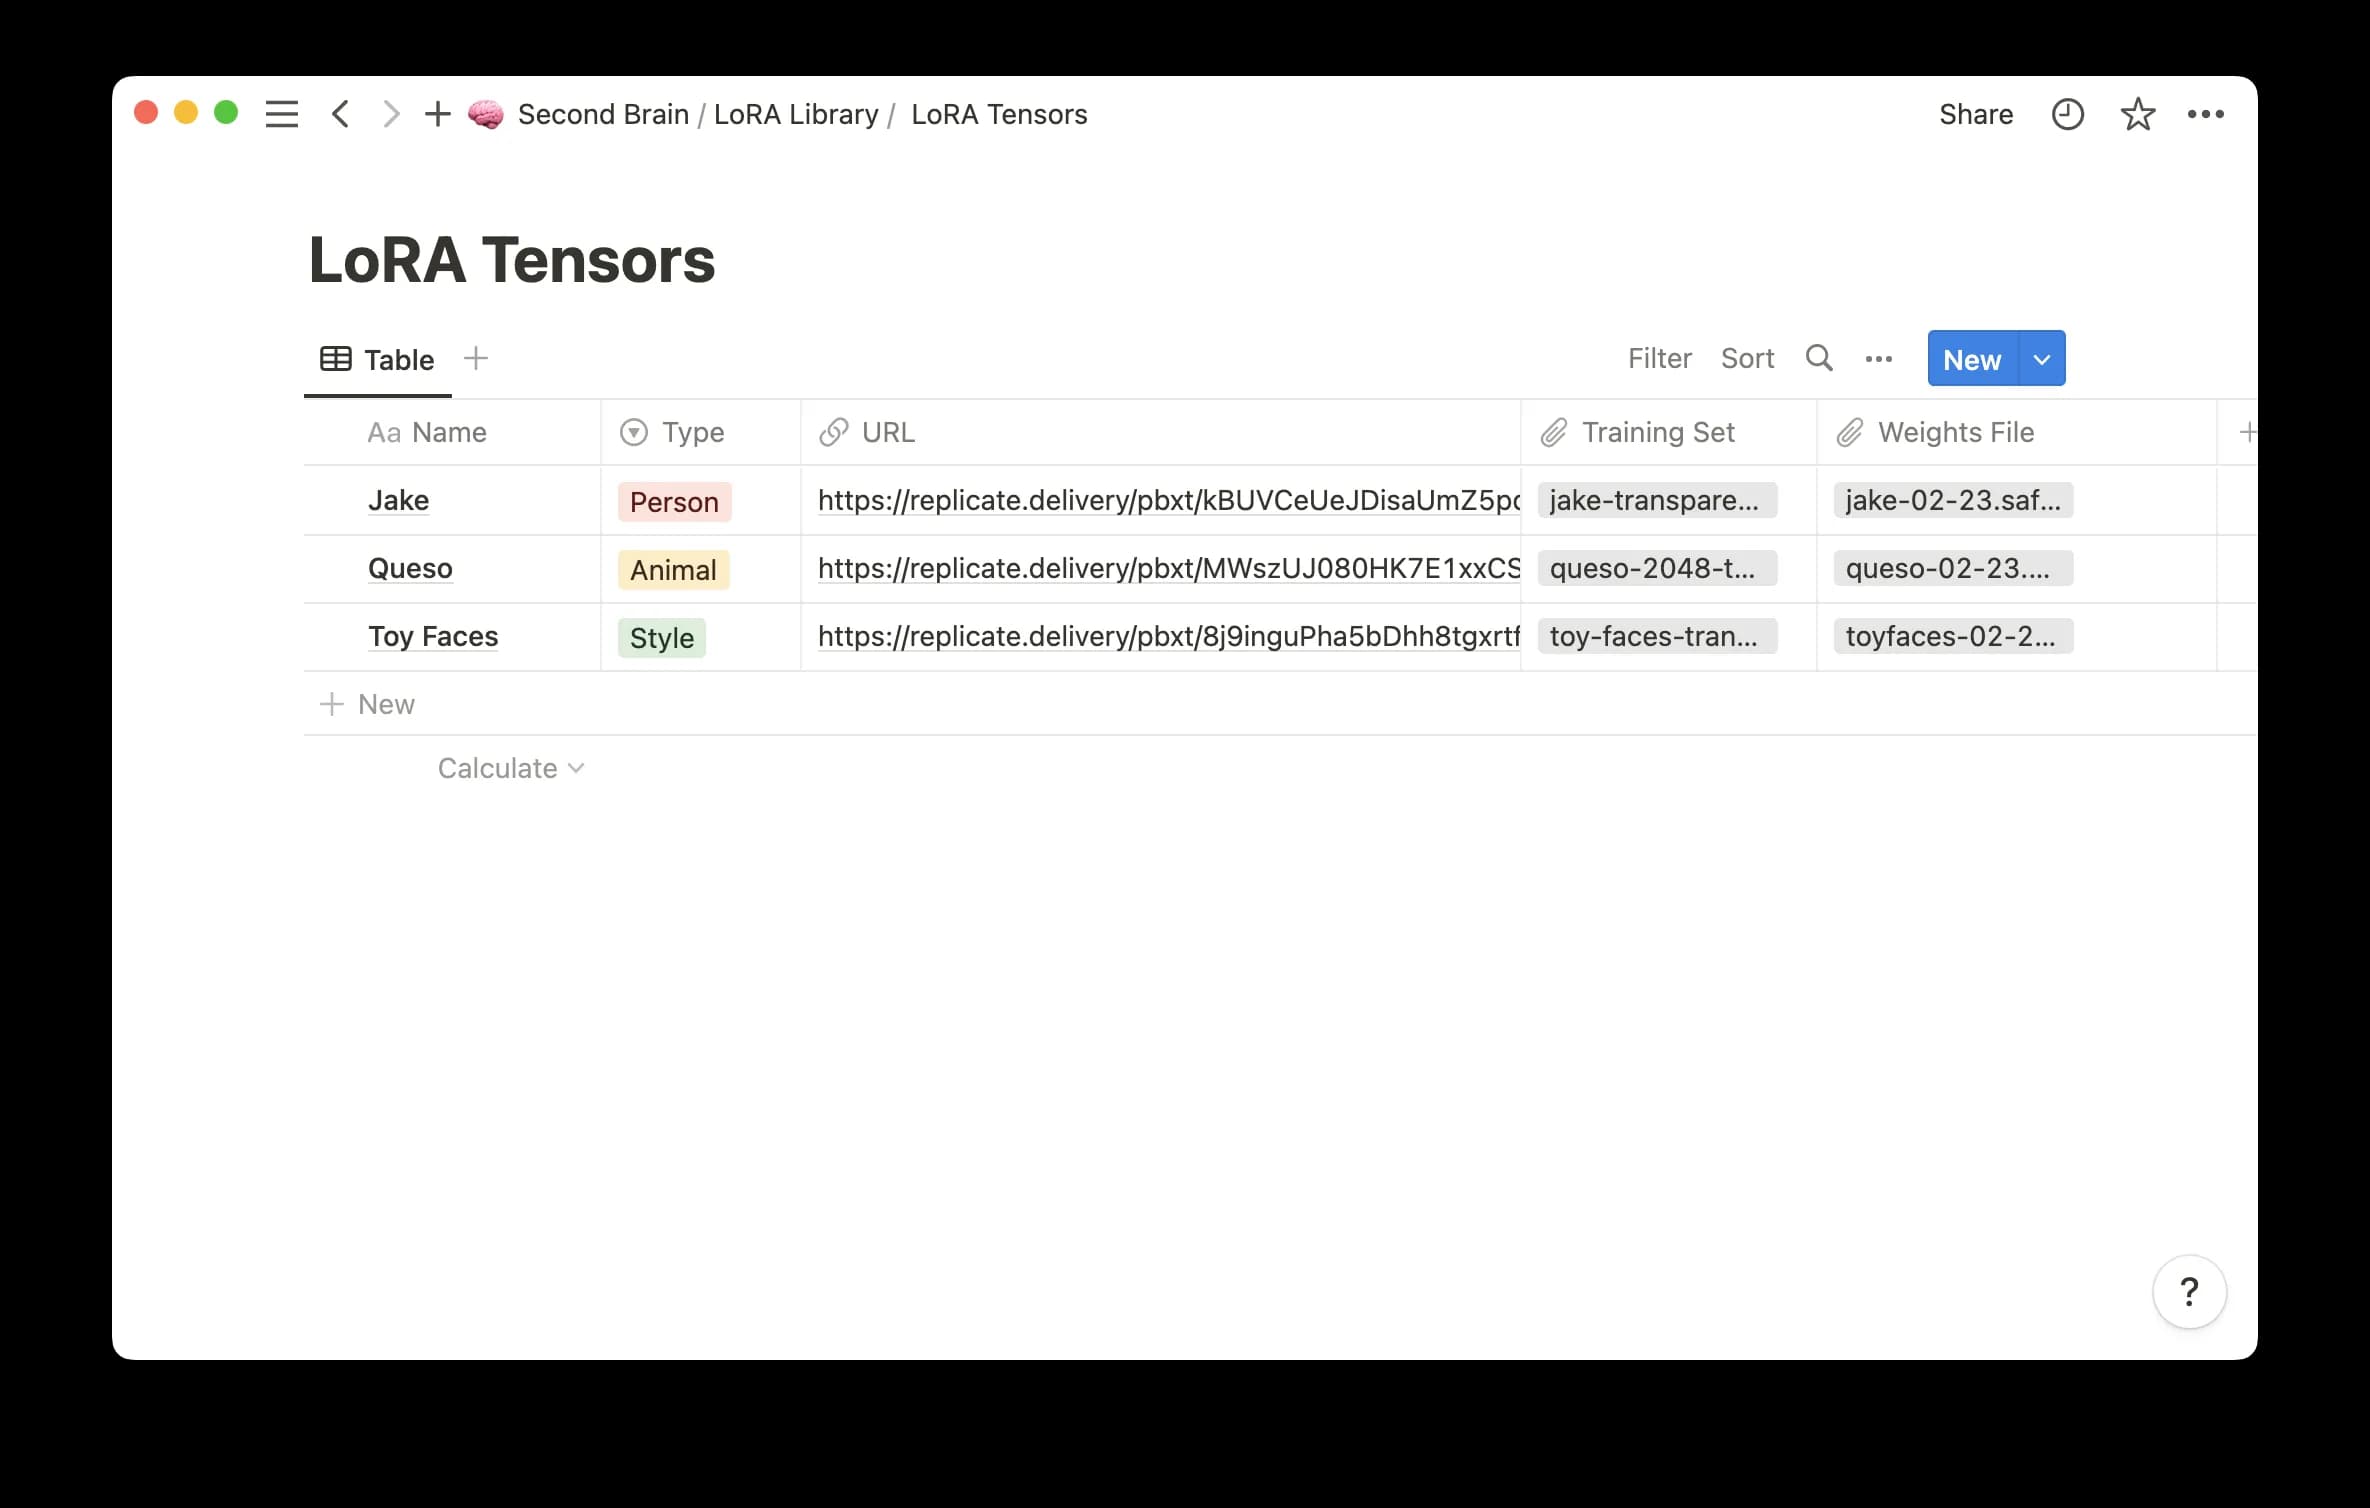
I’ve started saving all of my weights into a Notion DB, where I also track the training dataset, URL to weights, and the weights file itself.
If you’re anything like me, it’s probably easy to imagine amassing a fairly large/diverse set of LoRA concepts, objects, and styles. So saving it somewhere searchable will make life easier in the future. I also suggest saving the training data zip file in the same place, so you can reproduce similar weights in the future by using next-generation fine-tuning techniques.
5. Generating Images With Custom Stable Diffusion LoRA weights
🥳 Awesome, now that you’ve got your safetensors weights file, you can use it to generate images that use your face as a reference!
On Replicate, if you search public models for “LoRA” you’ll find a handful of “flavored” Stable Diffusion models that will play nicely with your LoRA weights. https://replicate.com/explore?query=lora
These models are all Stable Diffusion or Stable Diffusion pre-trained DreamBooth checkpoints that have been set up on Replicate in a way that lets you add your LoRA weights on top.
Each of these models has the following two required parameters:
prompt: A prompt that contains the string<1>in place of the trained concept, e.g.an astronaut riding a horse in the style of <1>. Use<2>,<3>if you pass multiple URLs to thelora_urlsinput.lora_urls: The URL or URLs of your trained LoRA concept(s) you copied in the previous step. You can pass a single URL or a list of URLs separated by a pipe character|. Passing multiple URLs allows you to combine multiple concepts into a single image.
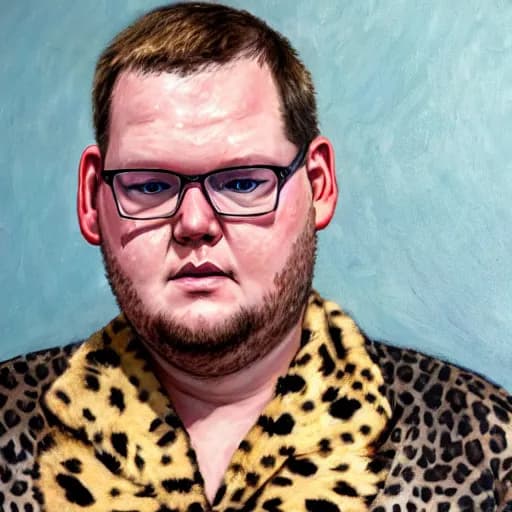
Stable Diffusion
These prompts were generated with the barebones Stable Diffusion model. I had to play with the LoRA scale parameter to get the best results. I found that a scale of 0.5 or 0.4 worked best for my face.
https://replicate.com/cloneofsimo/lora
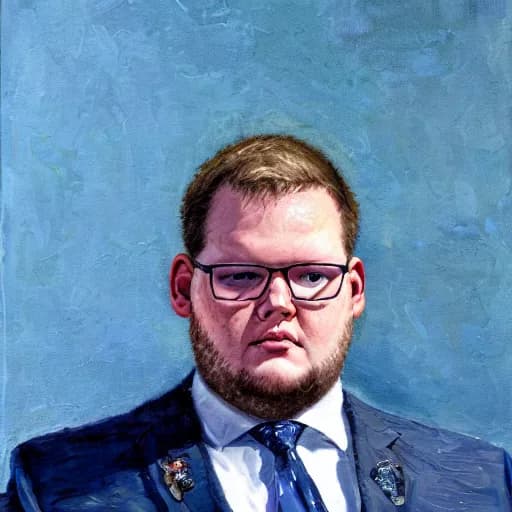
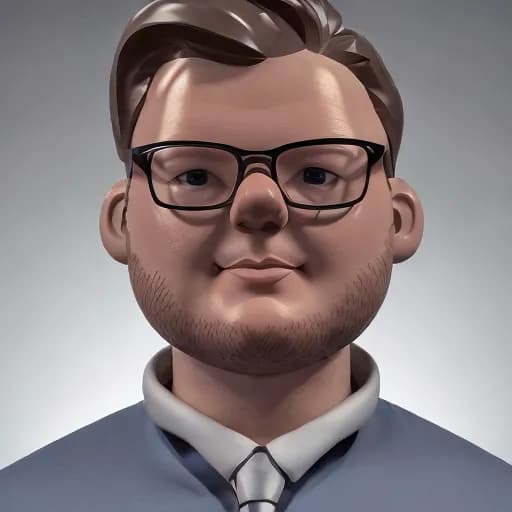
PROMPT: portrait of <1> in a suit, detailed painting, hd, hq, high resolution, high detail, 4 k, 8 k

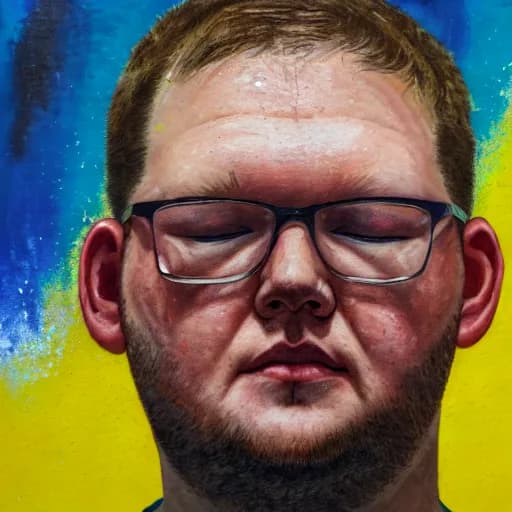
PROMPT: portrait of <1>, detailed painting, hd, hq, high resolution, high detail, 4 k, 8 k
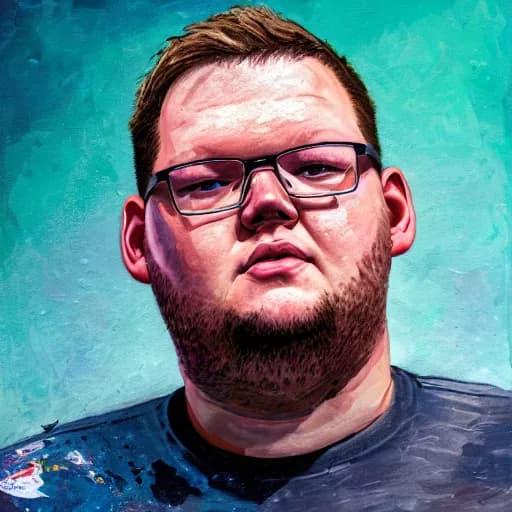
PROMPT: portrait of <1> in a leopard print housecoat, detailed painting, hd, hq, high resolution, high detail, 4 k, 8 k
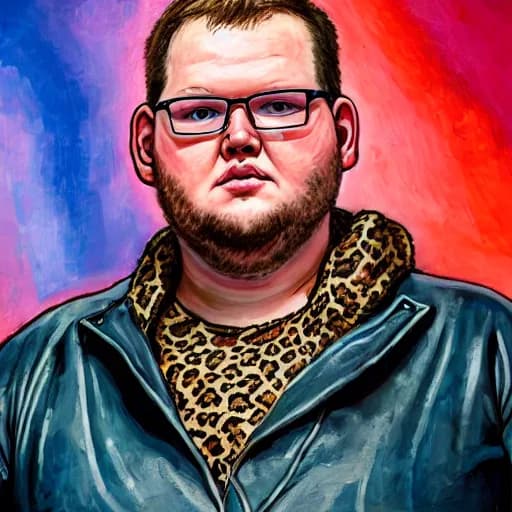
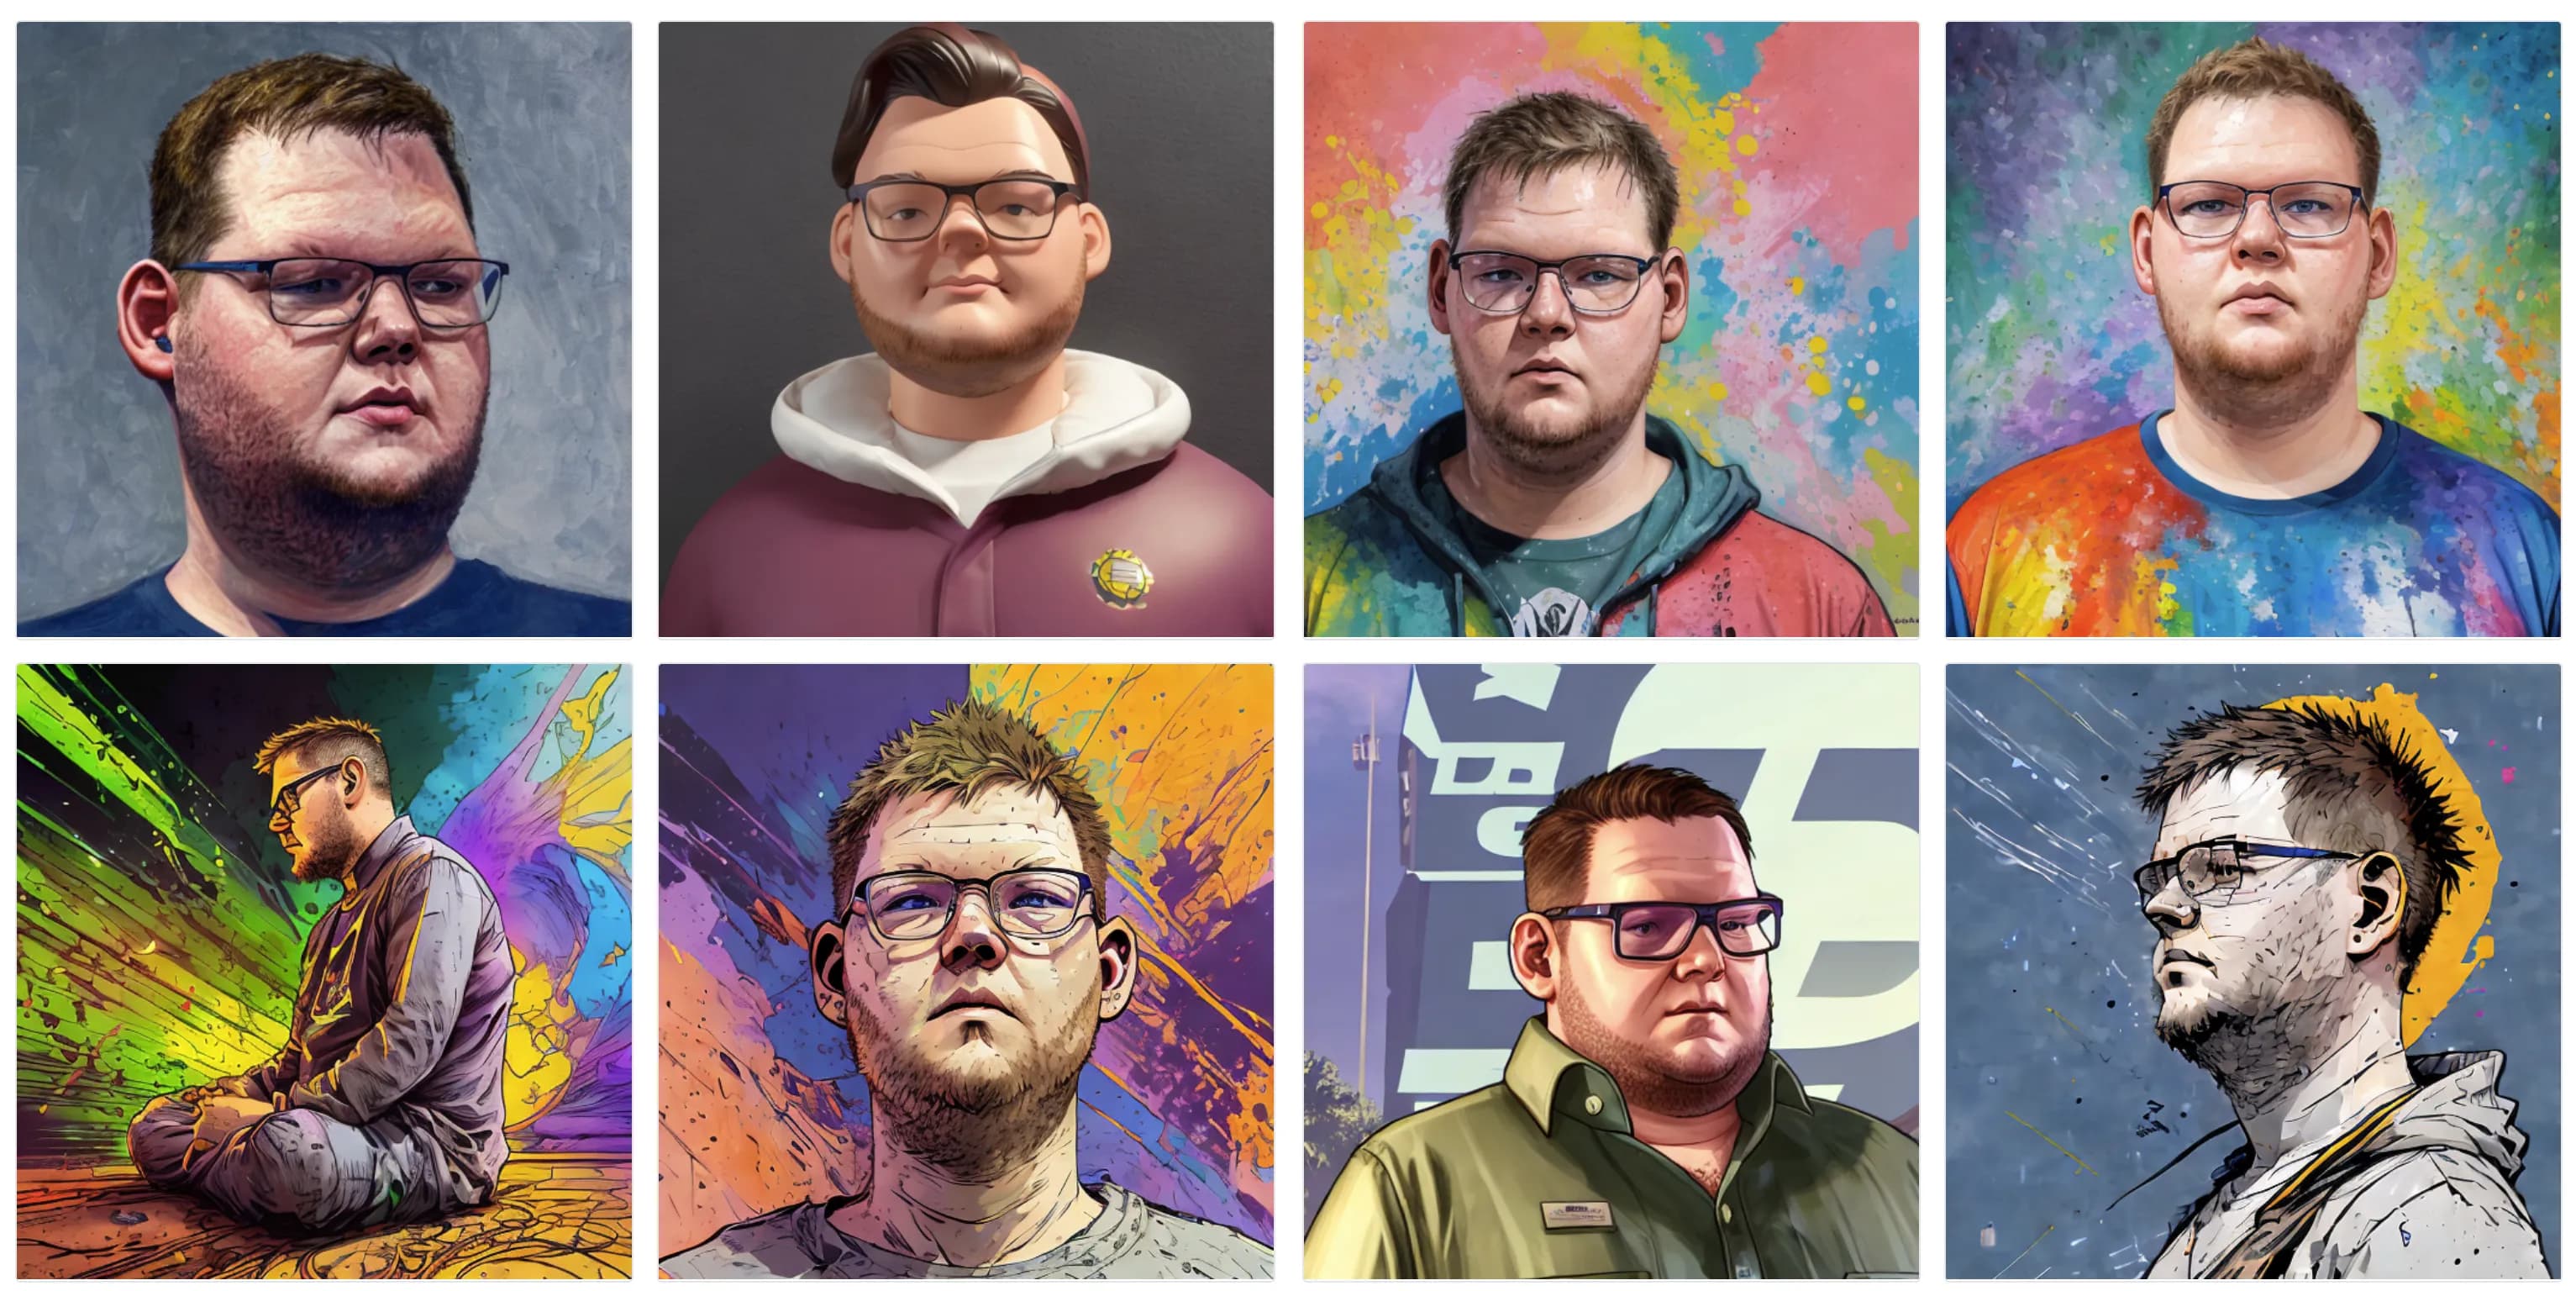
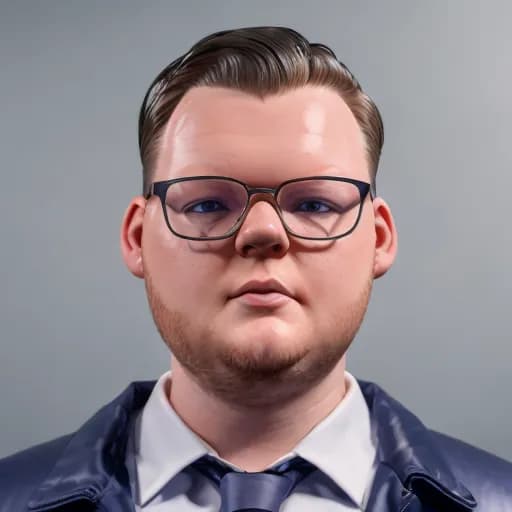
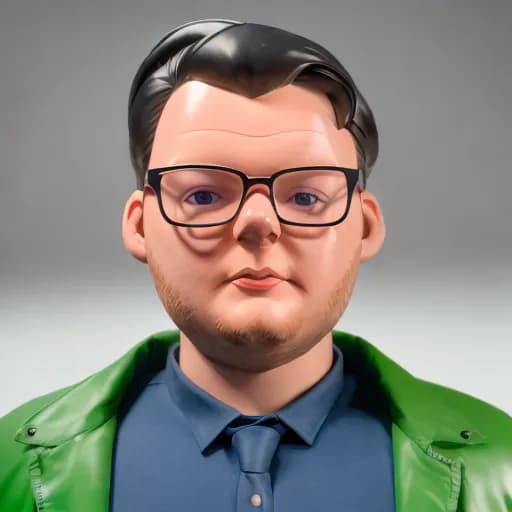
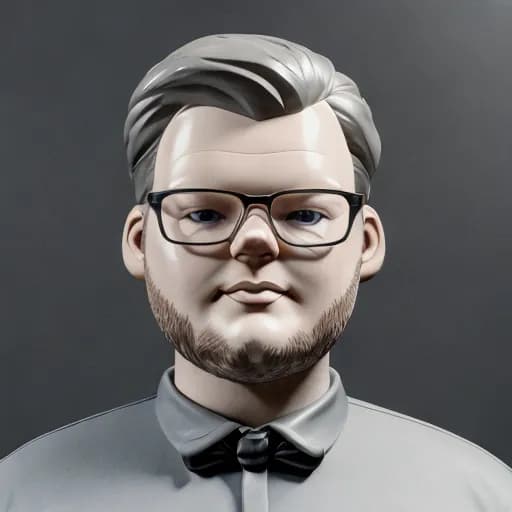
Realistic Vision 1.3
This is the Realistic Vision 1.3 model, which is Stable Diffusion + extra DreamBooth training on top. This model yielded the overall best results, and responded well to many prompts. I think it's likely because it was trained on lots of photos of people, so it's better at generating faces than the other models.
https://replicate.com/cloneofsimo/realistic_vision_v1.3
https://civitai.com/models/4201/realistic-vision-v13
PROMPT: concept art of <1>, abstract impressionistic style, detailed face, detailed eyes, realistic eyes, realistic face, colorful background, graffiti background, highres, RAW photo 8k uhd, dslr
.webp&w=1080&q=75)
.webp&w=1080&q=75)
.webp&w=1080&q=75)
.webp&w=1080&q=75)
.webp&w=1080&q=75)
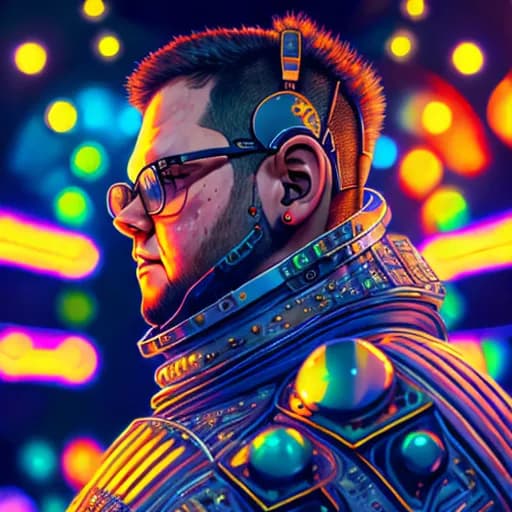
Inkpunk Diffusion
This was my favorite model to play with because it did such a great job of capturing realistic details but portraying them in a specific illustration style. It's a Stable Diffusion + Dreambooth model, vaguely inspired by Gorillaz, FLCL, and Yoji Shinkawa.
https://replicate.com/cloneofsimo/inkpunk_lora
https://huggingface.co/Envvi/Inkpunk-Diffusion
PROMPT: a photo of <1>, nvinkpunk
%25201.webp&w=1080&q=75)
%25201.webp&w=1080&q=75)
%25201.webp&w=1080&q=75)
%25201.webp&w=1080&q=75)
%25201.webp&w=1080&q=75)
.webp&w=1080&q=75)
.webp&w=1080&q=75)
.webp&w=1080&q=75)
.webp&w=1080&q=75)
.webp&w=1080&q=75)
.webp&w=1080&q=75)
GTA5 Diffusion
This model was trained on the loading screens, gta storymode, and gta online DLCs artworks. Which includes characters, background, chop, and some objects.
https://replicate.com/cloneofsimo/gta5_lora
https://huggingface.co/ItsJayQz/GTA5_Artwork_Diffusion
PROMPT: a photo of <1> gtav style

%25202.webp&w=1080&q=75)
%25202.webp&w=1080&q=75)

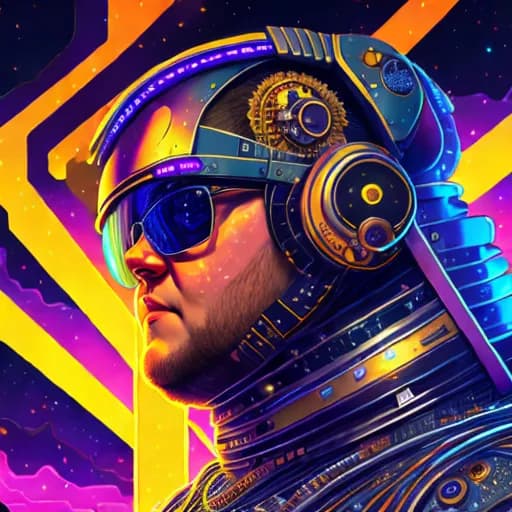
Vintedois Diffusion
https://replicate.com/cloneofsimo/vintedois_lora
https://huggingface.co/22h/vintedois-diffusion-v0-1
close up portrait of <1> in a Sci Fi suit - 4k uhd, hyper detailed, photorealistic, steampunk, lovecraft colors, dan mumford colors, psychedelic black light, epic composition
%25203.webp&w=1080&q=75)
%25203.webp&w=1080&q=75)
Using Multiple LoRA Concepts
Last but certainly not least, I wanted to try out style transfer and use multiple LoRA concepts simultaneously.
I kicked off another round of LoRA training, but this time I used the type style and trained it with 70 transparent PNGs of the excellent Toy Faces Library. I purchased this stock library back in 2020 and used it for avatars in an unreleased project, so it was cool to rediscover them for something completely different.
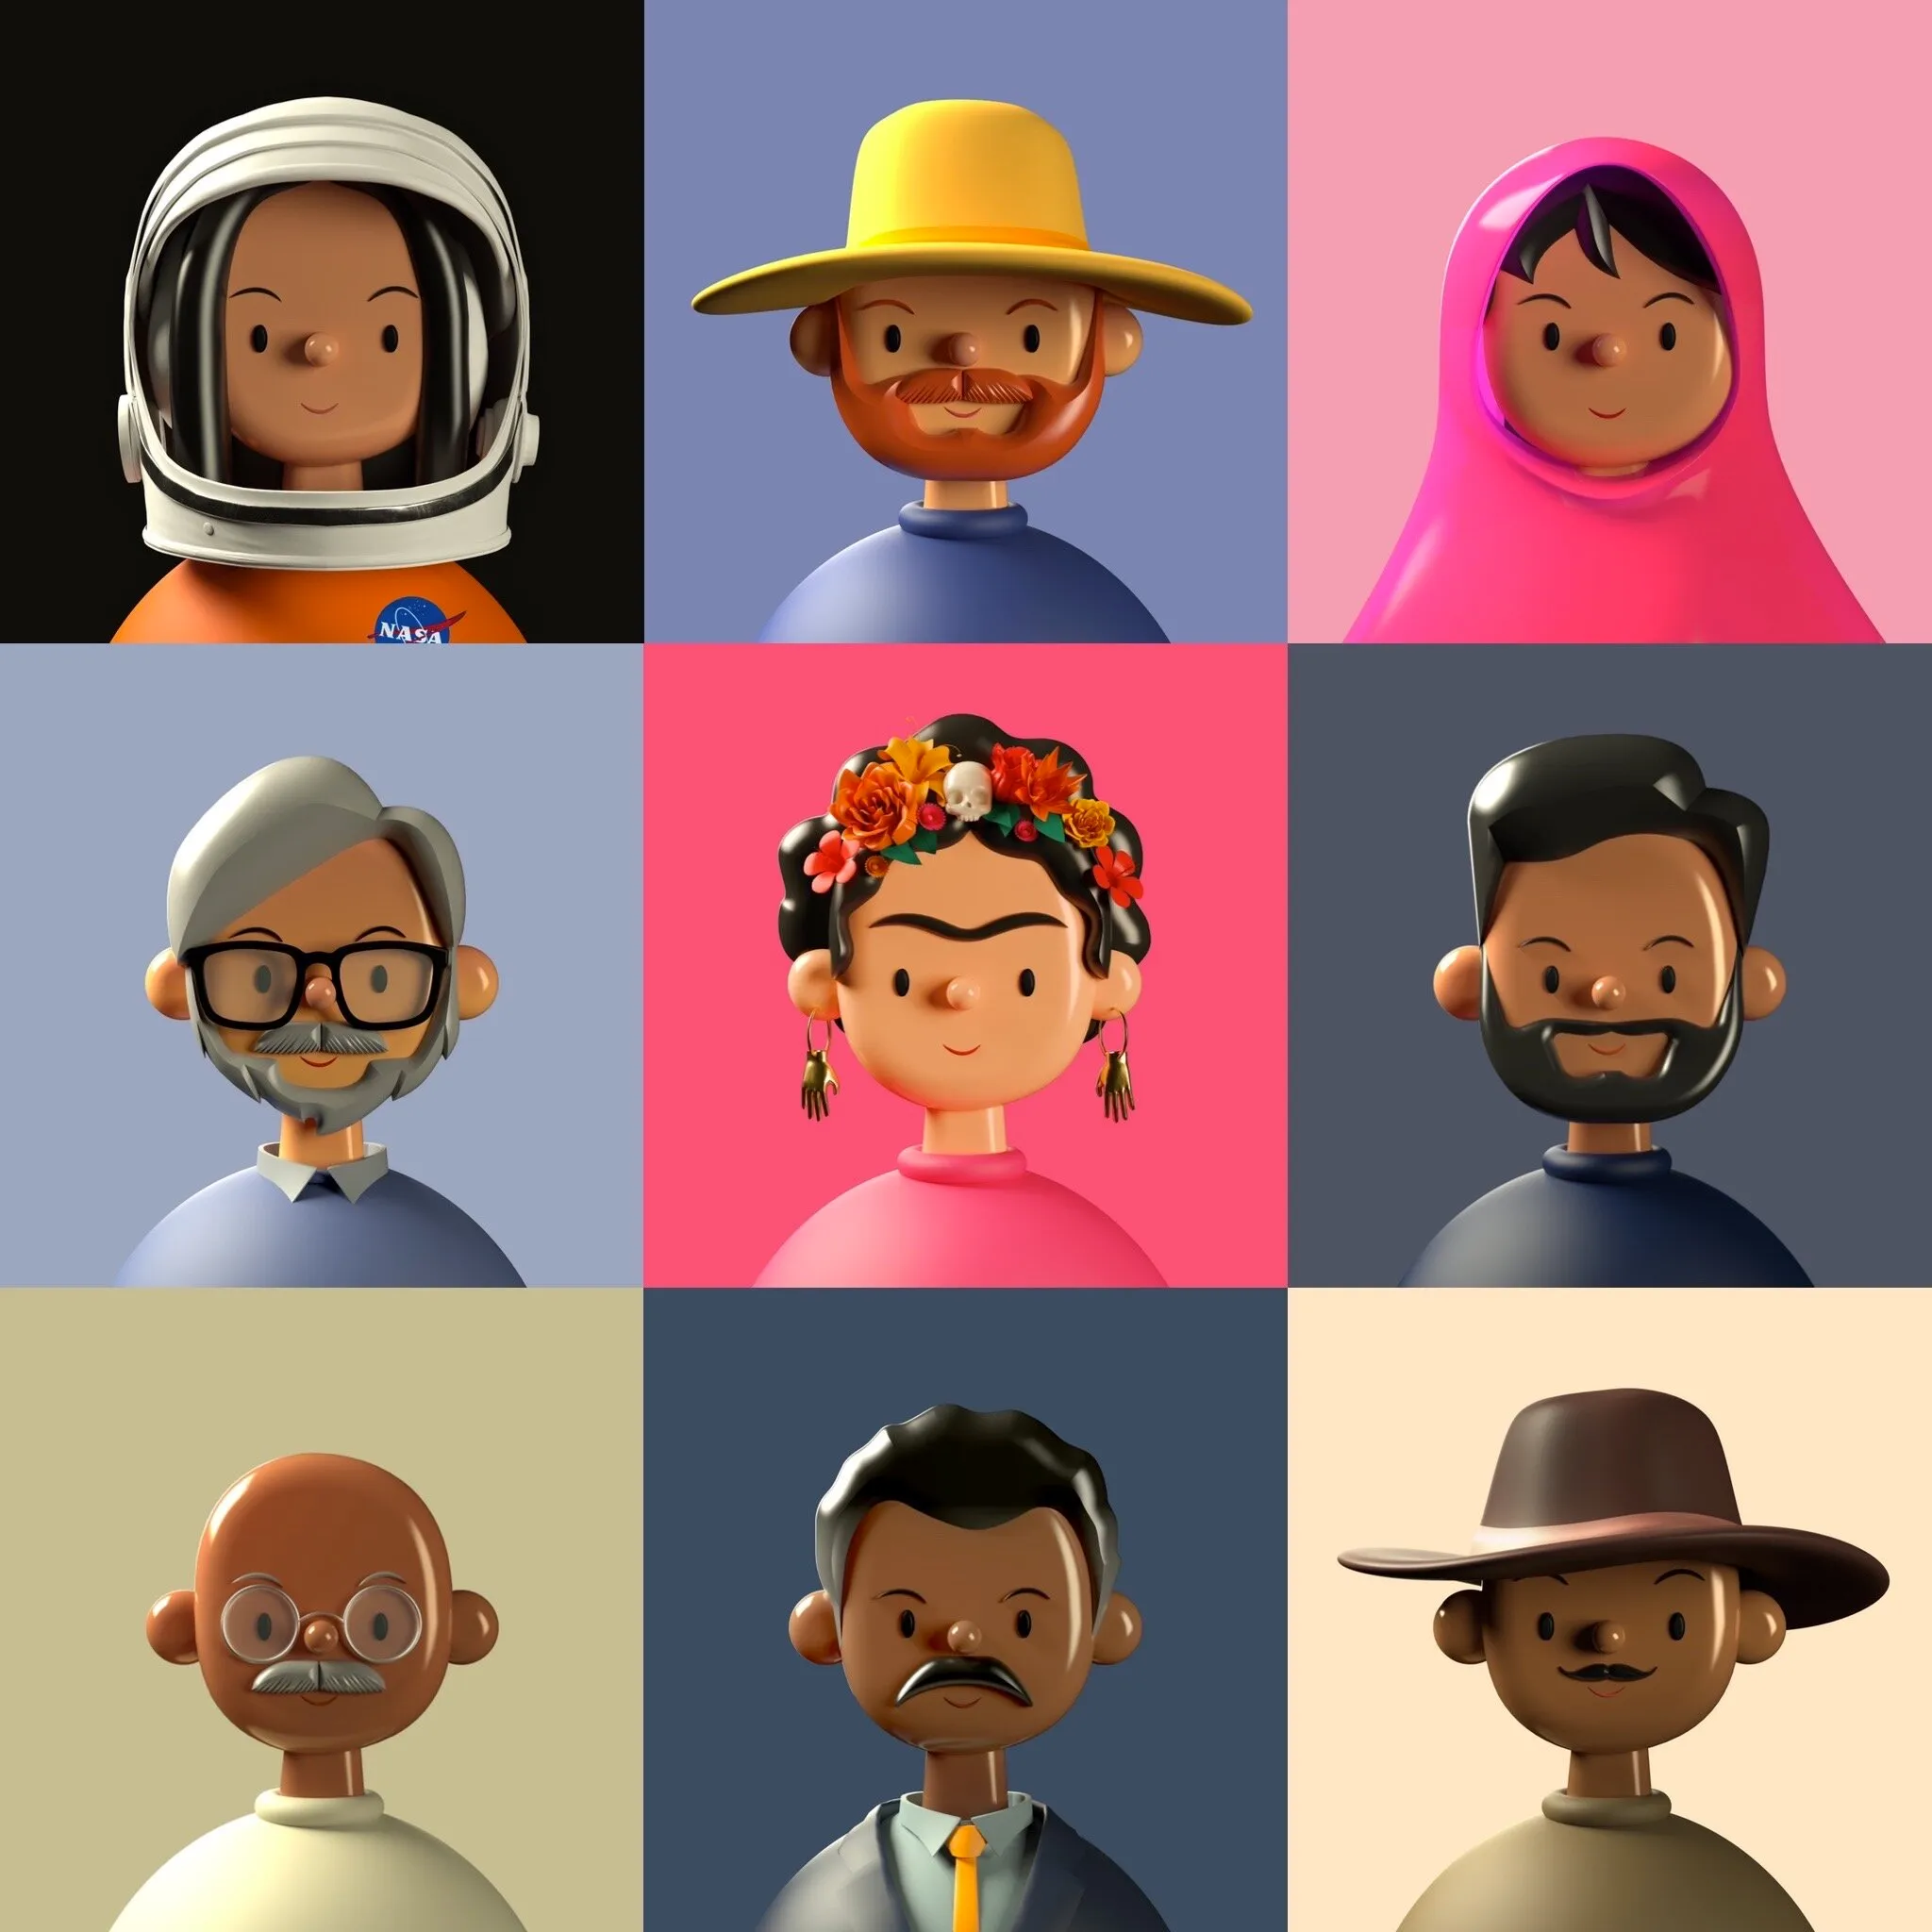
Mixing the LoRA concept of my face with the style of toy faces yielded an interesting mix of imagery that looks sort of like me, sort of like toy faces, but not really like either 🤷♂️
To generate these, I used the Realistic Vision 1.3 model, which I felt had the best/most accurate results overall. The prompt was
PROMPT: photo of <1>, in the style of <2>, detailed faces, highres, RAW photo 8k uhd, dslr
and the lora_urls parameter included two urls, separated by the | character. I also set the lora_scales to be 0.5|0.6, which I believe keeps things fairly balanced but skews slightly toward the style than the photo. If you crank up the lora_scales to 1, the outputs start to look very similar to the input images from the training image set.
Conclusion
Since August, I’ve spent a few hundred hours playing around with Stable Diffusion and getting a feel for what it does and how it works. For me, as a not-so-talented digital artist and painter, it’s been extremely helpful for getting images out of my mind and into the world. While vanilla Stable Diffusion is impressive on its own, I am most excited about the long-term potential for artists and designers to wield it as a tool that helps them create the best work of their lives.
I think fine-tuning techniques like LoRA, DreamBooth, and Textual Inversion are all significant steps toward making that dream a reality. Today, fine-tuning gives you some creative control over the imagery you produce, but it is very exploratory. When working with fine-tuning in Stable Diffusion, you really never know what you’re going to get.
The process is very incremental and full of trial and error. Sometimes you’ll generate 100 images before you start getting the results you’re looking for. Sometimes you’ll generate 100 images and give up because things aren’t going in the right direction.
As it stands today, I feel like Stable Diffusion pushes artists to think more like a creative director than an artist. It’s all about communicating a “vision” of what you see in your mind's eye and incrementally working toward making it a reality. Looking at an image, critiquing what’s good and what’s bad, changing the prompt word by word.
In the future, I’m hoping that image generation models become more integrated into tools like Photoshop and Procreate, enhancing the skills of artists and reducing the effort it takes to go from image in mind to image in the world.
Until then, I will continue happily hacking on Stable Diffusion with fine-tuned models for fun.