How I Used Stable Diffusion and Dreambooth to Create A Painted Portrait of My Dog
Introduction
When I first started playing with Stable Diffusion text-to-image generation, in August 2022, my immediate reaction was, "ZOMG! I need to make art prints for my art wall!". Only to then immediately face-plant because vanilla Stable Diffusion is quite challenging to tame. If you are trying to reproduce a specific subject, you need to utilize additional strategies and techniques, none of which existed at the time.
In the following months, several new community projects have emerged that aim to give the AI artist full creative control over the visual outputs they are trying to bring to life. One such technique is LoRA (Low-Rank Adaptation). I explored using LoRA in my posts about Making Self Portraits with Stable Diffusion and Blending Custom Artist Styles.
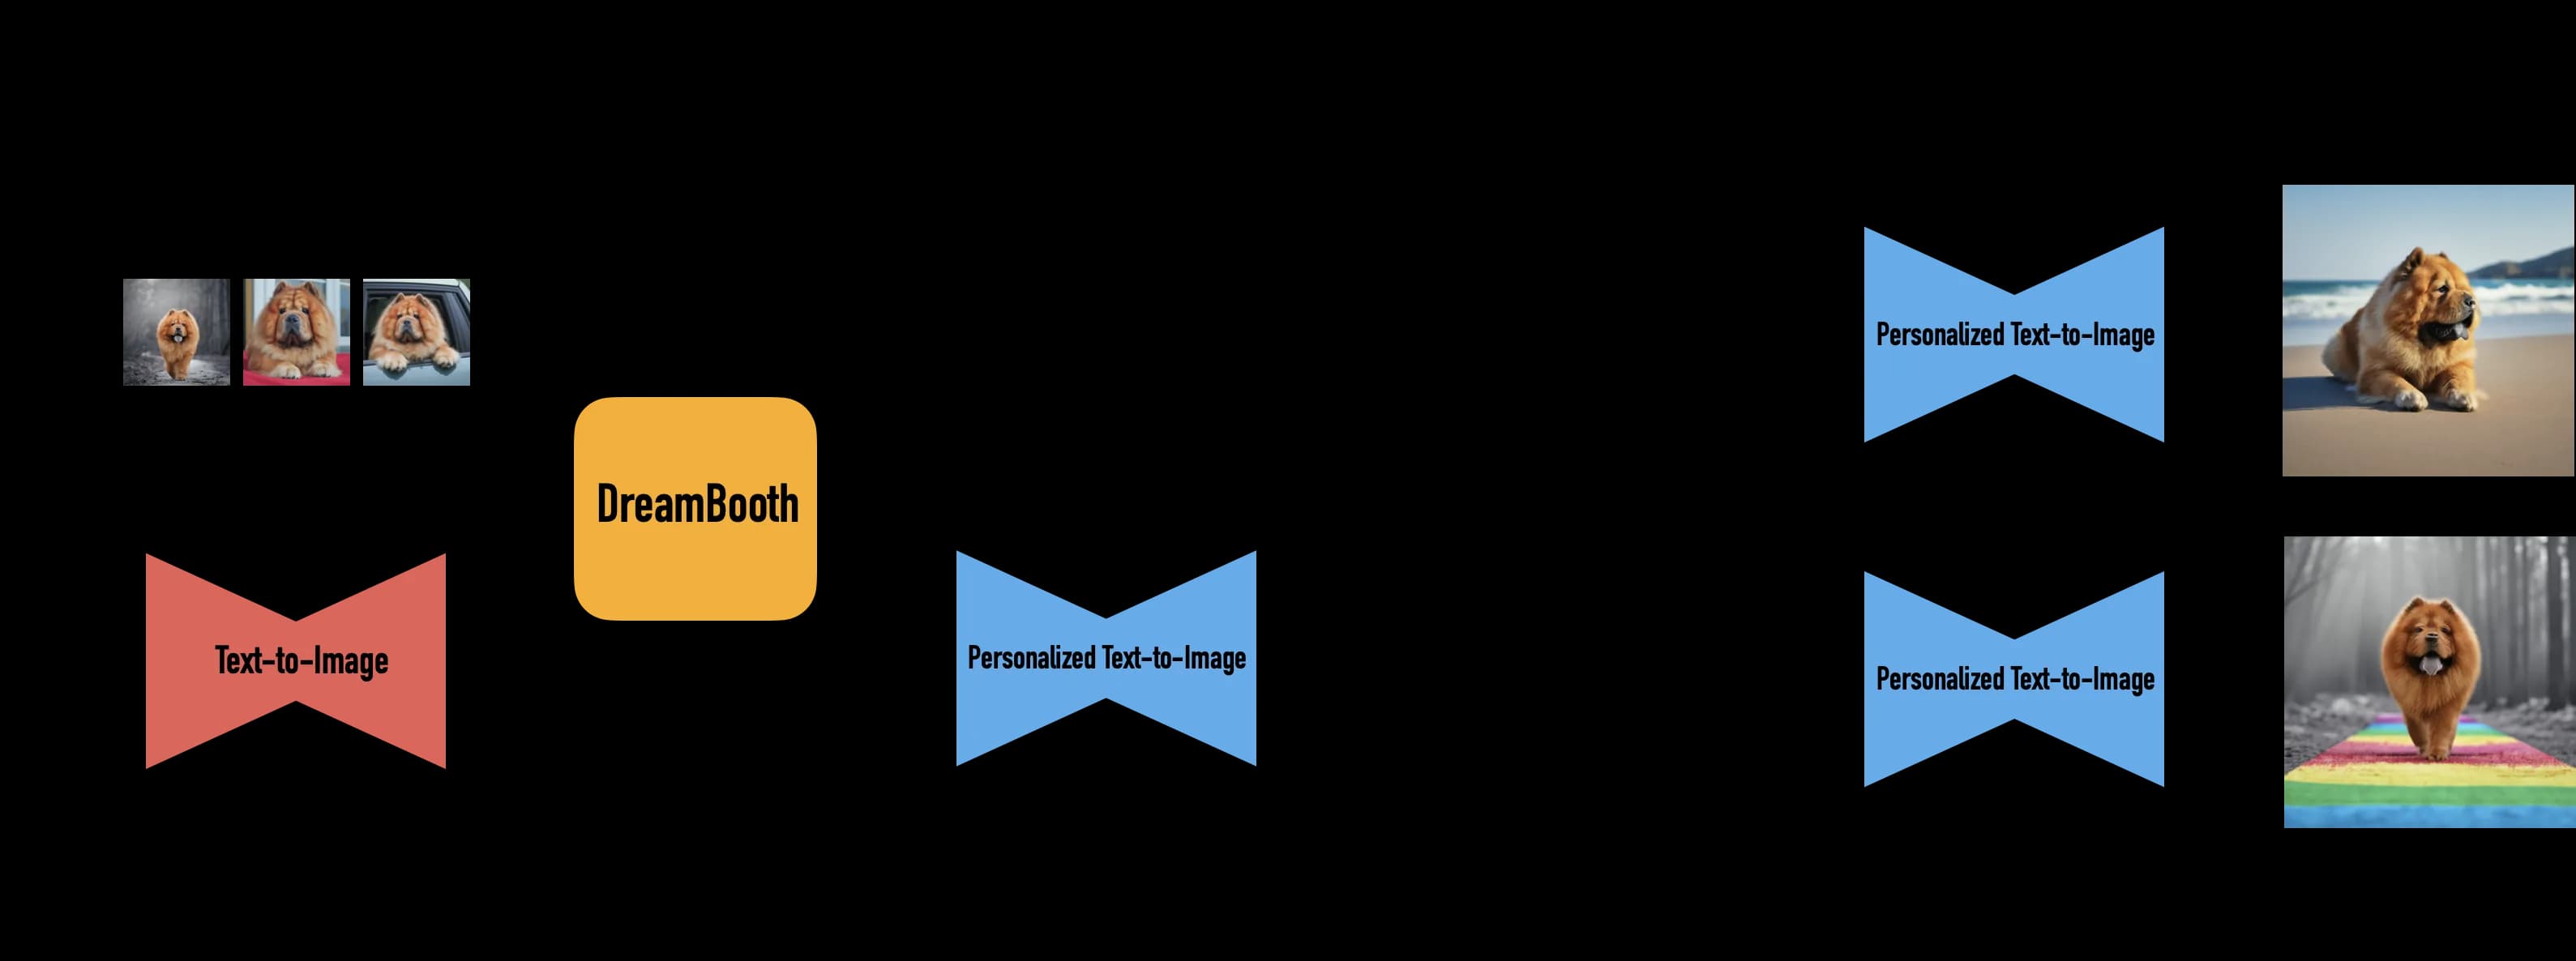
An even more popular technique is Dreambooth, and that is what we will focus on for the remainder of this blog post. I will walk through my entire workflow/process for bringing Stable Diffusion to life as a high-quality framed art print. We’ll touch on making art with Dreambooth, Stable Diffusion, Outpainting, Inpainting, Upscaling, preparing for print with Photoshop, and finally printing on fine-art paper with an Epson XP-15000 printer.
So without further ado, let’s dive in!
What is Dreambooth?
Dreambooth is a fine-tuning technique for text-to-image diffusion AI models. Basically, that just means that you can “fine-tune” the already capable open source Stable Diffusion model to produce reliable and consistent images of subjects and styles which you define.
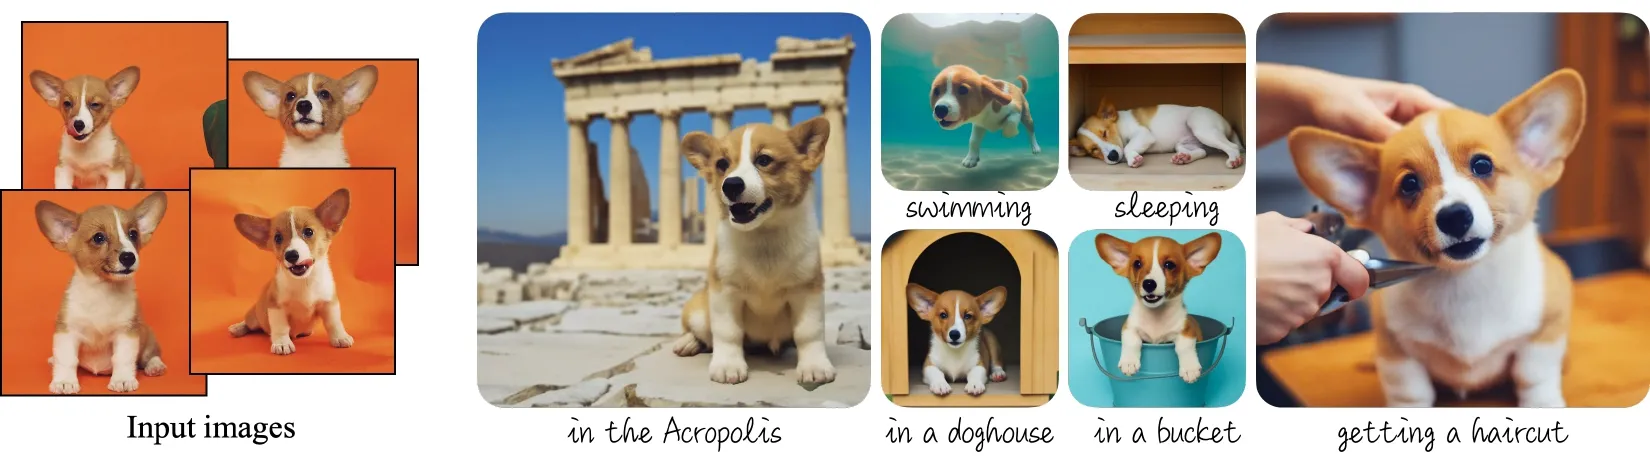
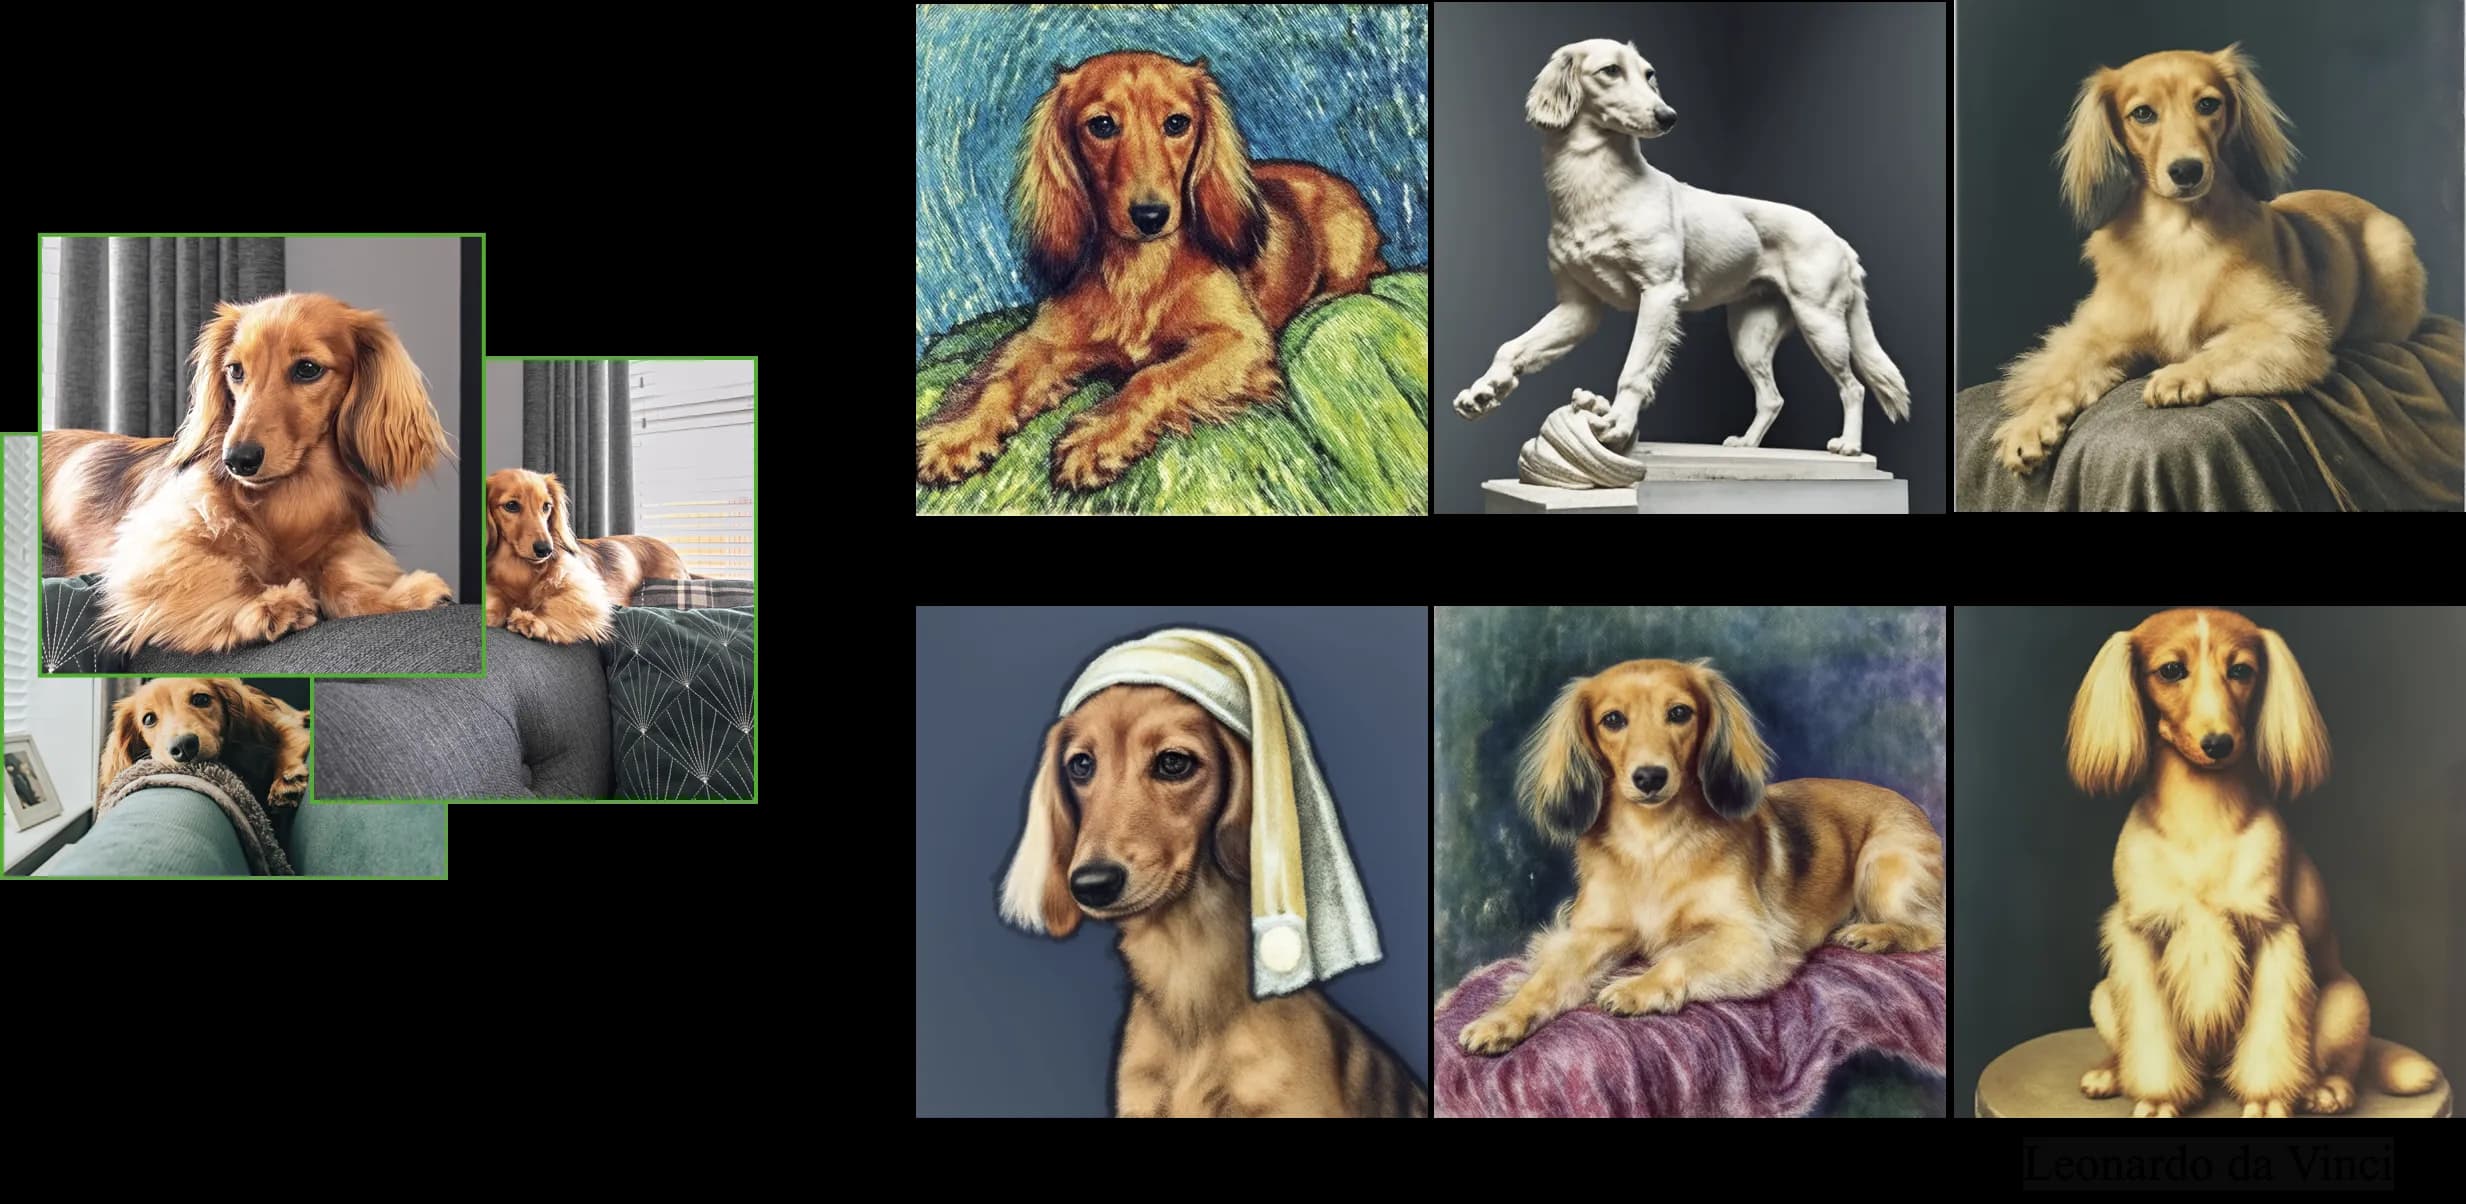
If you are interested in this sort of thing, I highly recommend reading through the Dreambooth paper, which you can find here https://arxiv.org/abs/2208.12242; while there are some technical sections, they also include many image examples which helps you build an intuition about what is possible. I found the Dreambooth paper to be hugely inspirational, and it actually led me to making this art project and writing this blog post; perhaps mostly because there are a ton of dog photo examples 😅. I’m including a few images from their paper below.
How To Train Your Own Dreambooth Model with Replicate
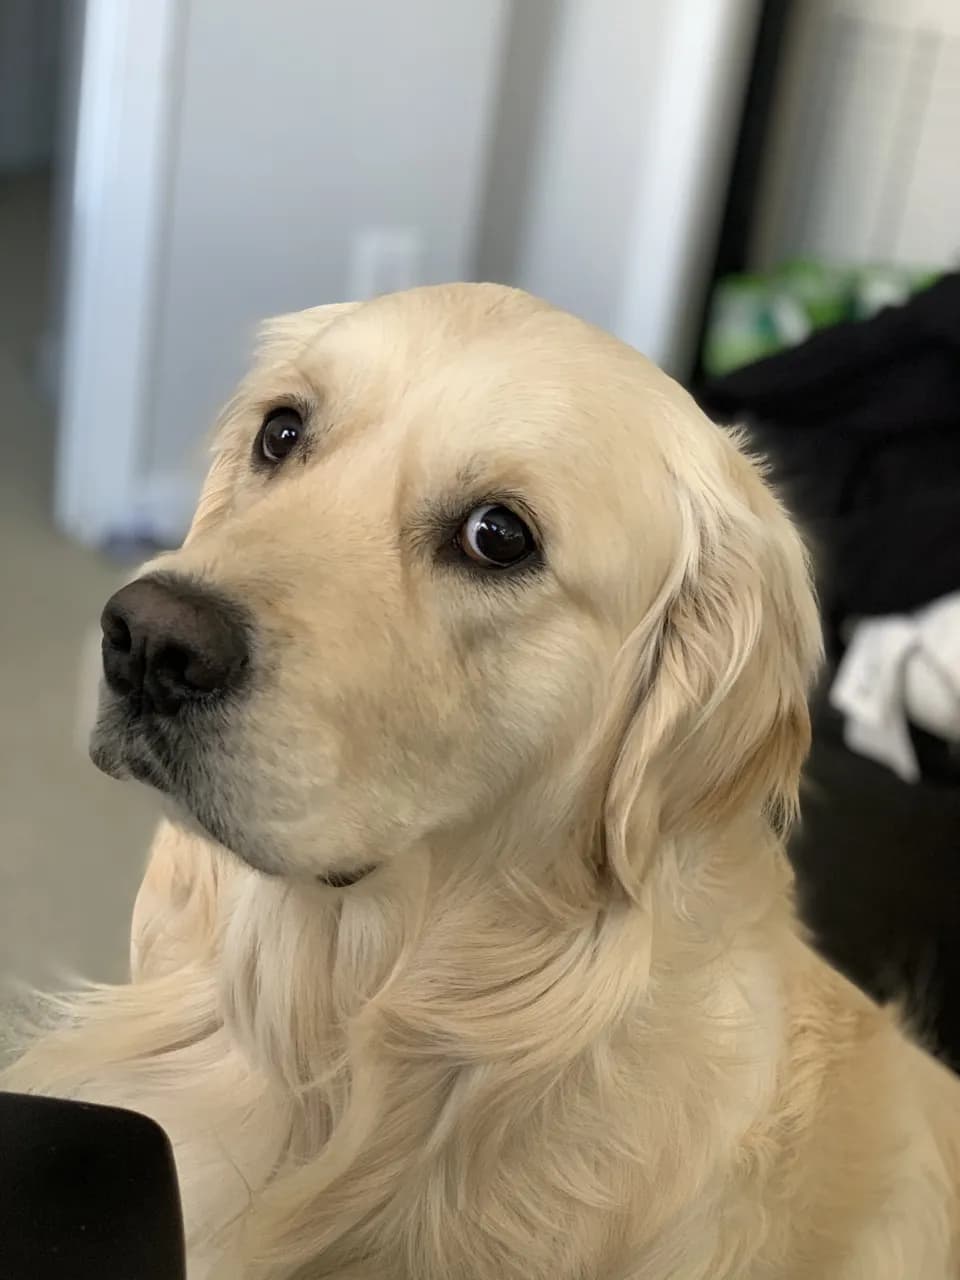
For this project and post, we’re going to train a Dreambooth model on photos of my best friend, 🧀 Queso.
Queso is a very photogenic and cuddly English Cream Golden Retriever, and he is the goodest boy that’s ever existed, which makes him the perfect subject for training a custom Dreambooth model!
Building an Image Training Set
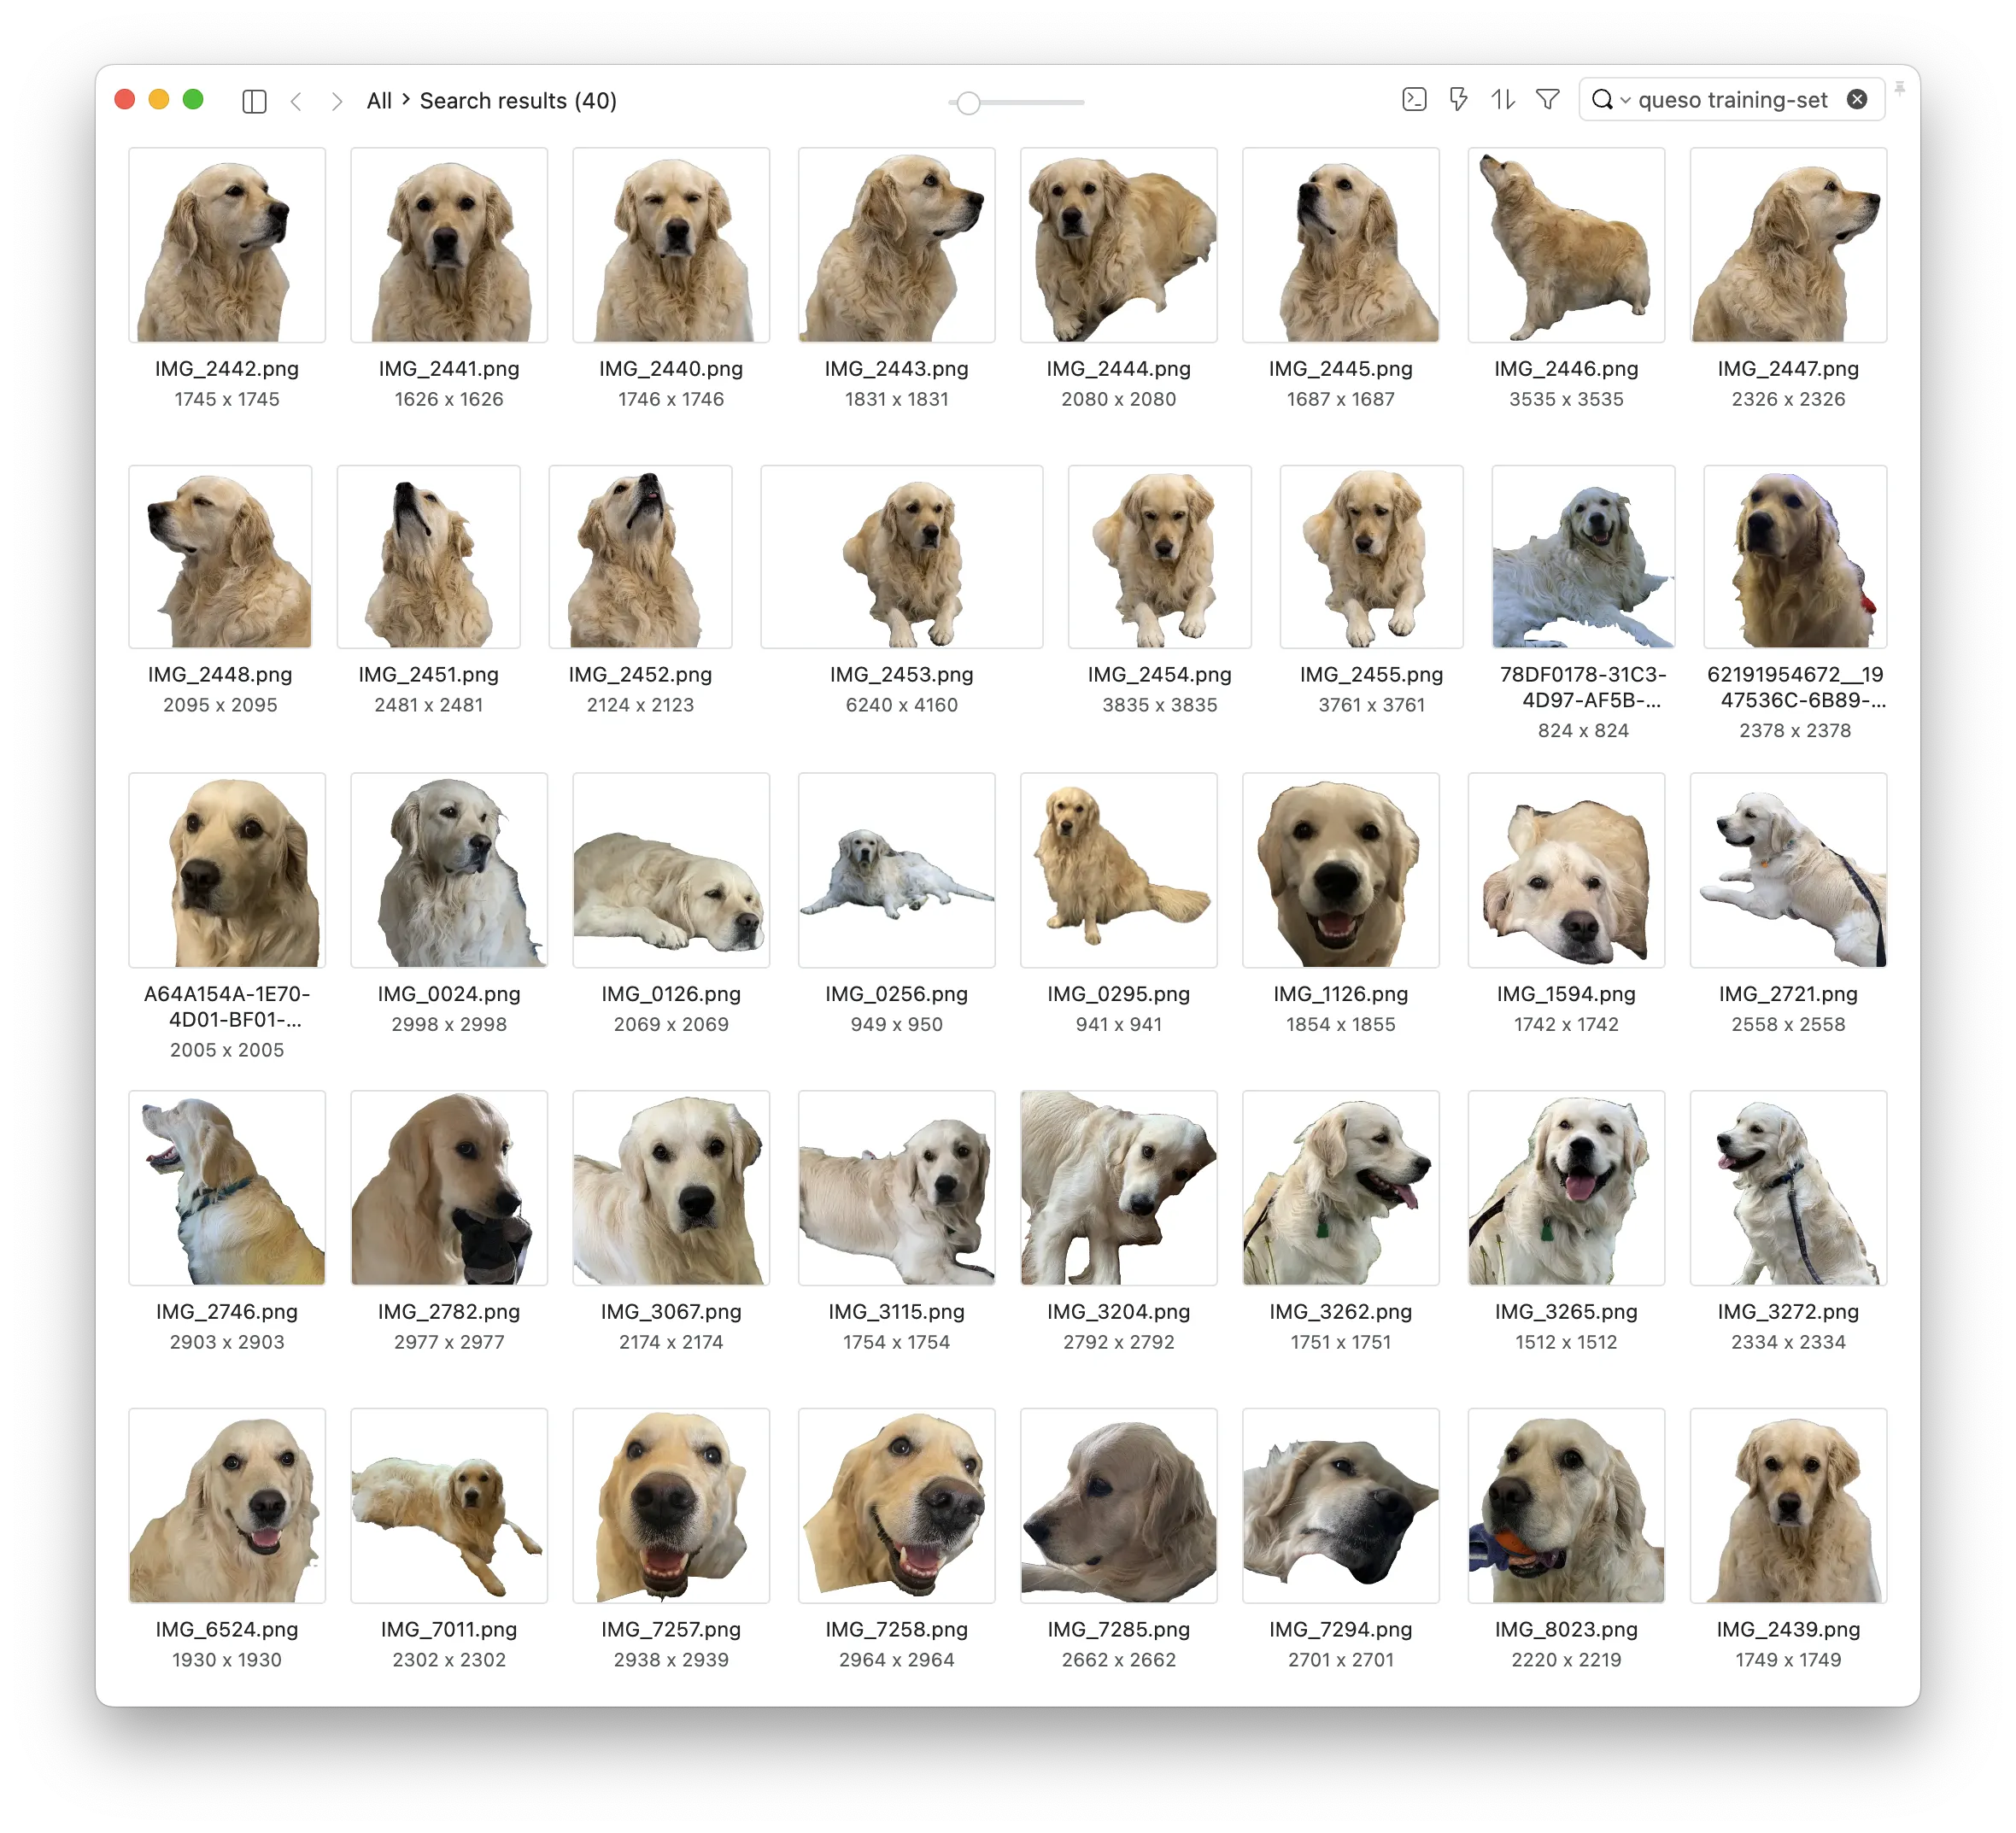
The first thing you need when training a custom Dreambooth model is a “high quality” image training set. I put high quality in quotes because I’ve seen pretty good results with less-than-ideal images in the past. However, the common practice is to select several images of your subject in a variety of poses, environments, and lighting conditions. The more variety (in poses, environments, and lighting) you have of your subject, the more generalized and flexible your fine-tuned Dreambooth model will be.
In the paper, they use 3-5 photos for training Dreambooth models; but in the community, it’s common to use more. So in my case, I gathered 40 photos of Queso in various poses, lighting, and environment.
I chose to cut out the backgrounds of my images since some of them were in very similar environments, and in early tests, I found that those background elements began to show up in my generated images. This is very optional, and I don’t recommend it unless you run into issues. I was able to do this pretty quickly in Photoshop with the Object Selection tool; quickly selecting Queso, inverting the selection, and deleting the background.
Once I had all my images, I created a .zip file, and uploaded it to s3, where I could reference it by URL. This is important, becasue we will pass this zip file url into the Dreambooth training job in the next step.
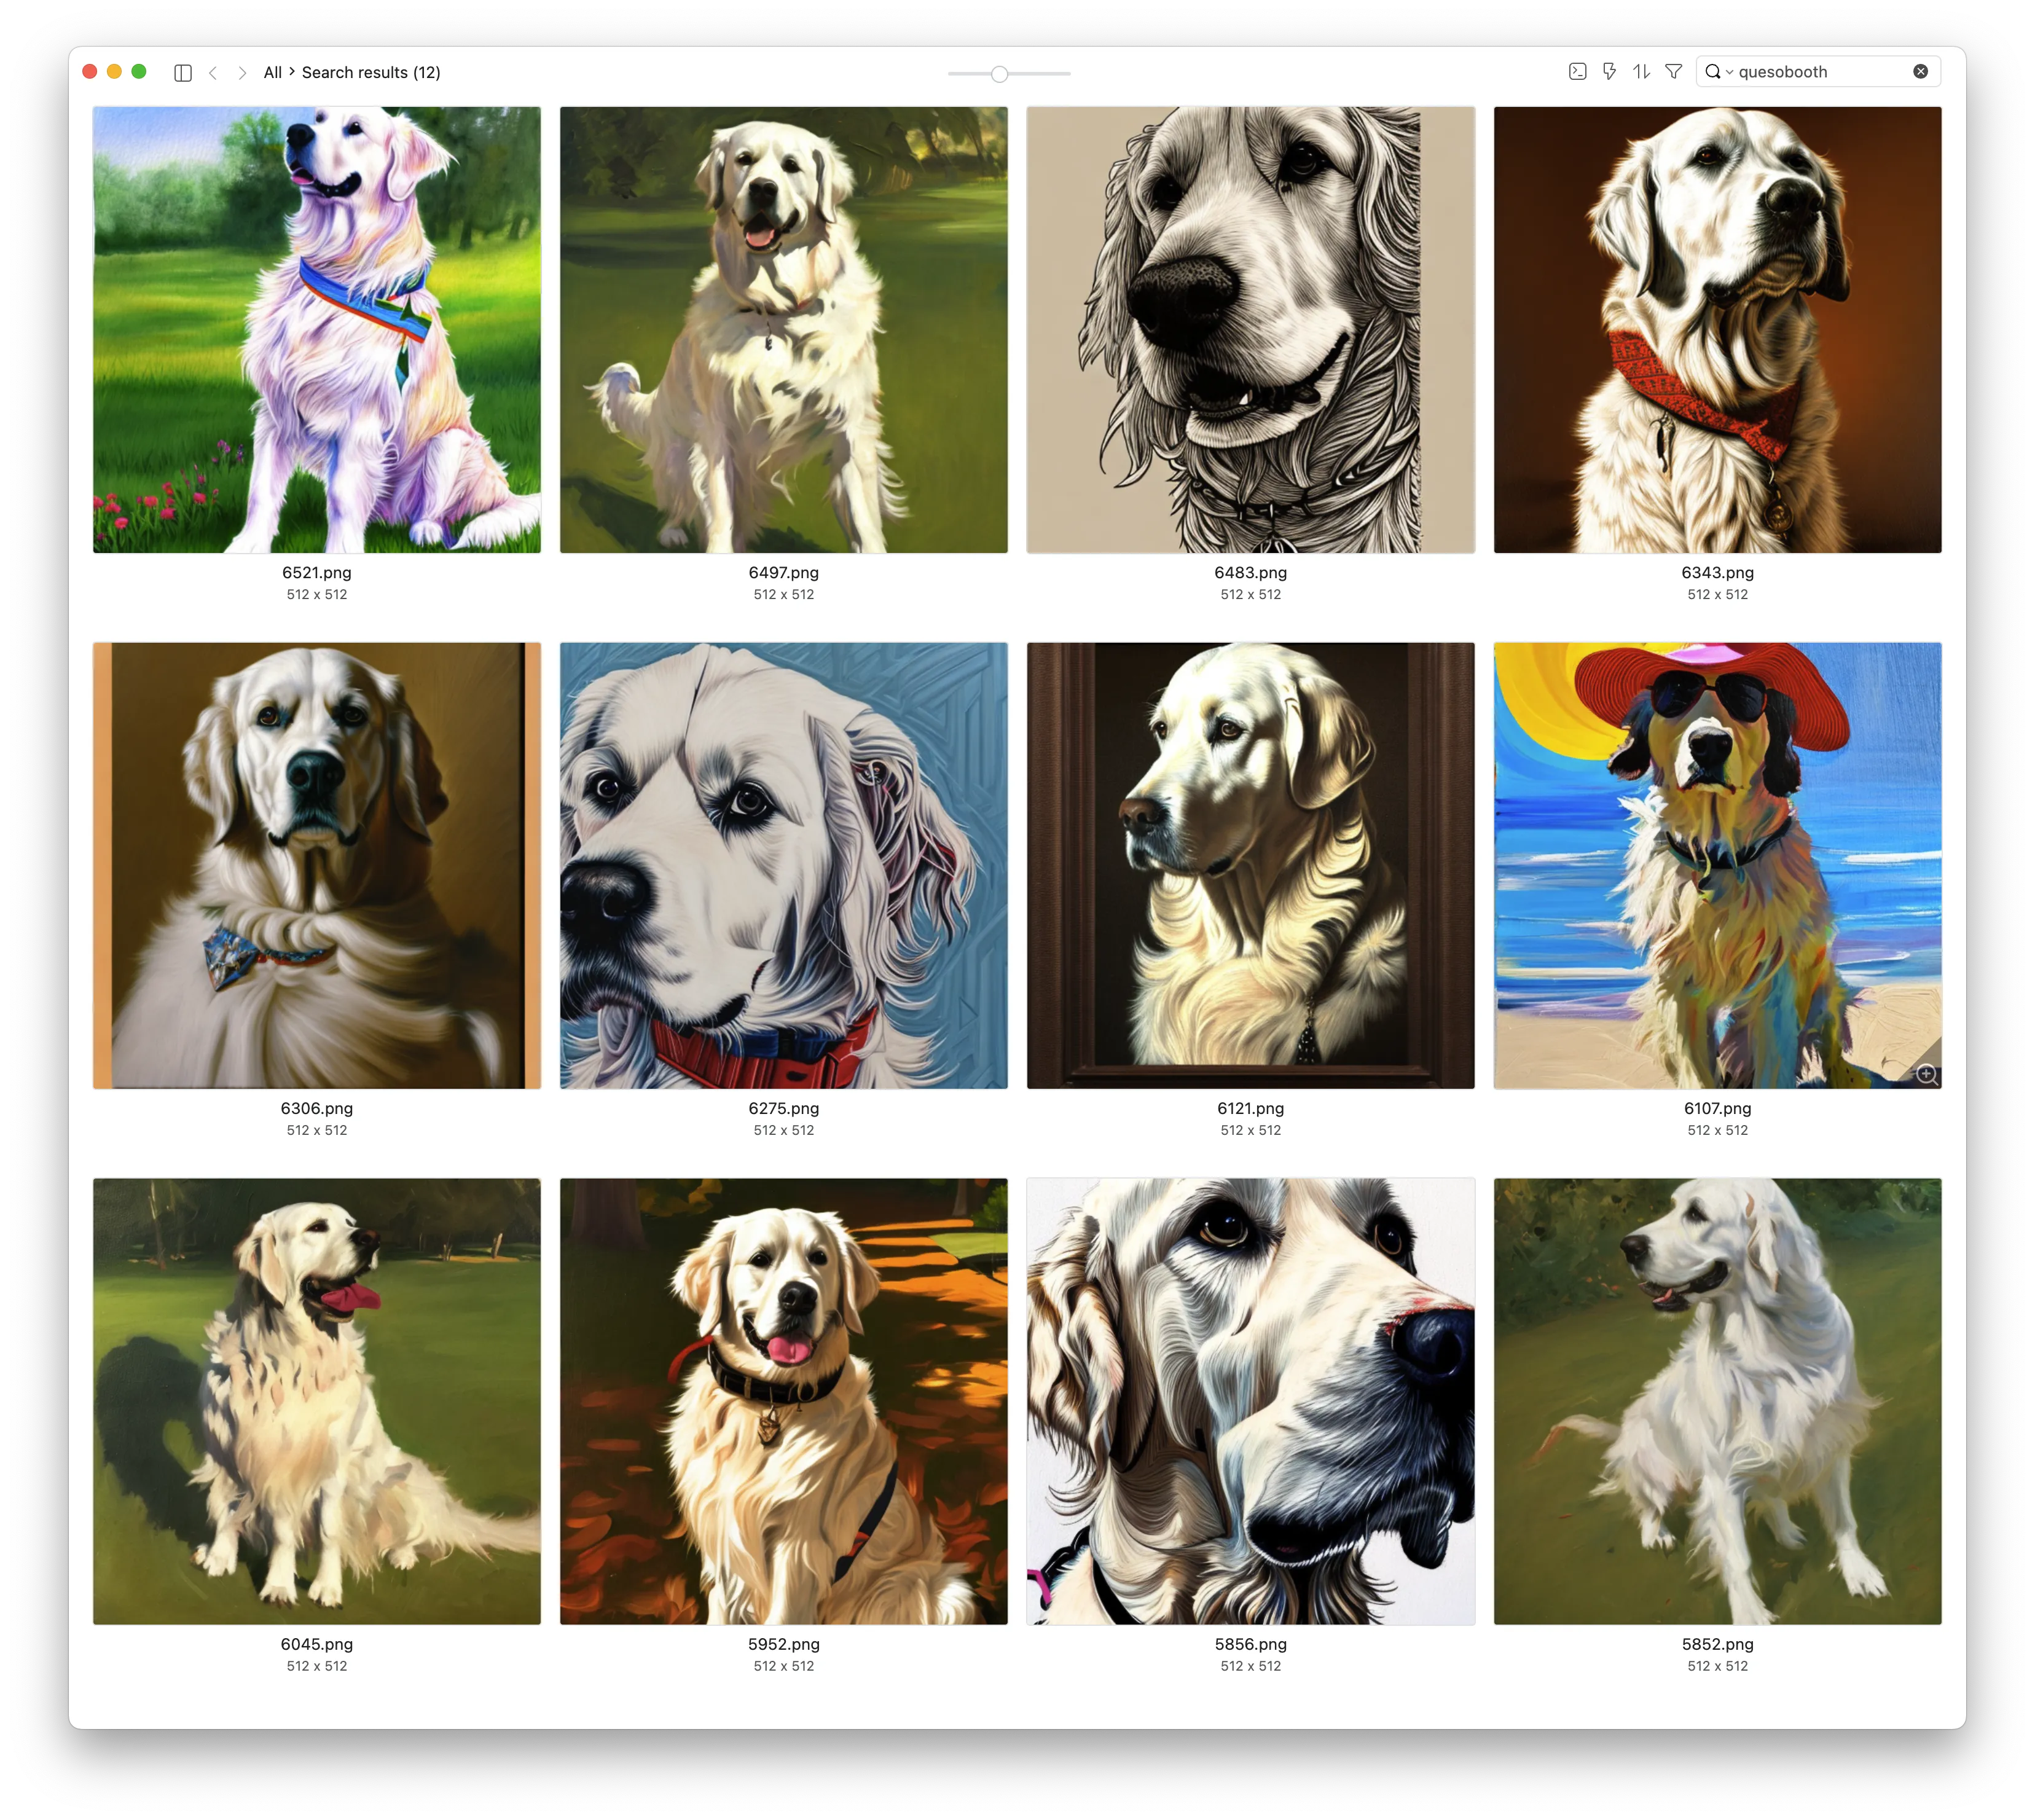
Below is an image grid of my Queso training set. Isn’t he the best boy you’ve ever seen?
Running the Dreambooth Training on Replicate
For our Dreambooth training adventures, I chose to use Replicate (as I did in my last few posts). Replicate is nice for projects like this because it minimizes the pain of fumbling with cloud GPUs and manually getting everything installed and set up. You just send an HTTP request without having to think about GPUs or terminating instances when you’re done. Replicate has a semi-documented Dreambooth training API, which is described in this blog post.
If you are adventurous and just want to dive into the deep end I would suggest trying out this set of fast-stable-diffusion google colab notebook by @TheLastBen: https://github.com/TheLastBen/fast-stable-diffusion. They’ve got a notebook for training Dreambooth models and quickly spinning up the Automatic1111 Stable Diffusion web interface.
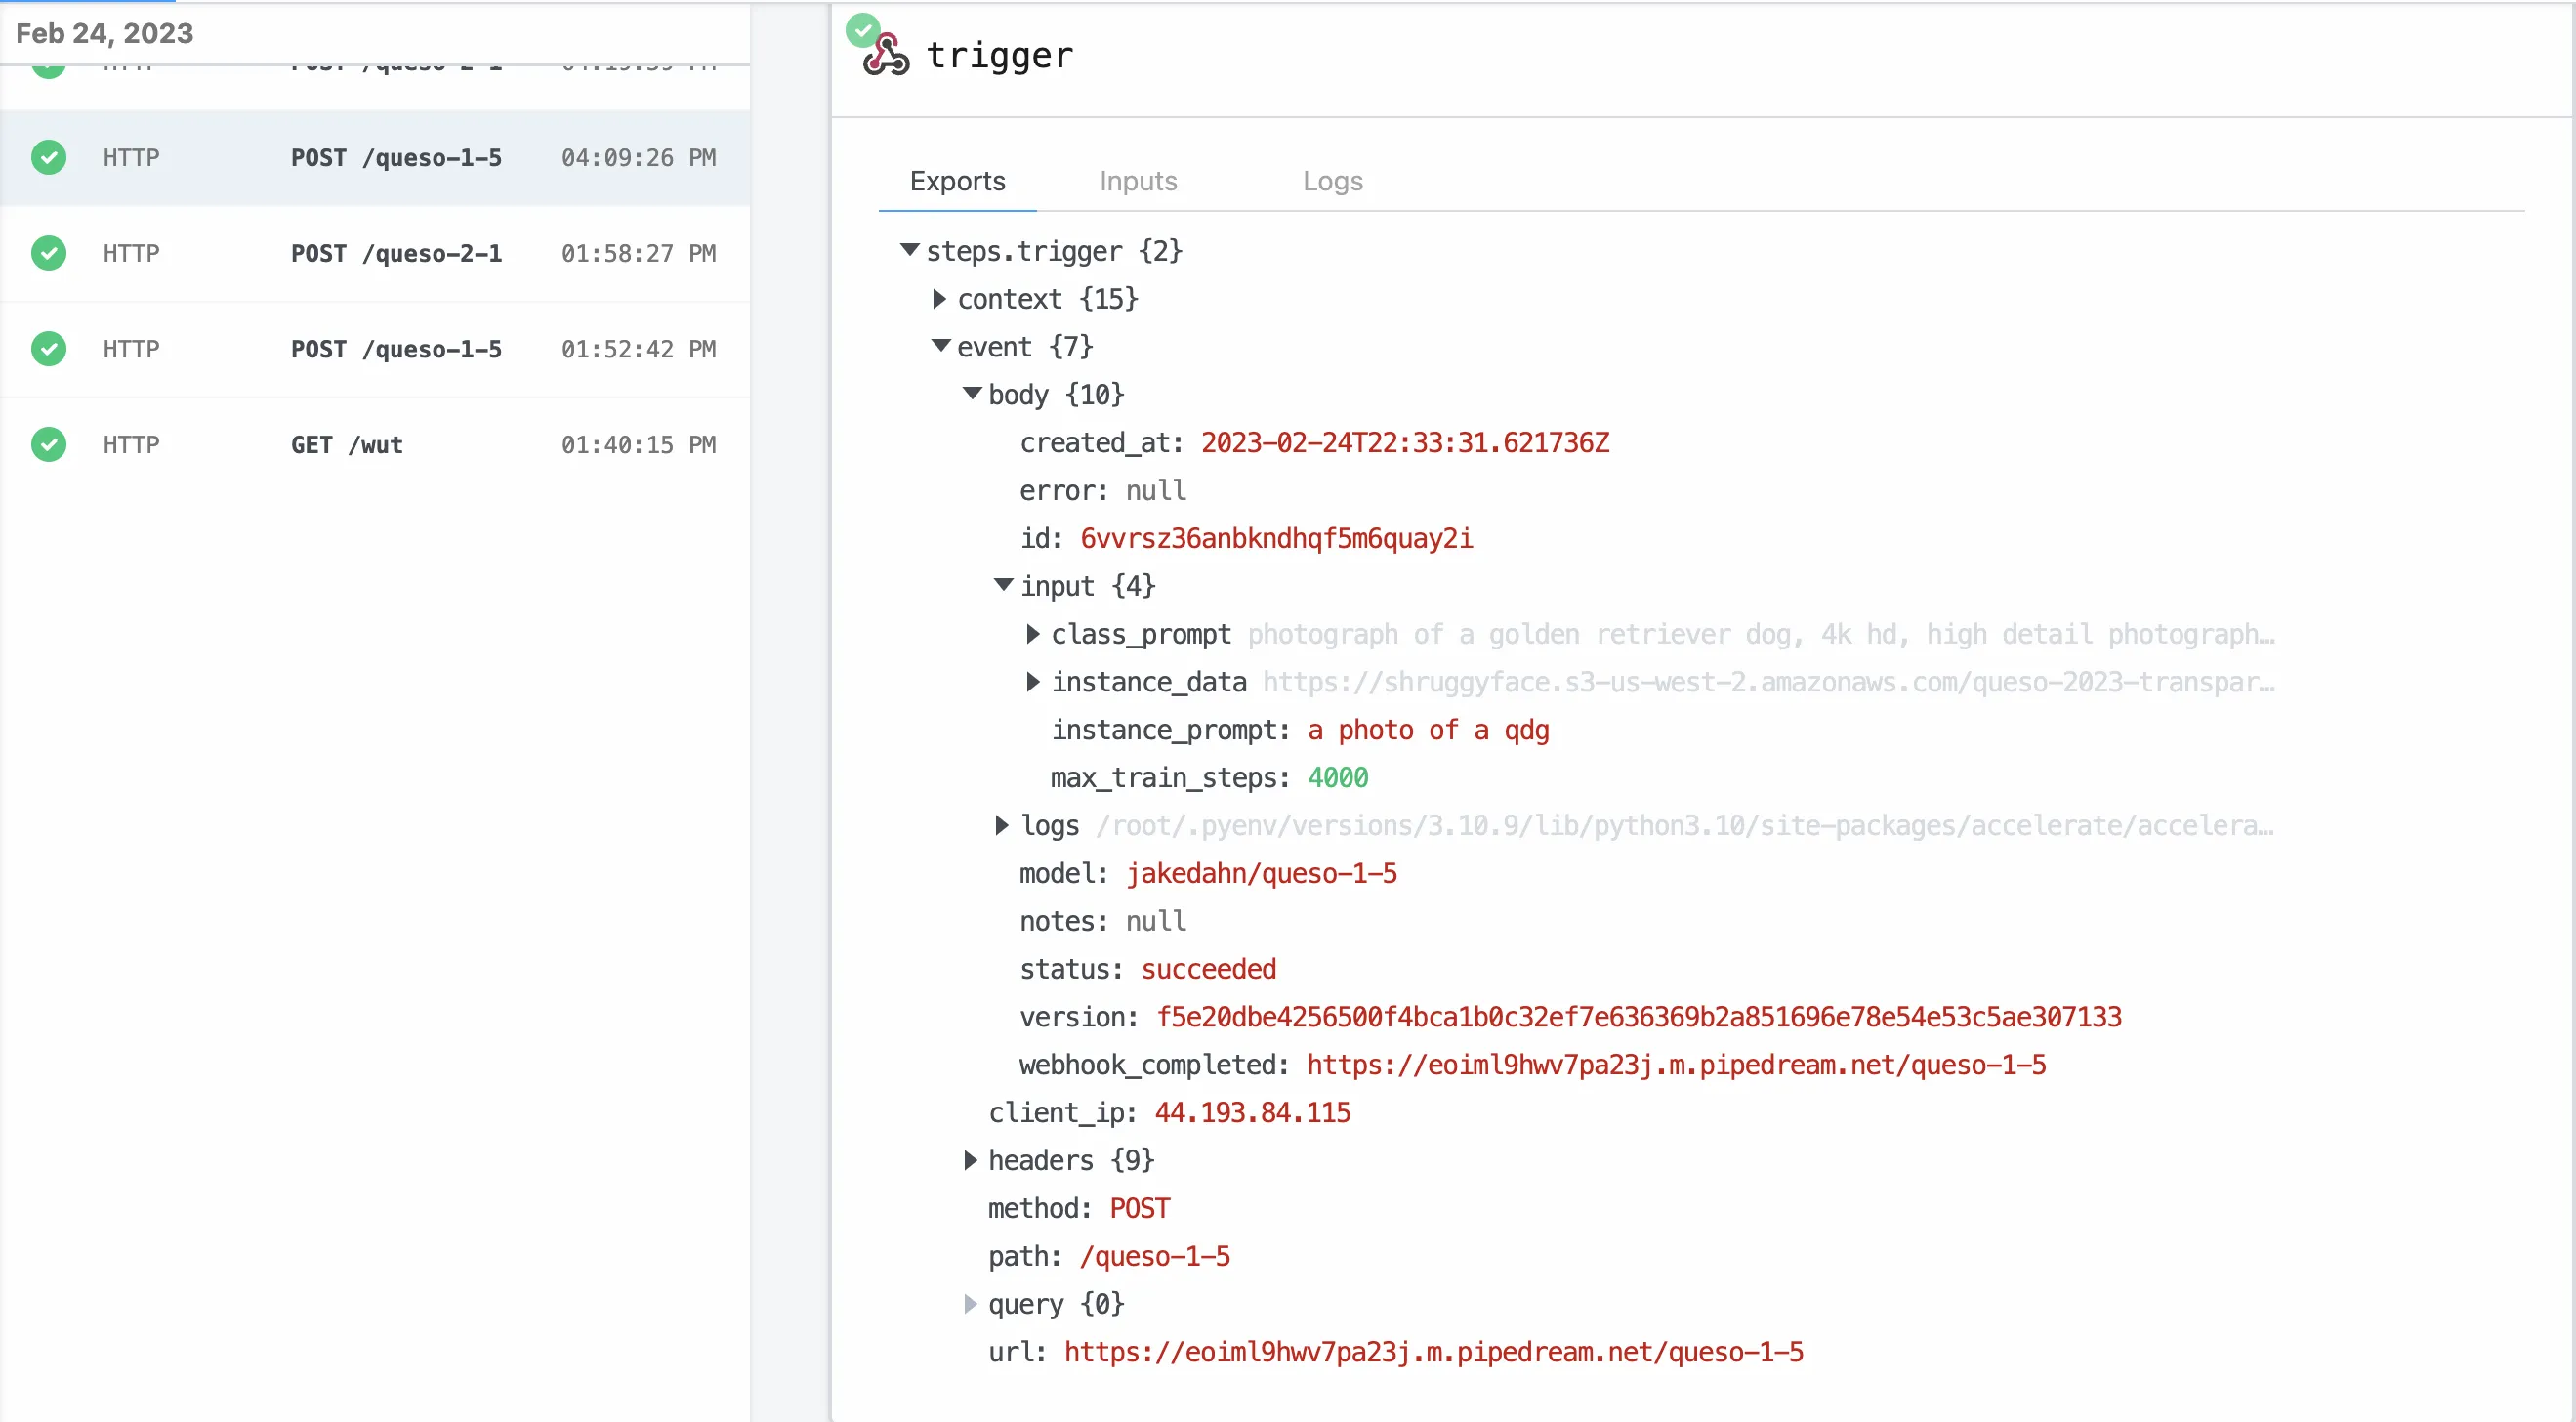
Following the Replicate Dreambooth documentation blog post, I made a quick one-off bash script with some hard-coded inputs.
Below I’ve included my queso-1.5.sh bash script, which is just copy-pasted from the Replicate blog. Below that, I’ve included a breakdown of the various parameters I’m using. If you’re interested in more advanced training parameters, you can find the detailed per-parameter documentation here: https://replicate.com/replicate/dreambooth/api
This script takes ~30-40 minutes to run from start to finish, so you might want to take a break and go for a walk with a furry friend. Unfortunately, more training steps mean more time training and 4000 steps is a lot.
You’ll notice there’s a model field in the JSON request body. Once the training job is complete, a private replicate model will be created at a URL like https://replicate.com/jakedahn/queso-1-5 (I left mine private, so it will return a 404). Once this model is created, you’ll be able to generate images via the Replicate web UI, or via the Replicate API.
#!/bin/bash

curl -X POST \
    -H "Authorization: Token $REPLICATE_API_TOKEN" \
    -H "Content-Type: application/json" \
    -d '{
            "input": {
                "instance_prompt": "a photo of a qdg dog",
                "class_prompt": "photograph of a golden retriever dog, 4k hd, high detail photograph, sharp lens, realistic, highly detailed, fur",
                "instance_data": "https://shruggyface.s3-us-west-2.amazonaws.com/queso-2023-transparent-all.zip",
                "max_train_steps": 4000
            },
            "model": "jakedahn/queso-1-5", # The dreambooth model will be added to your Replicate account at this URL. Replace "jakedahn" with your username...
            "trainer_version": "cd3f925f7ab21afaef7d45224790eedbb837eeac40d22e8fefe015489ab644aa",
            "webhook_completed": "https://abc123.m.pipedream.net/queso-1-5"
        }' \
    https://dreambooth-api-experimental.replicate.com/v1/trainings
Then I ran it like this:
REPLICATE_API_TOKEN=your-token-here ./queso-1-5.sh
Breaking down the inputs
The inputs in this script define how the Dreambooth model is trained, and they are important.
instance_prompt: The Instance Prompt is sort of like an example prompt that you would use if you wanted to get an image of your model subject. The suggested format isa [identifier] [class noun]. Interestingly, you want theidentifierto be a unique “token”. That means it should be 3-4 letters, and it should not be a word. I’ve heard some folks have specific tokens that work better for them, I choseqdg.class_prompt: When training Dreambooth models, you need to provide additional “Regularization Images,” which help to prevent extreme overfitting. Without these images, every image generated will just be trying to recreate the exact images in your training set. By giving the training set additional “similar” images, in our case, more photos of golden retrievers, the output model will be more flexible and give better results in more scenarios. By default, Replicate will generate 50 images using your class prompt; I suggest experimenting with more.instance_data: This is a zip file containing all of your training images. Replicate has an API for uploading this file to their servers, but it’s kind of complicated/involved, so I just self-hosted my file on s3, where I could easily reuse it for future projects.max_train_steps: This is the number of training steps. Higher is better, sort of. I’ve heard multiple conflicting things about this value, but the most consistent thing seems to be “100 steps for every training image”. So since I have 40 images, I used 4000 steps. In previous training runs, I was getting great results with 40 images and 3000 steps — so this is something you’ll want to experiment with on your own.trainer_version: The trainer version is important! There are a handful of options that you may want to experiment with.- If you want to use Stable Diffusion v1.5, use
cd3f925f7ab21afaef7d45224790eedbb837eeac40d22e8fefe015489ab644aa - If you want to use Stable Diffusion v2.1, use
d5e058608f43886b9620a8fbb1501853b8cbae4f45c857a014011c86ee614ffb
- If you want to use Stable Diffusion v1.5, use
webhook_completed: Training a dreambooth model takes some time, and getting a notification when it is complete is nice. I use a requestbin from https://pipedream.com for this webhook url, which gives a simple UI for exploring the data that is sent to the webhook endpoint:
Generating Images
Great! If you have been following along thus far, you should have your very own custom Dreambooth model! Next is the fun part: generating a ridiculous amount of images of your furry friend.
First, we need to write a handful of prompts, and then we can generate hundreds or thousands of images 😱.
Seeing as I am quite possibly the world's worst prompt engineer, I went the easy route and went for an hour-long stroll down the infinite scroll of Lexica. Lexica is a massive collection of AI-generated imagery, all shared with their prompts. After a while, I picked ten images I thought were cool from the search term dog portrait, and copied their prompts. You can see this vie
I am quite possibly the world's worst prompt engineer.
I collected the following prompts and replaced the dog breeds with my token qdg:
PROMPTS = [
    "Adorably cute qdg dog portrait, artstation winner by Victo Ngai, Kilian Eng and by Jake Parker, vibrant colors, winning-award masterpiece, fantastically gaudy, aesthetic octane render, 8K HD Resolution",
    "Incredibly cute golden retriever qdg dog portrait, artstation winner by Victo Ngai, Kilian Eng and by Jake Parker, vibrant colors, winning-award masterpiece, fantastically gaudy, aesthetic octane render, 8K HD Resolution",
    "a high quality painting of a very cute golden retriever qdg dog puppy, friendly, curious expression. painting by artgerm and greg rutkowski and alphonse mucha ",
    "magnificent qdg dog portrait masterpiece work of art. oil on canvas. Digitally painted. Realistic. 3D. 8k. UHD.",
    "intricate five star qdg dog facial portrait by casey weldon, oil on canvas, hdr, high detail, photo realistic, hyperrealism, matte finish, high contrast, 3 d depth, centered, masterpiece, vivid and vibrant colors, enhanced light effect, enhanced eye detail, artstationhd ",
    "a portrait of a qdg dog in a scenic environment by mary beale and rembrandt, royal, noble, baroque art, trending on artstation ",
    "a painted portrait of a qdg dog with brown fur, no white fur, wearing a sea captain's uniform and hat, sea in background, oil painting by thomas gainsborough, elegant, highly detailed, anthro, anthropomorphic dog, epic fantasy art, trending on artstation, photorealistic, photoshop, behance winner ",
    "qdg dog guarding her home, dramatic sunset lighting, mat painting, highly detailed, ",
    "qdg dog, realistic shaded lighting poster by ilya kuvshinov katsuhiro otomo, magali villeneuve, artgerm, jeremy lipkin and michael garmash and rob rey ",
    "a painting of a qdg dog dog, greg rutkowski, cinematic lighting, hyper realistic painting",
]
Then I wrote a super quick/bad Python script that iterates through each of these prompts ten times, generating a total of 100 images. I did this many times… I never get sick of looking at AI generated dog art.
import os
import urllib
import random
import replicate

USERNAME = 'jakedahn'
MODEL_NAME = 'queso-1.5'
MODEL_SLUG = f'{USERNAME}/{MODEL_NAME}'

# Grab the model from replicate
model = replicate.models.get(MODEL_SLUG)
# Grab the latest version
version = model.versions.list()[0]

def download_prompt(prompt, negative_prompt=NEGATIVE_PROMPT, num_outputs=1):
    print("=====================================================================")
    print("prompt:", prompt)
    print("negative_prompt:", negative_prompt)
    print("num_outputs:", num_outputs)
    print("=====================================================================")
    image_urls = version.predict(
        prompt=prompt,
        width=512,
        height=512,
        negative_prompt=negative_prompt,
        num_outputs=num_outputs,
    )
    for url in image_urls:
        img_id = url.split("/")[4][:6]
        prompt = prompt.replace(" ", "-").replace(",", "").replace(".", "-")
        out_file = f"data/{MODEL_NAME}/{img_id}--{prompt}"[:200]
        out_file = out_file + ".jpg"

        # if folder doesn't exist, create it
        os.makedirs(os.path.dirname(out_file), exist_ok=True)

        print("Downloading to", out_file)
        urllib.request.urlretrieve(url, out_file)
    print("=====================================================================")

NEGATIVE_PROMPT = "cartoon, blurry, deformed, watermark, dark lighting, image caption, caption, text, cropped, low quality, low resolution, malformed, messy, blurry, watermark"

# these prompts were all taken from [https://lexica.art/?q=dog+portrait](https://lexica.art/?q=dog+portrait)
PROMPTS = [
    "Adorably cute qdg dog portrait, artstation winner by Victo Ngai, Kilian Eng and by Jake Parker, vibrant colors, winning-award masterpiece, fantastically gaudy, aesthetic octane render, 8K HD Resolution",
    "Incredibly cute golden retriever qdg dog portrait, artstation winner by Victo Ngai, Kilian Eng and by Jake Parker, vibrant colors, winning-award masterpiece, fantastically gaudy, aesthetic octane render, 8K HD Resolution",
    "a high quality painting of a very cute golden retriever qdg dog puppy, friendly, curious expression. painting by artgerm and greg rutkowski and alphonse mucha ",
    "magnificent qdg dog portrait masterpiece work of art. oil on canvas. Digitally painted. Realistic. 3D. 8k. UHD.",
    "intricate five star qdg dog facial portrait by casey weldon, oil on canvas, hdr, high detail, photo realistic, hyperrealism, matte finish, high contrast, 3 d depth, centered, masterpiece, vivid and vibrant colors, enhanced light effect, enhanced eye detail, artstationhd ",
    "a portrait of a qdg dog in a scenic environment by mary beale and rembrandt, royal, noble, baroque art, trending on artstation ",
    "a painted portrait of a qdg dog with brown fur, no white fur, wearing a sea captain's uniform and hat, sea in background, oil painting by thomas gainsborough, elegant, highly detailed, anthro, anthropomorphic dog, epic fantasy art, trending on artstation, photorealistic, photoshop, behance winner ",
    "qdg dog guarding her home, dramatic sunset lighting, mat painting, highly detailed, ",
    "qdg dog, realistic shaded lighting poster by ilya kuvshinov katsuhiro otomo, magali villeneuve, artgerm, jeremy lipkin and michael garmash and rob rey ",
    "a painting of a qdg dog dog, greg rutkowski, cinematic lighting, hyper realistic painting",
]

# Randomize PROMPT order
random.shuffle(PROMPTS)

# loop 10 times, generate 100 images
for i in range(10):
    for prompt in PROMPTS:
        download_prompt(prompt)
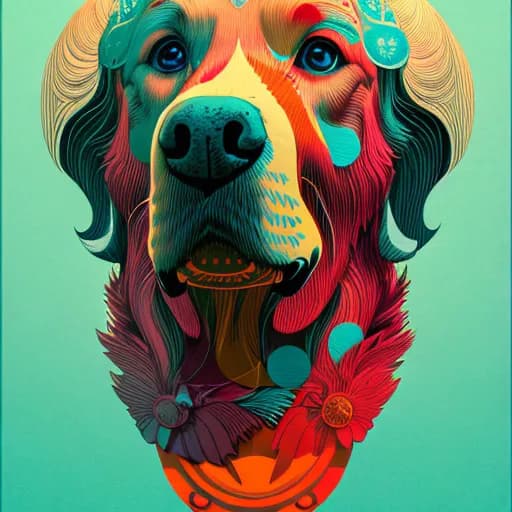
After running this script many times, I generated at least 1000 images. I would say ~20% were nonsense, and about 80% were cute, funny, or accurate. These are some of my favorites:
Finding THE ONE
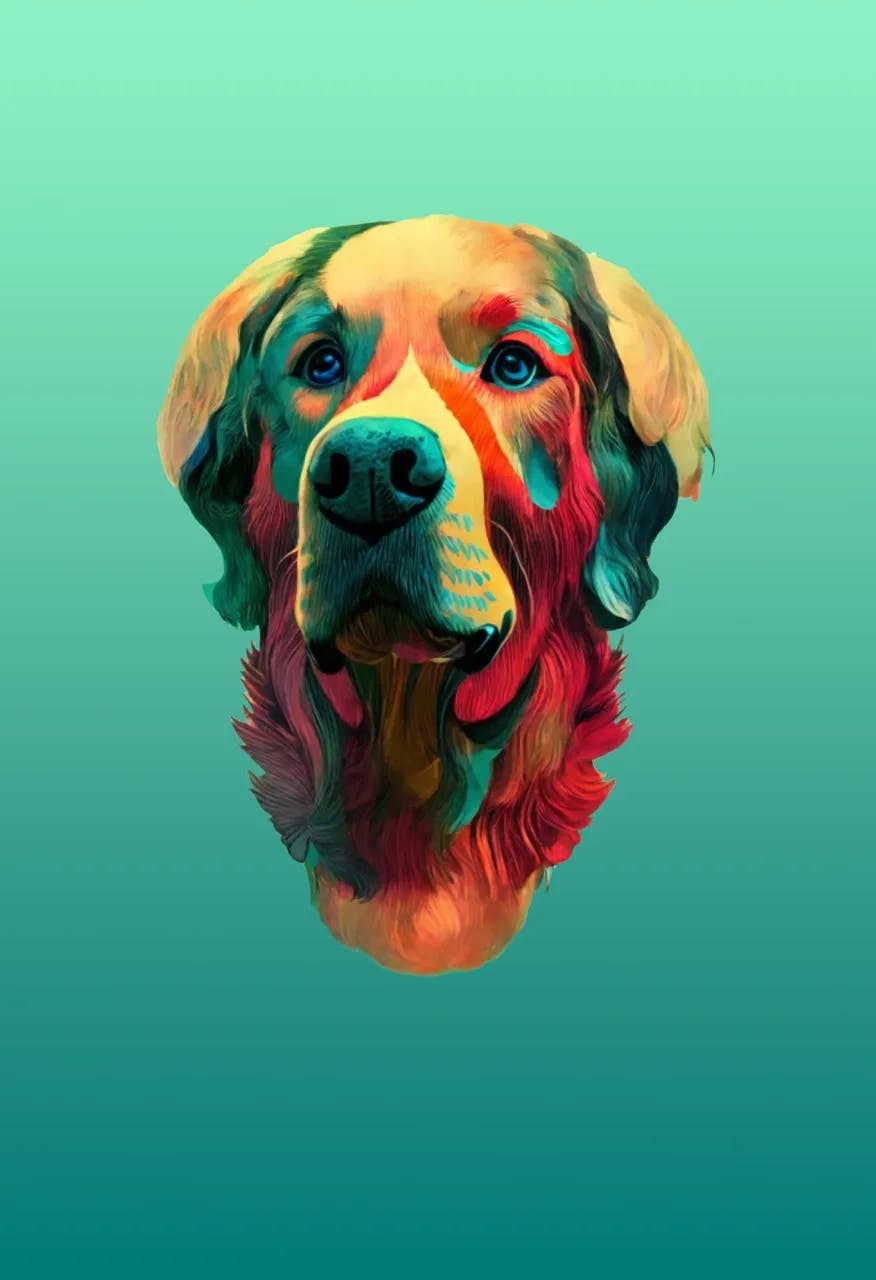
Eventually, after generating hundreds of artificial Quesos, I landed on this one. I love the color palette, which is vibrant and contrasty. I love the texture and all of the fine lines and details. It also captures Queso’s eyes pretty well, which is ultimately what sold me. Every time I look at it, I think, “dang, that’s Queso!”
Now, the end goal for this art project was to end up with a high-quality art print that I could frame and put on my art wall. While cool, this image wouldn’t make for a very good art print; the awkward crop at the top and bottom limits its potential. Also, if I were to print 512x512px at 300dpi, this image would only be 1.7x1.7” on paper. I’m targeting 11x17”.
So the next step in this project was to fix the awkward cropping. Boy, it’s a real bummer that we can’t just add new pixels to the top and bottom.
Just kidding! We can! That’s where Outpainting comes in.
Outpainting
Outpainting is a technique where you can generate new pixels that seamlessly extend an image's existing bounds. This means we can just generate new pixels on the top and bottom of our image, to get a complete artistic rendition of Queso. As far as I understand, and I may be wrong 🤷♂️, outpainting for diffusion models was first implemented by OpenAI.
They have an excellent example in their announcement blog post, which I’ve included here.
Original: Girl with a Pearl Earring by Johannes Vermeer Outpainting: August Kamp × DALL·E, taken from https://openai.com/blog/dall-e-introducing-outpainting
I haven’t used Dall-E 2 much, so I wanted to give it a try and see how it did with outpainting. In my opinion, the OpenAI outpainting user experience and interface is the best I’ve tried; but I wasn’t a huge fan of the generated pixel results. Here I’ve got a little video snippet where I added pixels to the top of my image, but all of the results were a little too cartoony for my liking; they also made it look like Queso was wearing a tiara headband.
❌ Strike 1
Then I tried using the Automatic1111 Stable Diffusion WebUI from the notebooks I mentioned above https://github.com/TheLastBen/fast-stable-diffusion. The Automatic1111 UI is the most full-featured and extensible UI in the community, so I figured outpainting would Just Work™️. I was wrong 😐. it seemed to take the top and bottom-most row of pixels and extend them down from 512px tall to 1344px tall.
❌ Strike 2!
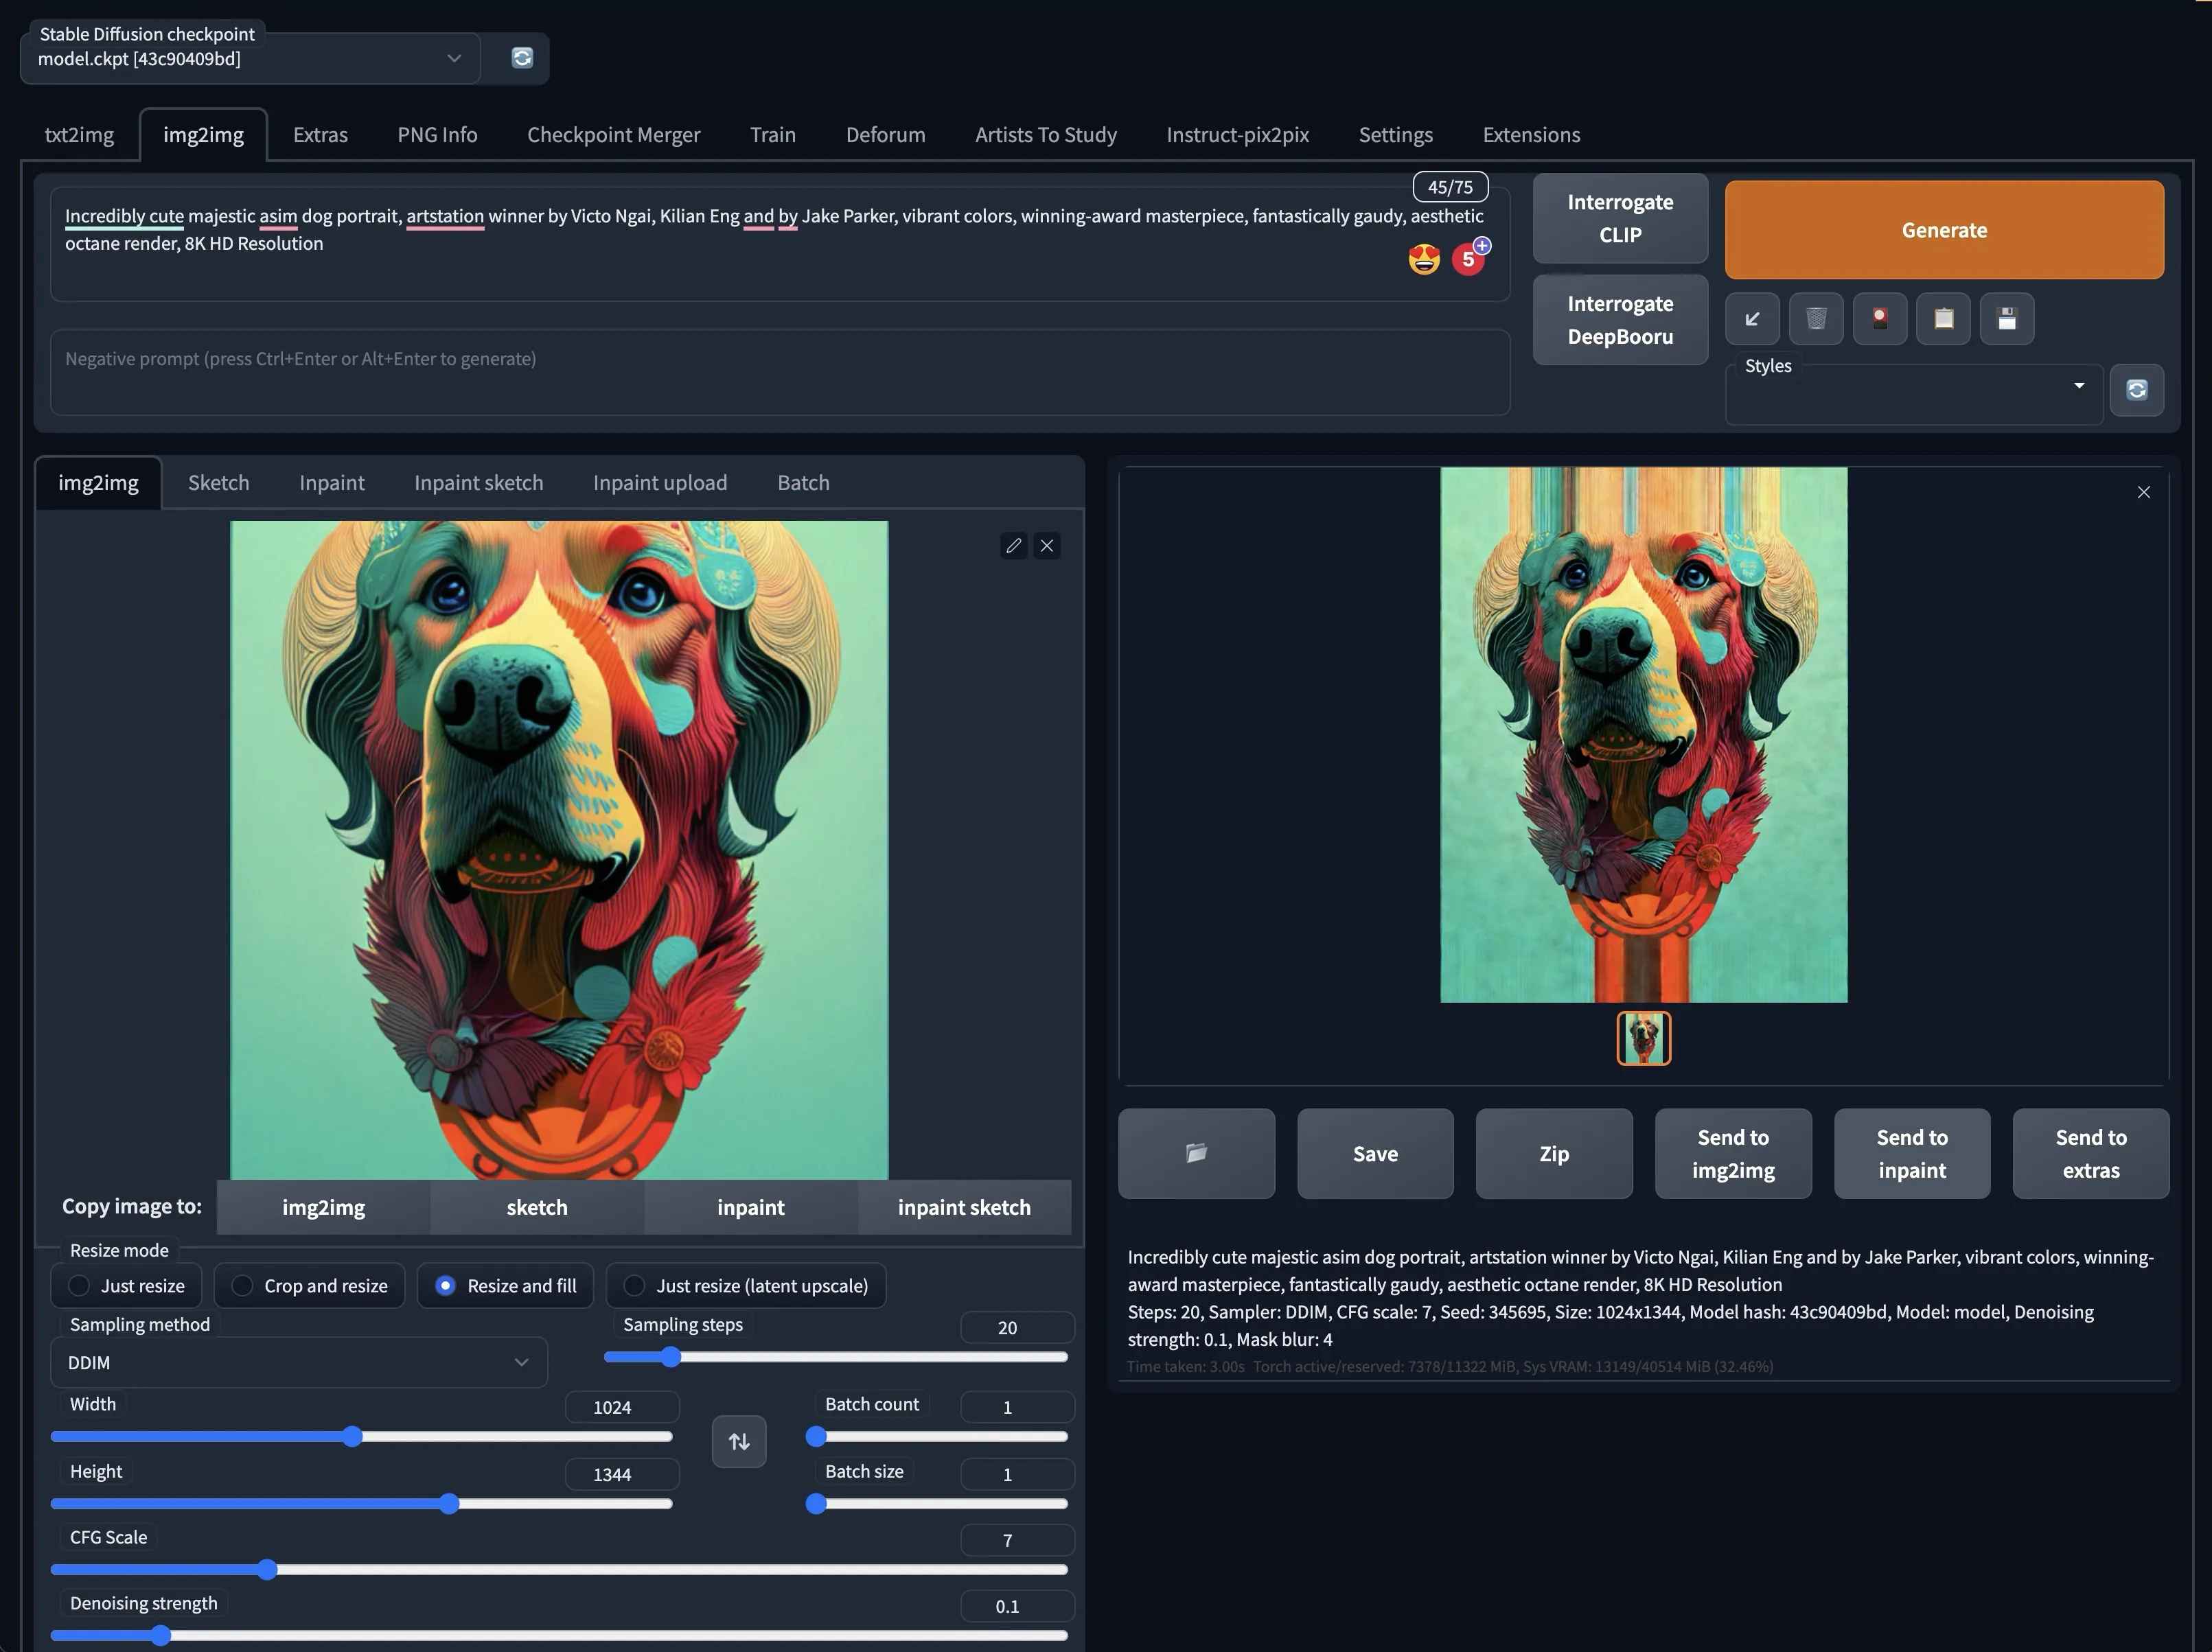
Finally, I tried using the Draw Things Mac App. I actually really like the Draw Things app. It does much of what Automatic1111 does but has a better UI and runs locally for free on an M1/M2 Macbook Pro. However, I couldn’t get the outpainting UI to actually work 😐. So I ultimately settled on using img2img of my 512x512px image to a 768x1152px image.
You may notice that the starting 512x512px image here is slightly different than the ones above. That’s because I got excited and started playing with inpainting (which I’ll cover in more detail next) before expanding the image. Don’t worry ‘bout it!
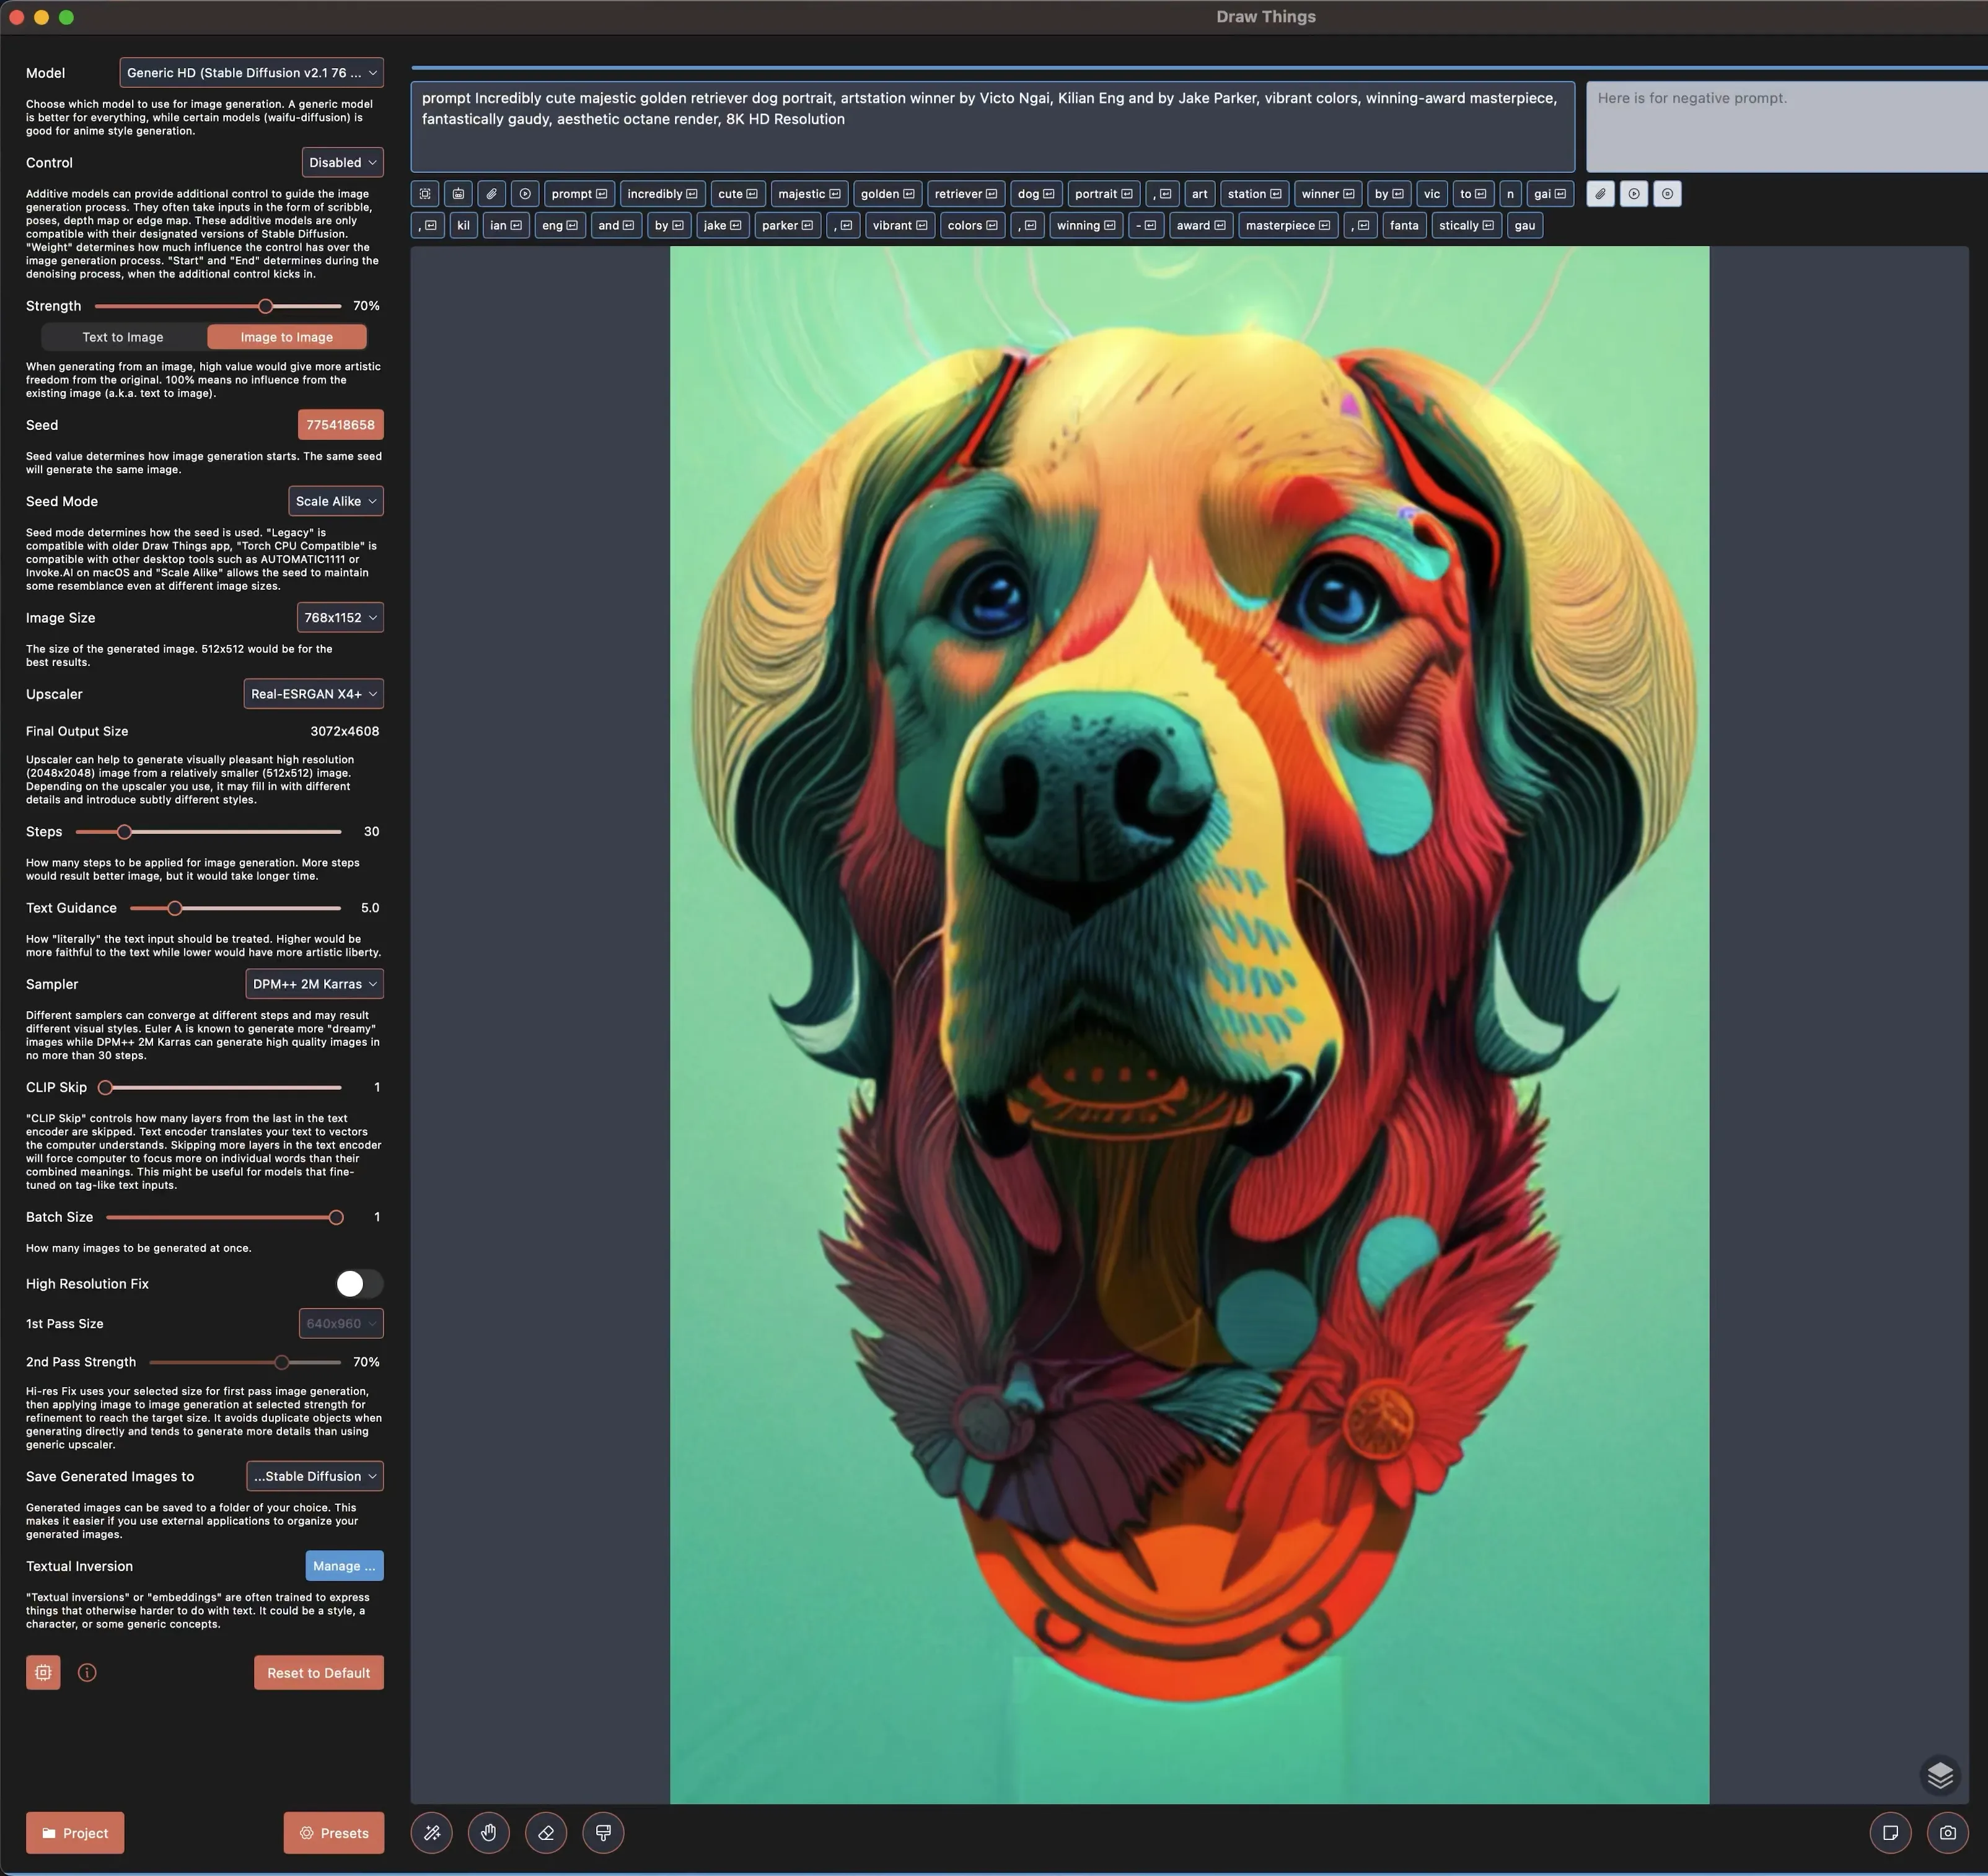
This worked pretty well! I was kind of surprised because I thought img2img would start generating weirdness in the unfilled space, but it did the right thing here.
You will notice that the hair detail in the forehead and the neck medallion circle are a little wobbly and un-detailed. I’m also not a huge fan of how the bottom looks like flowers. How in the world are we going to change that?
Inpainting, of course!
Inpainting
Inpainting is a technique where you mask out (paint over) a specific selection of your image and replace it with newly generated pixels. This is sort of similar and related to outpainting, but it’s used for fixing issues and adding details.
The inpainting step is where I spent most of my time on this project. Slowly and iteratively selecting small chunks, generating new imagery for those chunks, and inching towards something better. This is the life of an artist, materializing a vision from an idea. When I paint in real life (IRL), I do this exact same practice with acrylic paints on canvas. Slowly bringing sections of the painting to life.
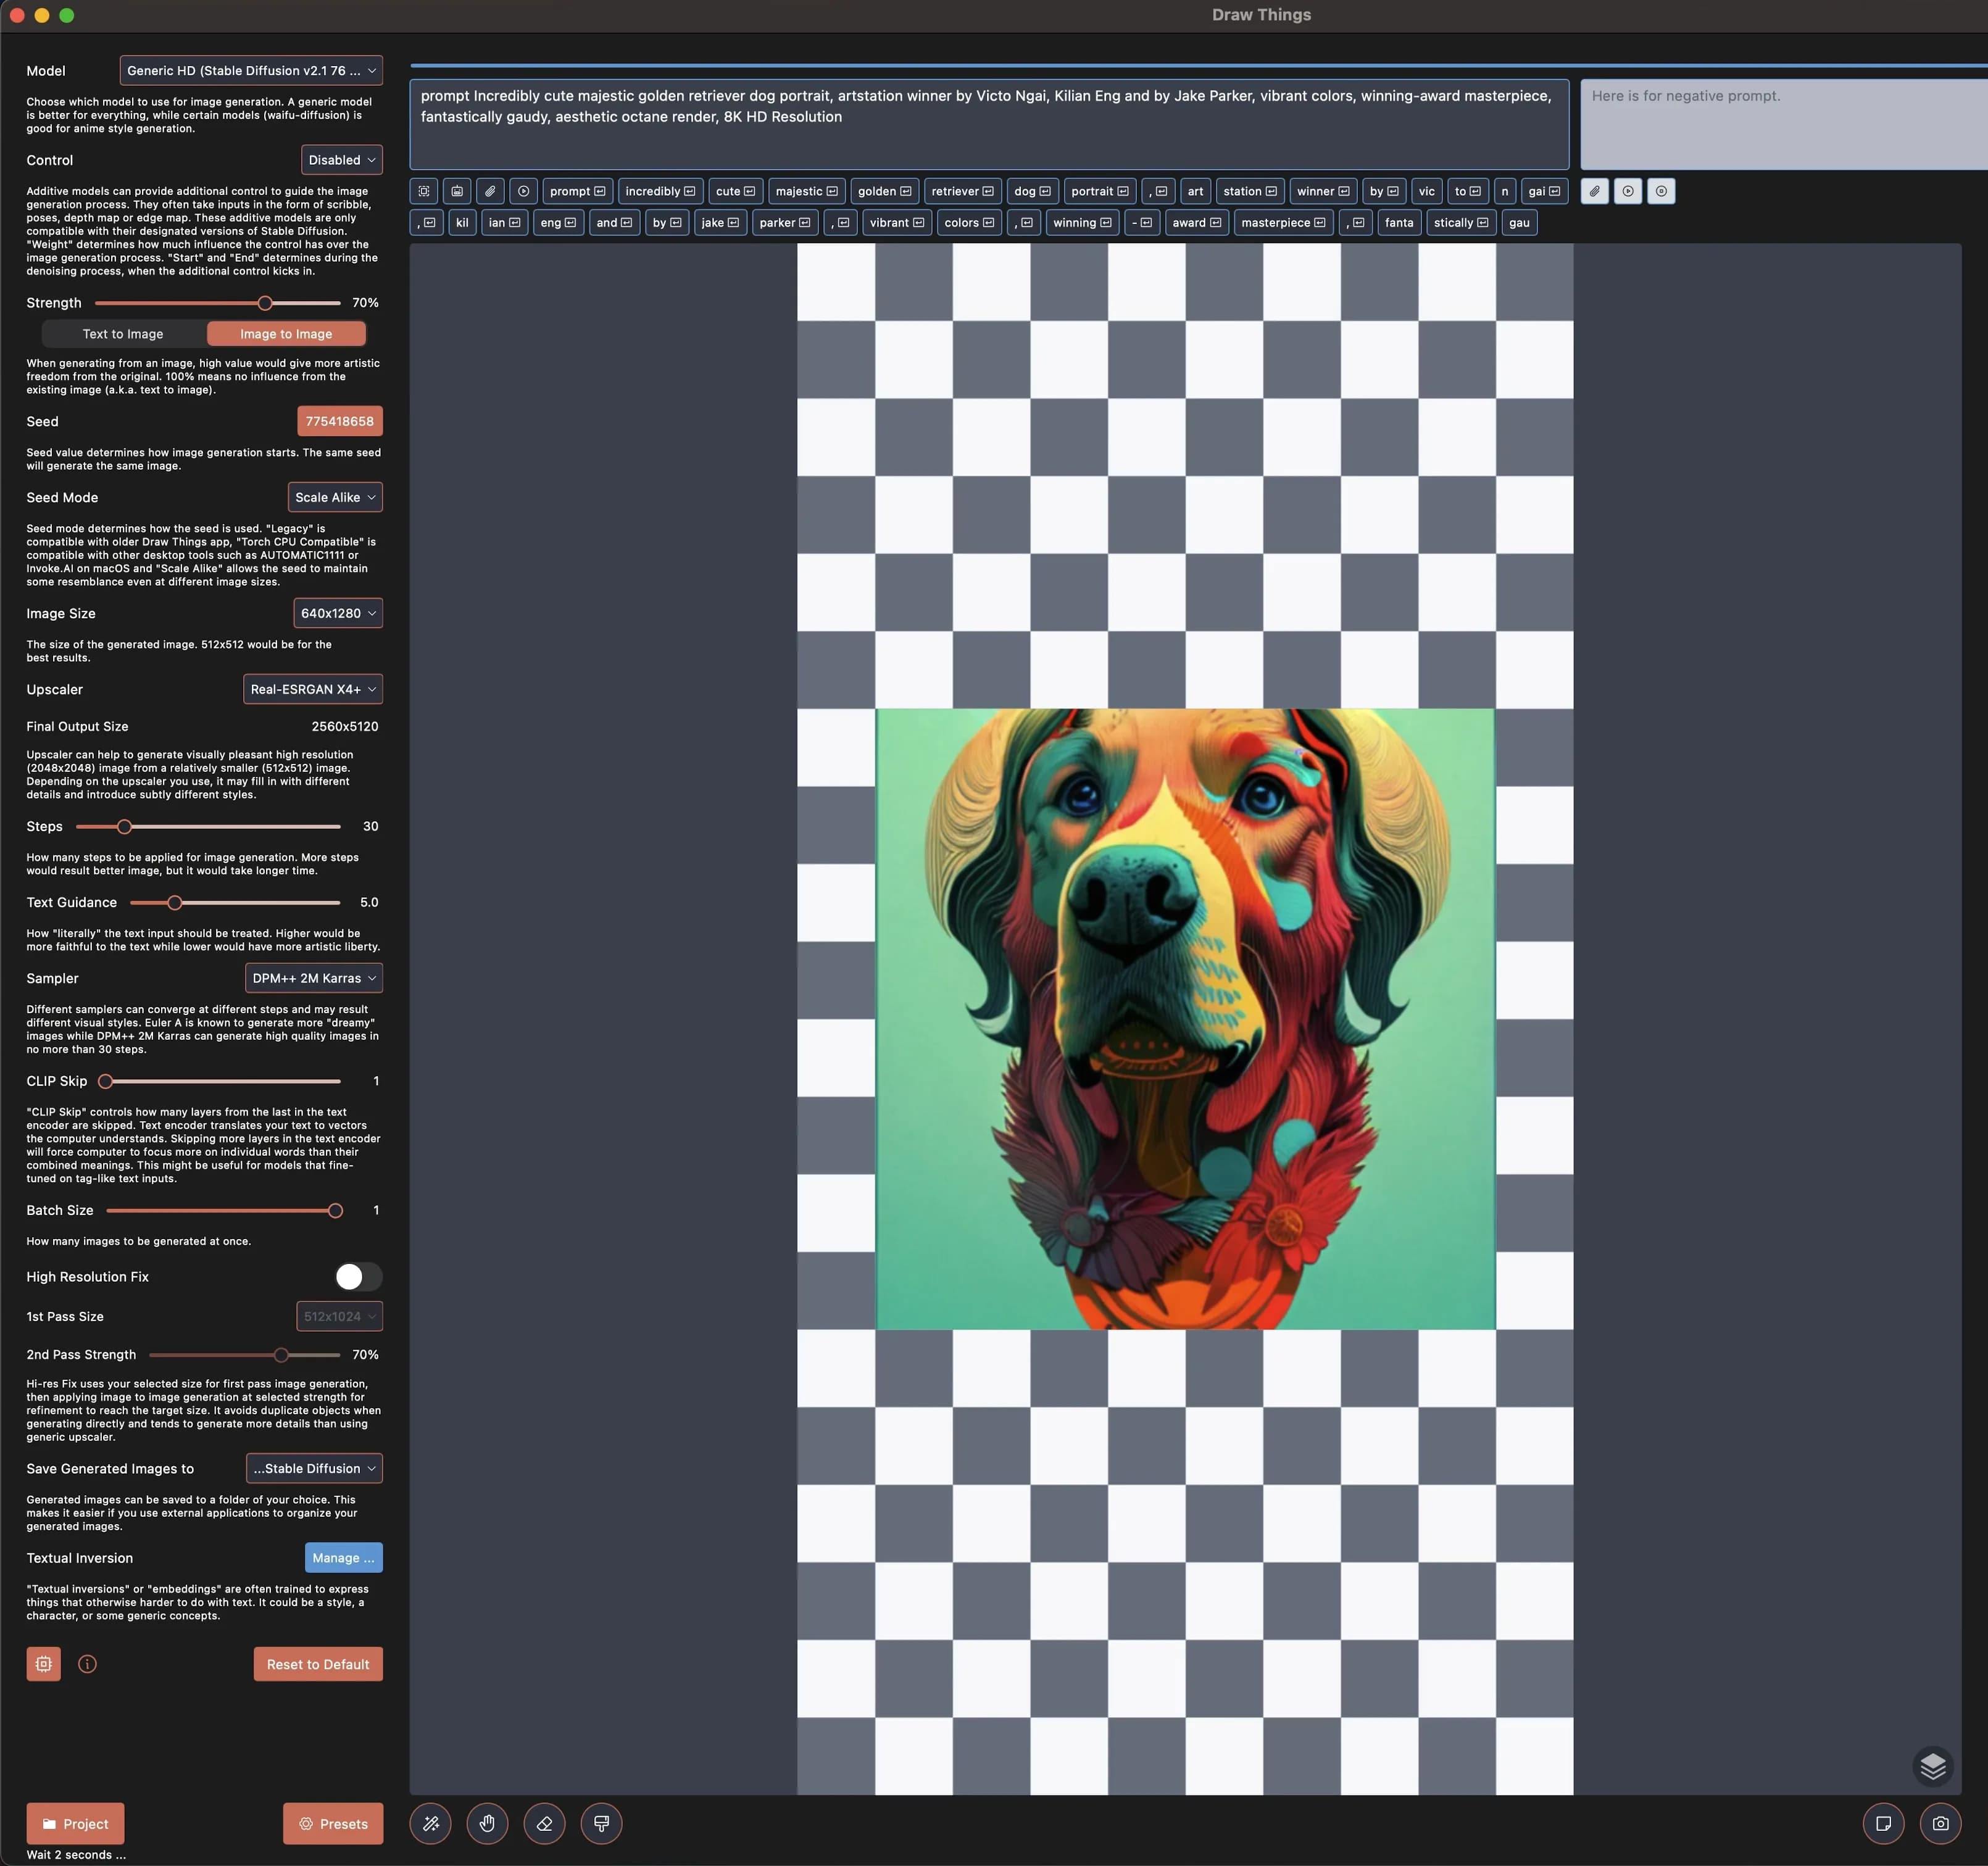
I tried the DrawThings app again for inpainting, but it wasn’t working correctly. So I returned to using the Automatic1111 UI for inpainting, which worked very well.
Below is a screenshot of what the inpainting process looks like. On the left, you paint over a bunch of places you want to modify/change, and then you generate many new iterations at once. I love doing this because it lets you test tens of directions in a few seconds instead of painstakingly testing tens of directions over the course of hours.
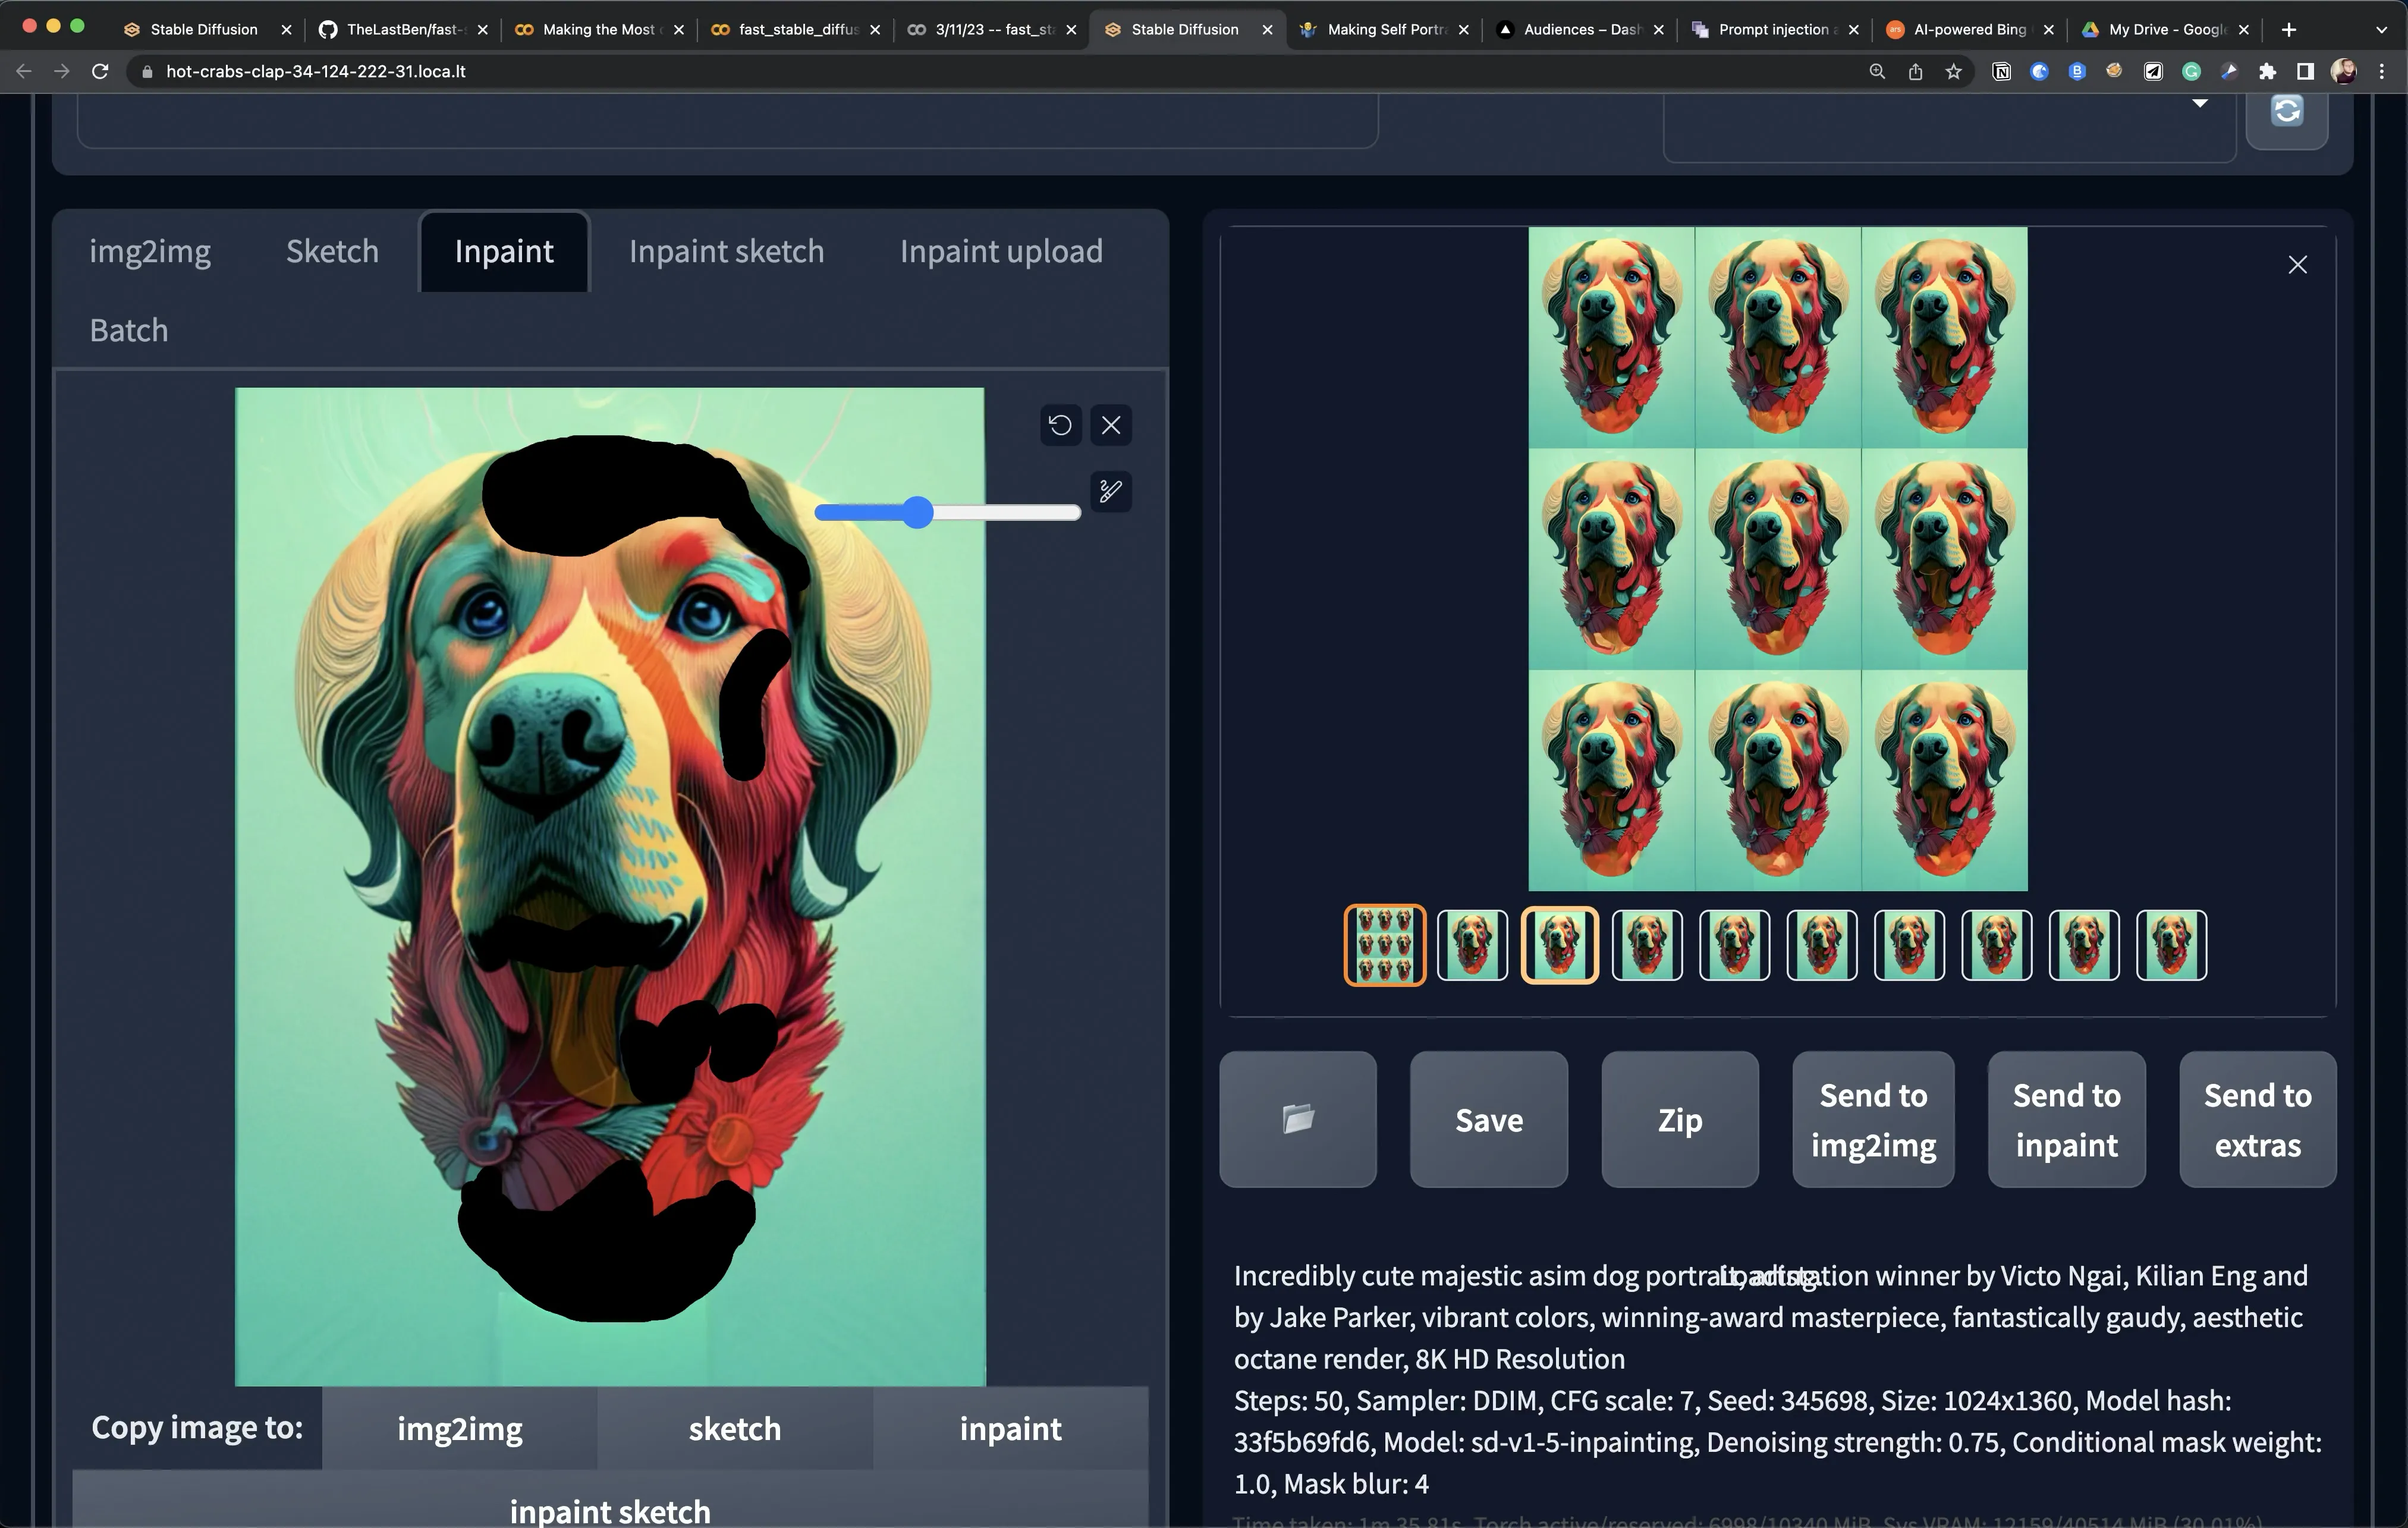
I recorded a little video of me scrolling back and forth through inpainting iterations for Queso’s ears. I can’t help but feel like this “generate 20 things, pick 1” is the new foundational workflow for artists in this new AI-capable world.
Final Result
After a few hours of playing with inpainting, I got to a place I was happy to call finished.
I made a neat video showing the before/after visualization of this AI-based post-processing journey. I love how the cartoony pieces of the original image were replaced with more fur-like elements; while keeping a consistent coloring scheme. I love it!
But this image is only 640x1280px; it needs to be much larger. EMBIGGEN!
That’s where Upscaling comes in.
Upscaling
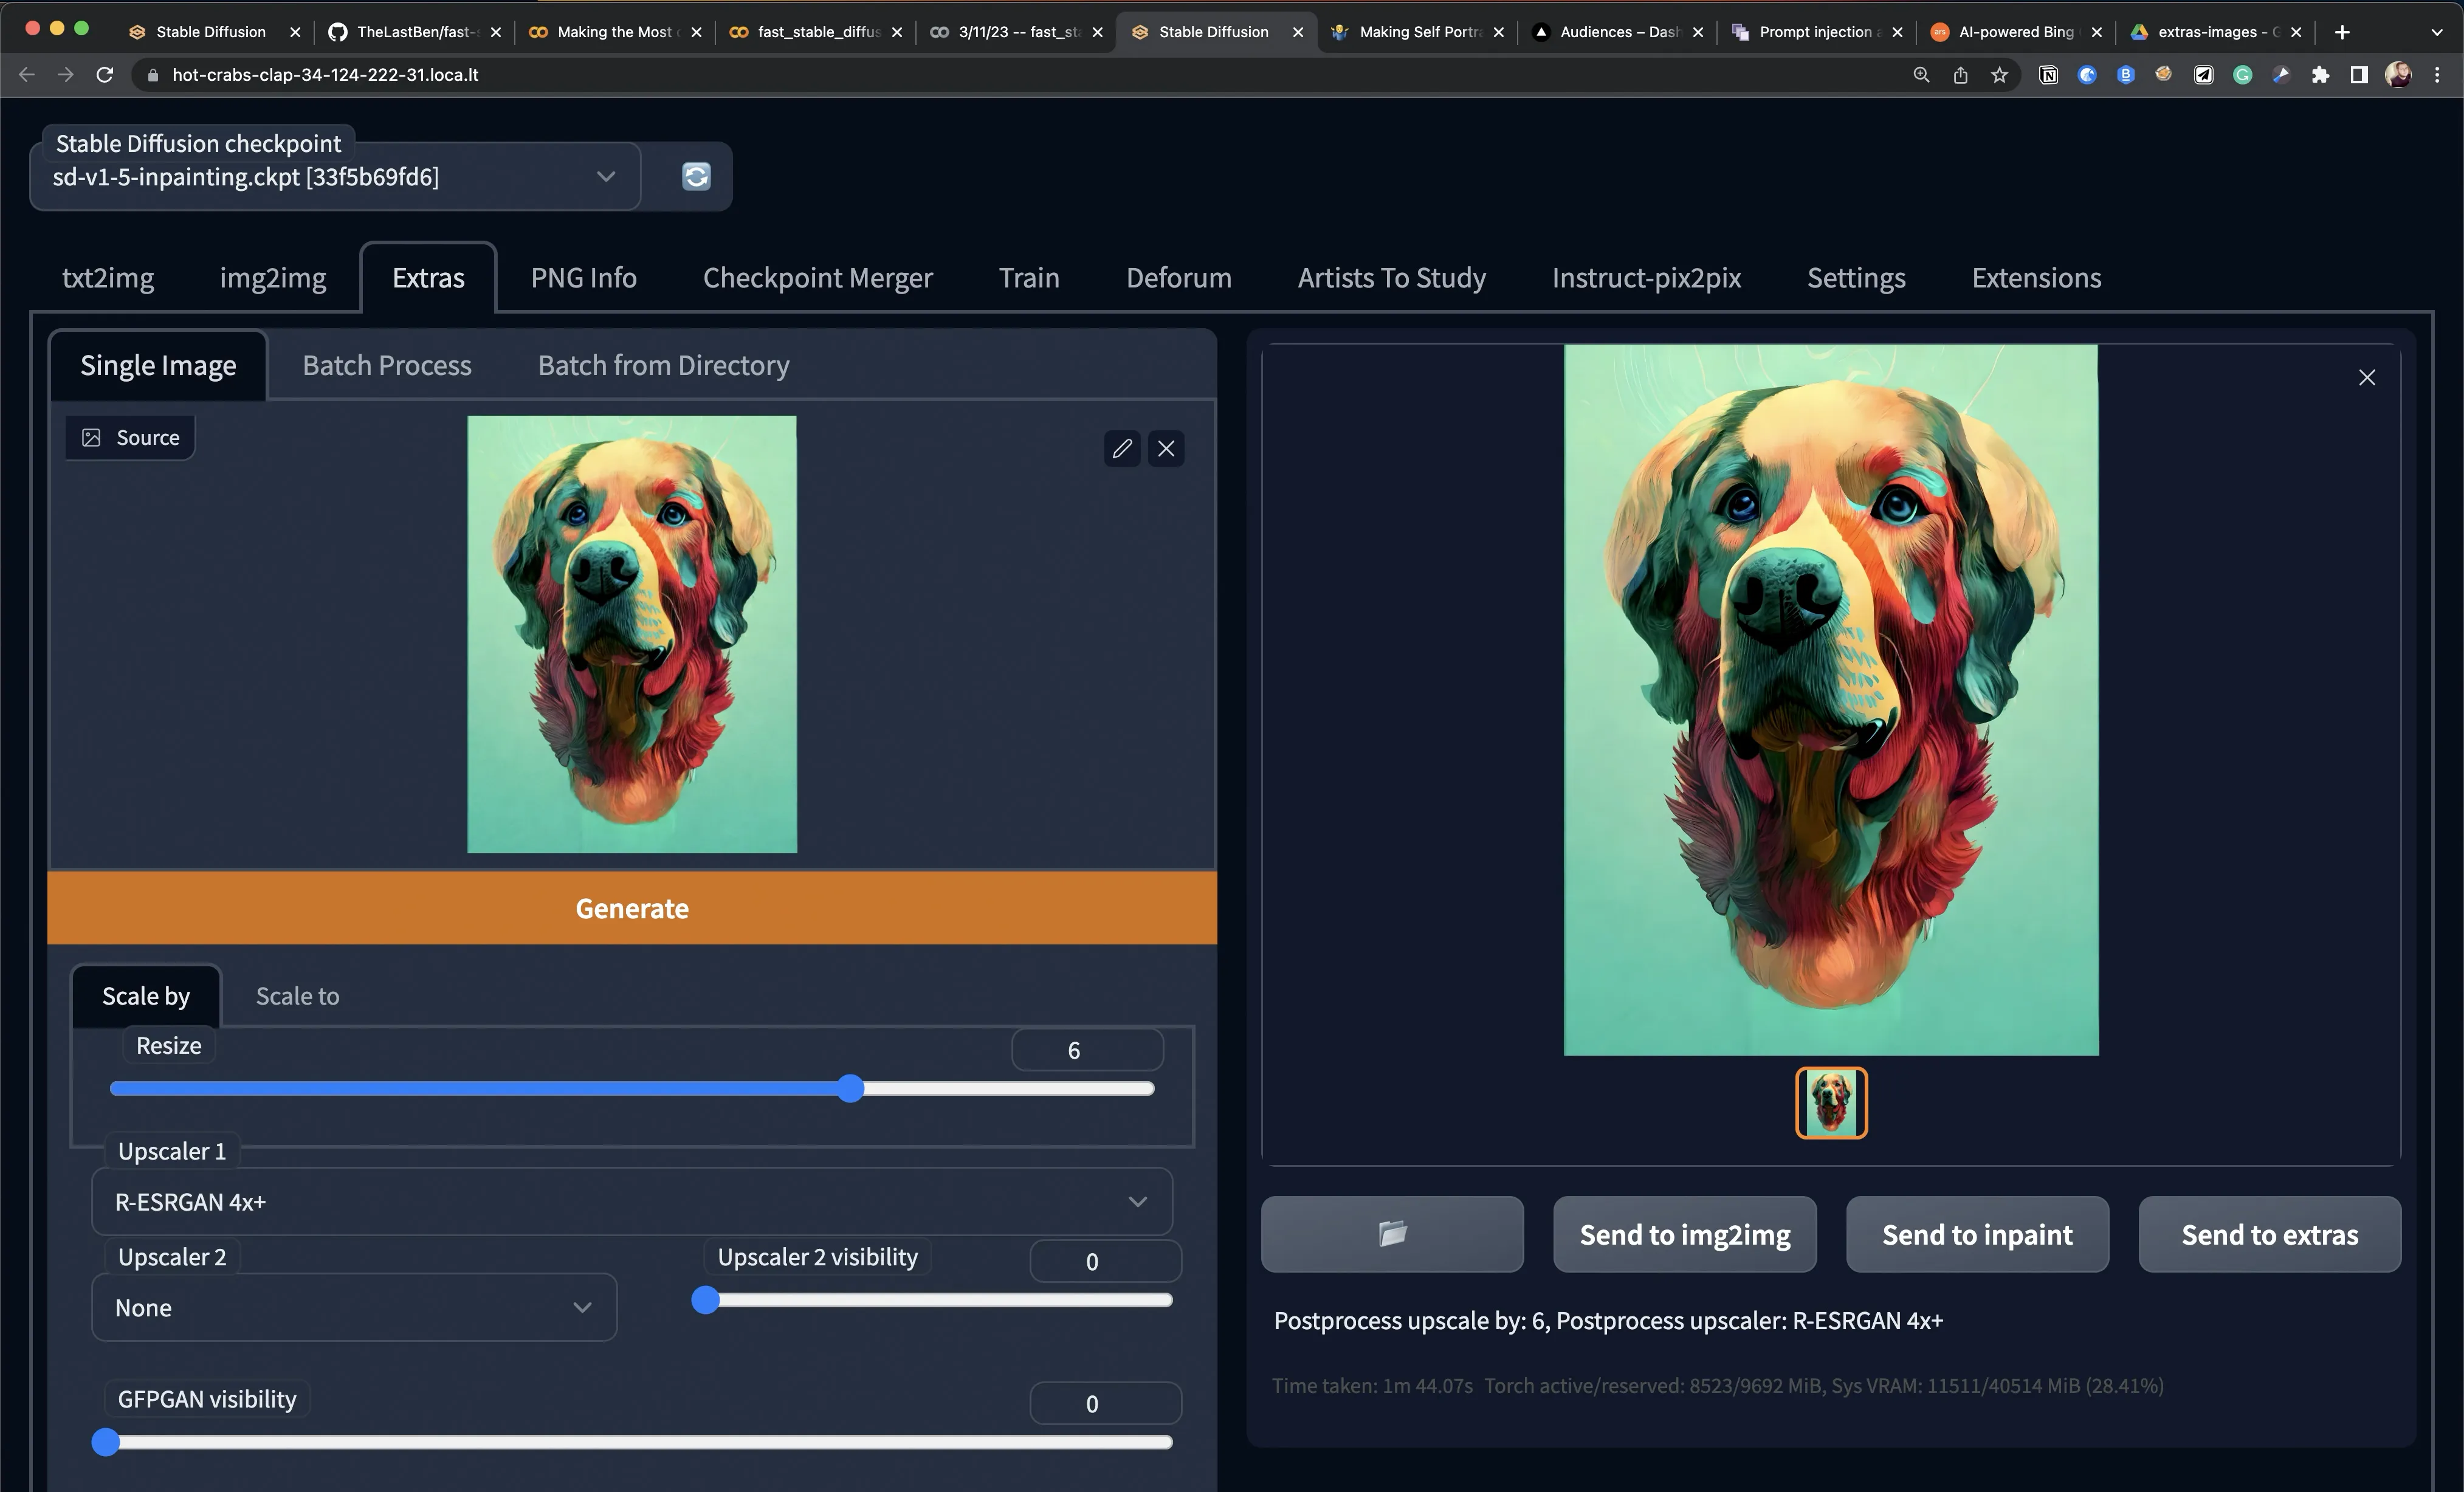
Upscaling is just a fancy way to “blow up” an image. Taking a small image and making it much larger. This is super helpful for high-quality prints, where you print at a 300dpi resolution — that’s a lot of pixels! Sometimes, it feels like I’m clicking the “ENHANCE” button 🤯
I like to use the Real-ESRGAN 4x+ upscaling model. In the screenshot below, you can see I 6x’d the image. To do this, you’ll need a GPU with a lot of VRAM. I ran this in google colab on an Nvidia A100 with 40GB VRAM. When I’m not running in a colab notebook, I will usually use this Replicate model https://replicate.com/nightmareai/real-esrgan
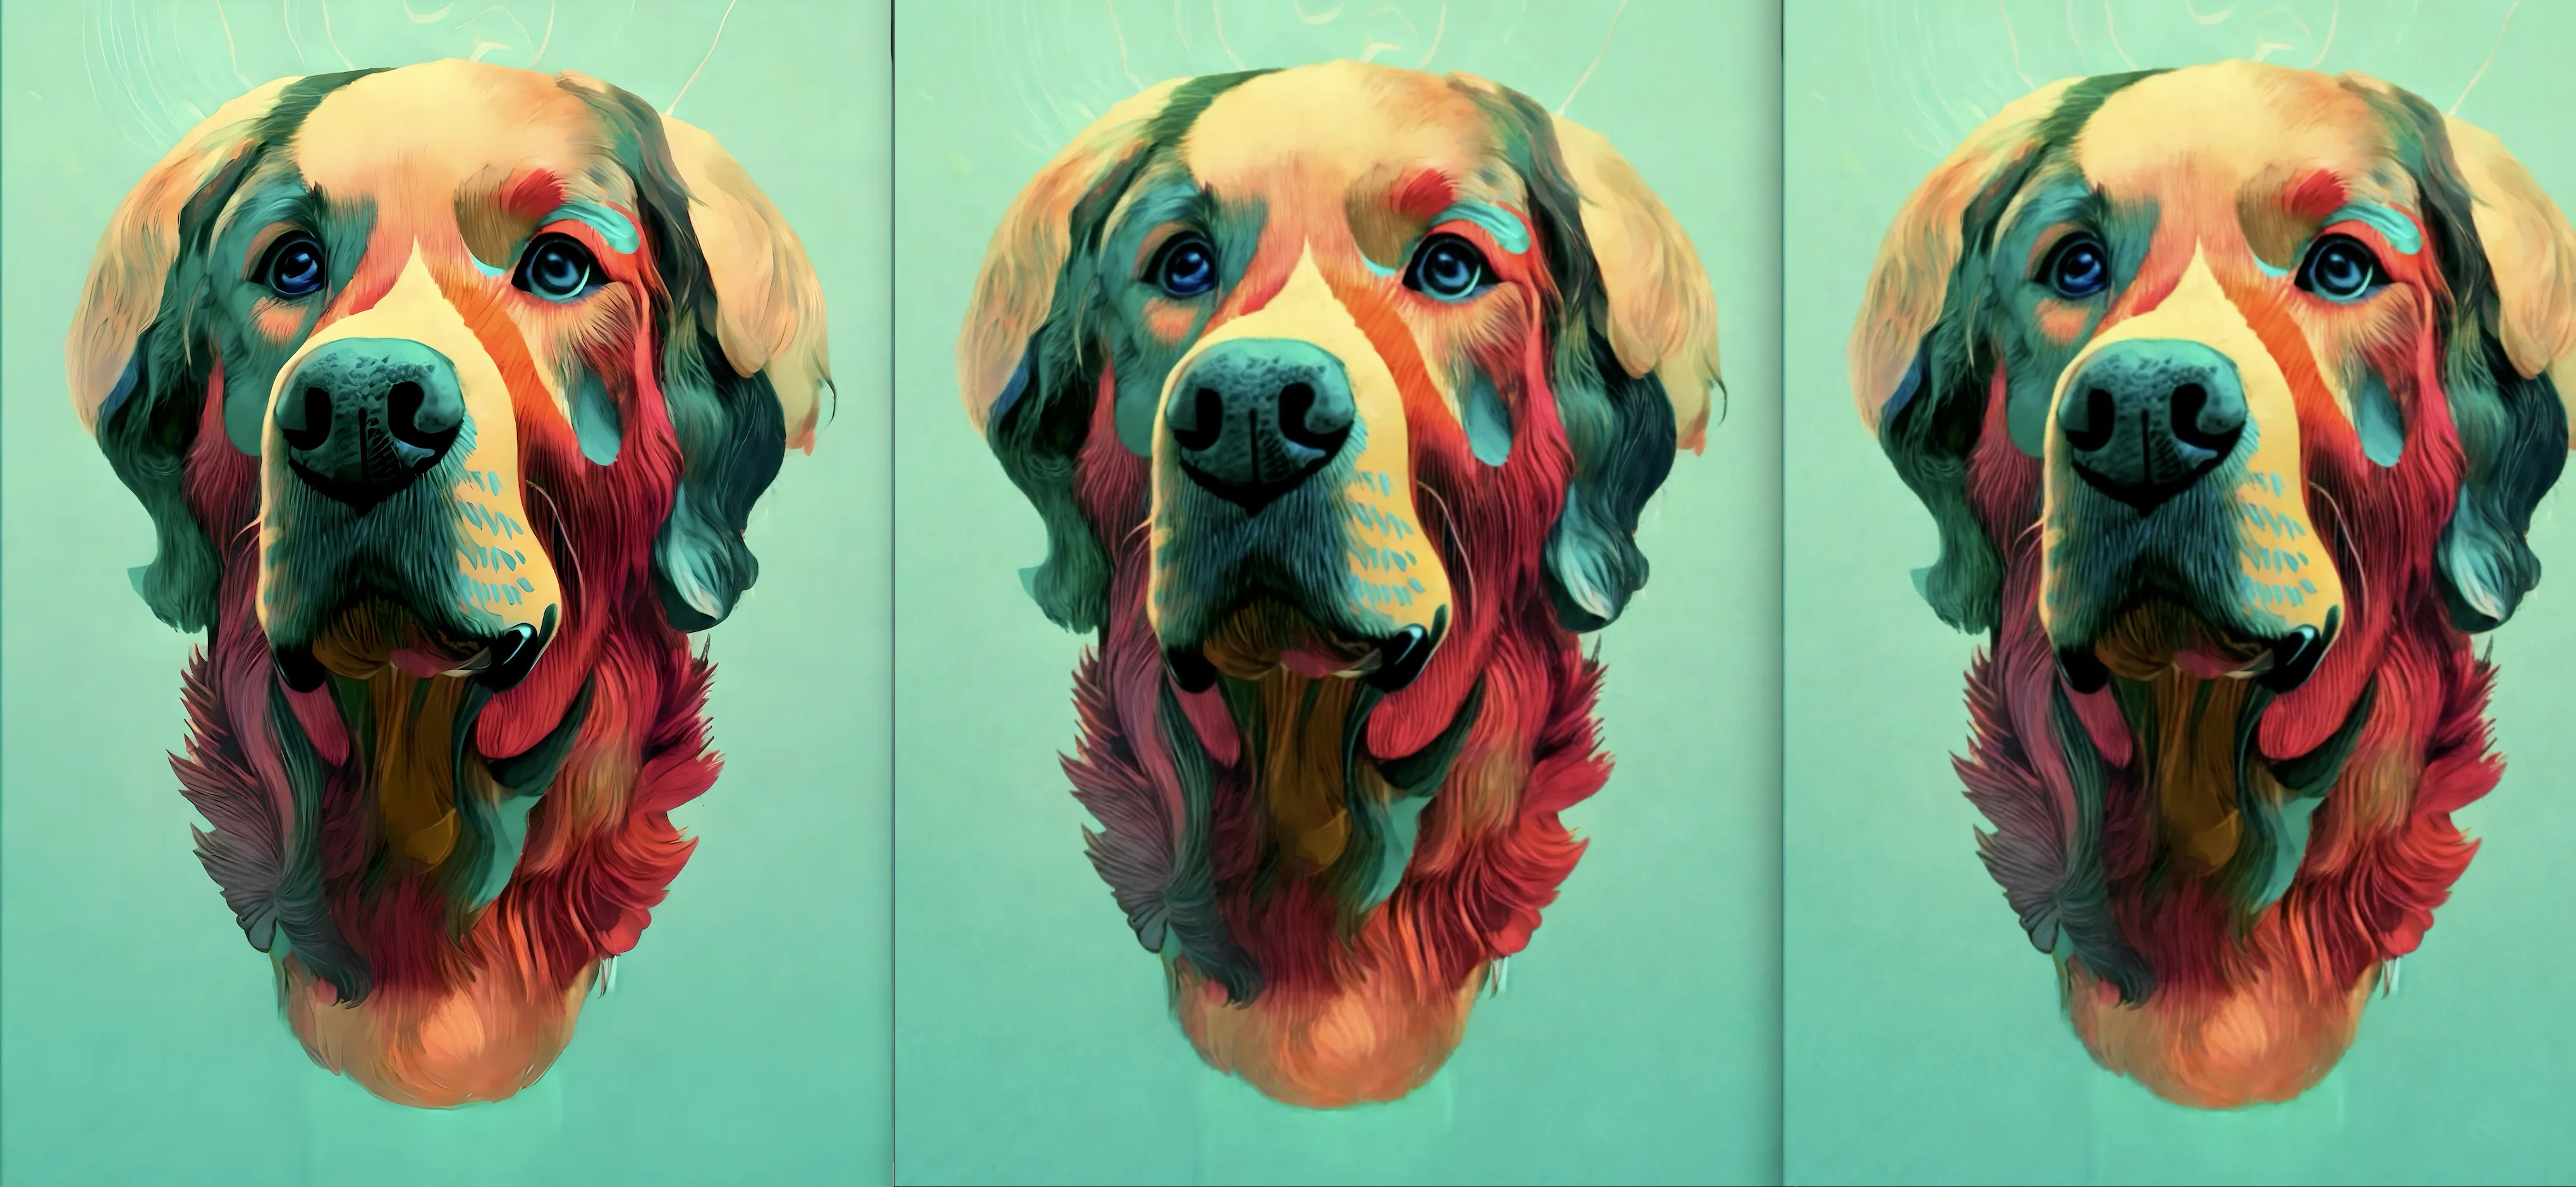
I tried a handful of settings, but the settings in the image above are what I ended with. Interestingly, not all settings are made equal! In the following image, I display three upscaled images side by side. Each of them has varying degrees of compression and loss of detail. They are especially noticeable around the eyes, nose, and fur.
After upscaling, the Queso portrait was 2888x3835px, which is 9.63x12.78” at 300dpi. However, I’m targeting a visible space of 11x17” and printing on 13x19” paper.
So the final step is to prepare everything for print.
Preparing for Print
In the images above, you may have noticed weird compression artifacts and textures in the green gradient background. I want just to delete all of that and place it on a solid gradient.
First, I used the Object Selection tool to quickly select Queso, then I inverted the selection and deleted the background.
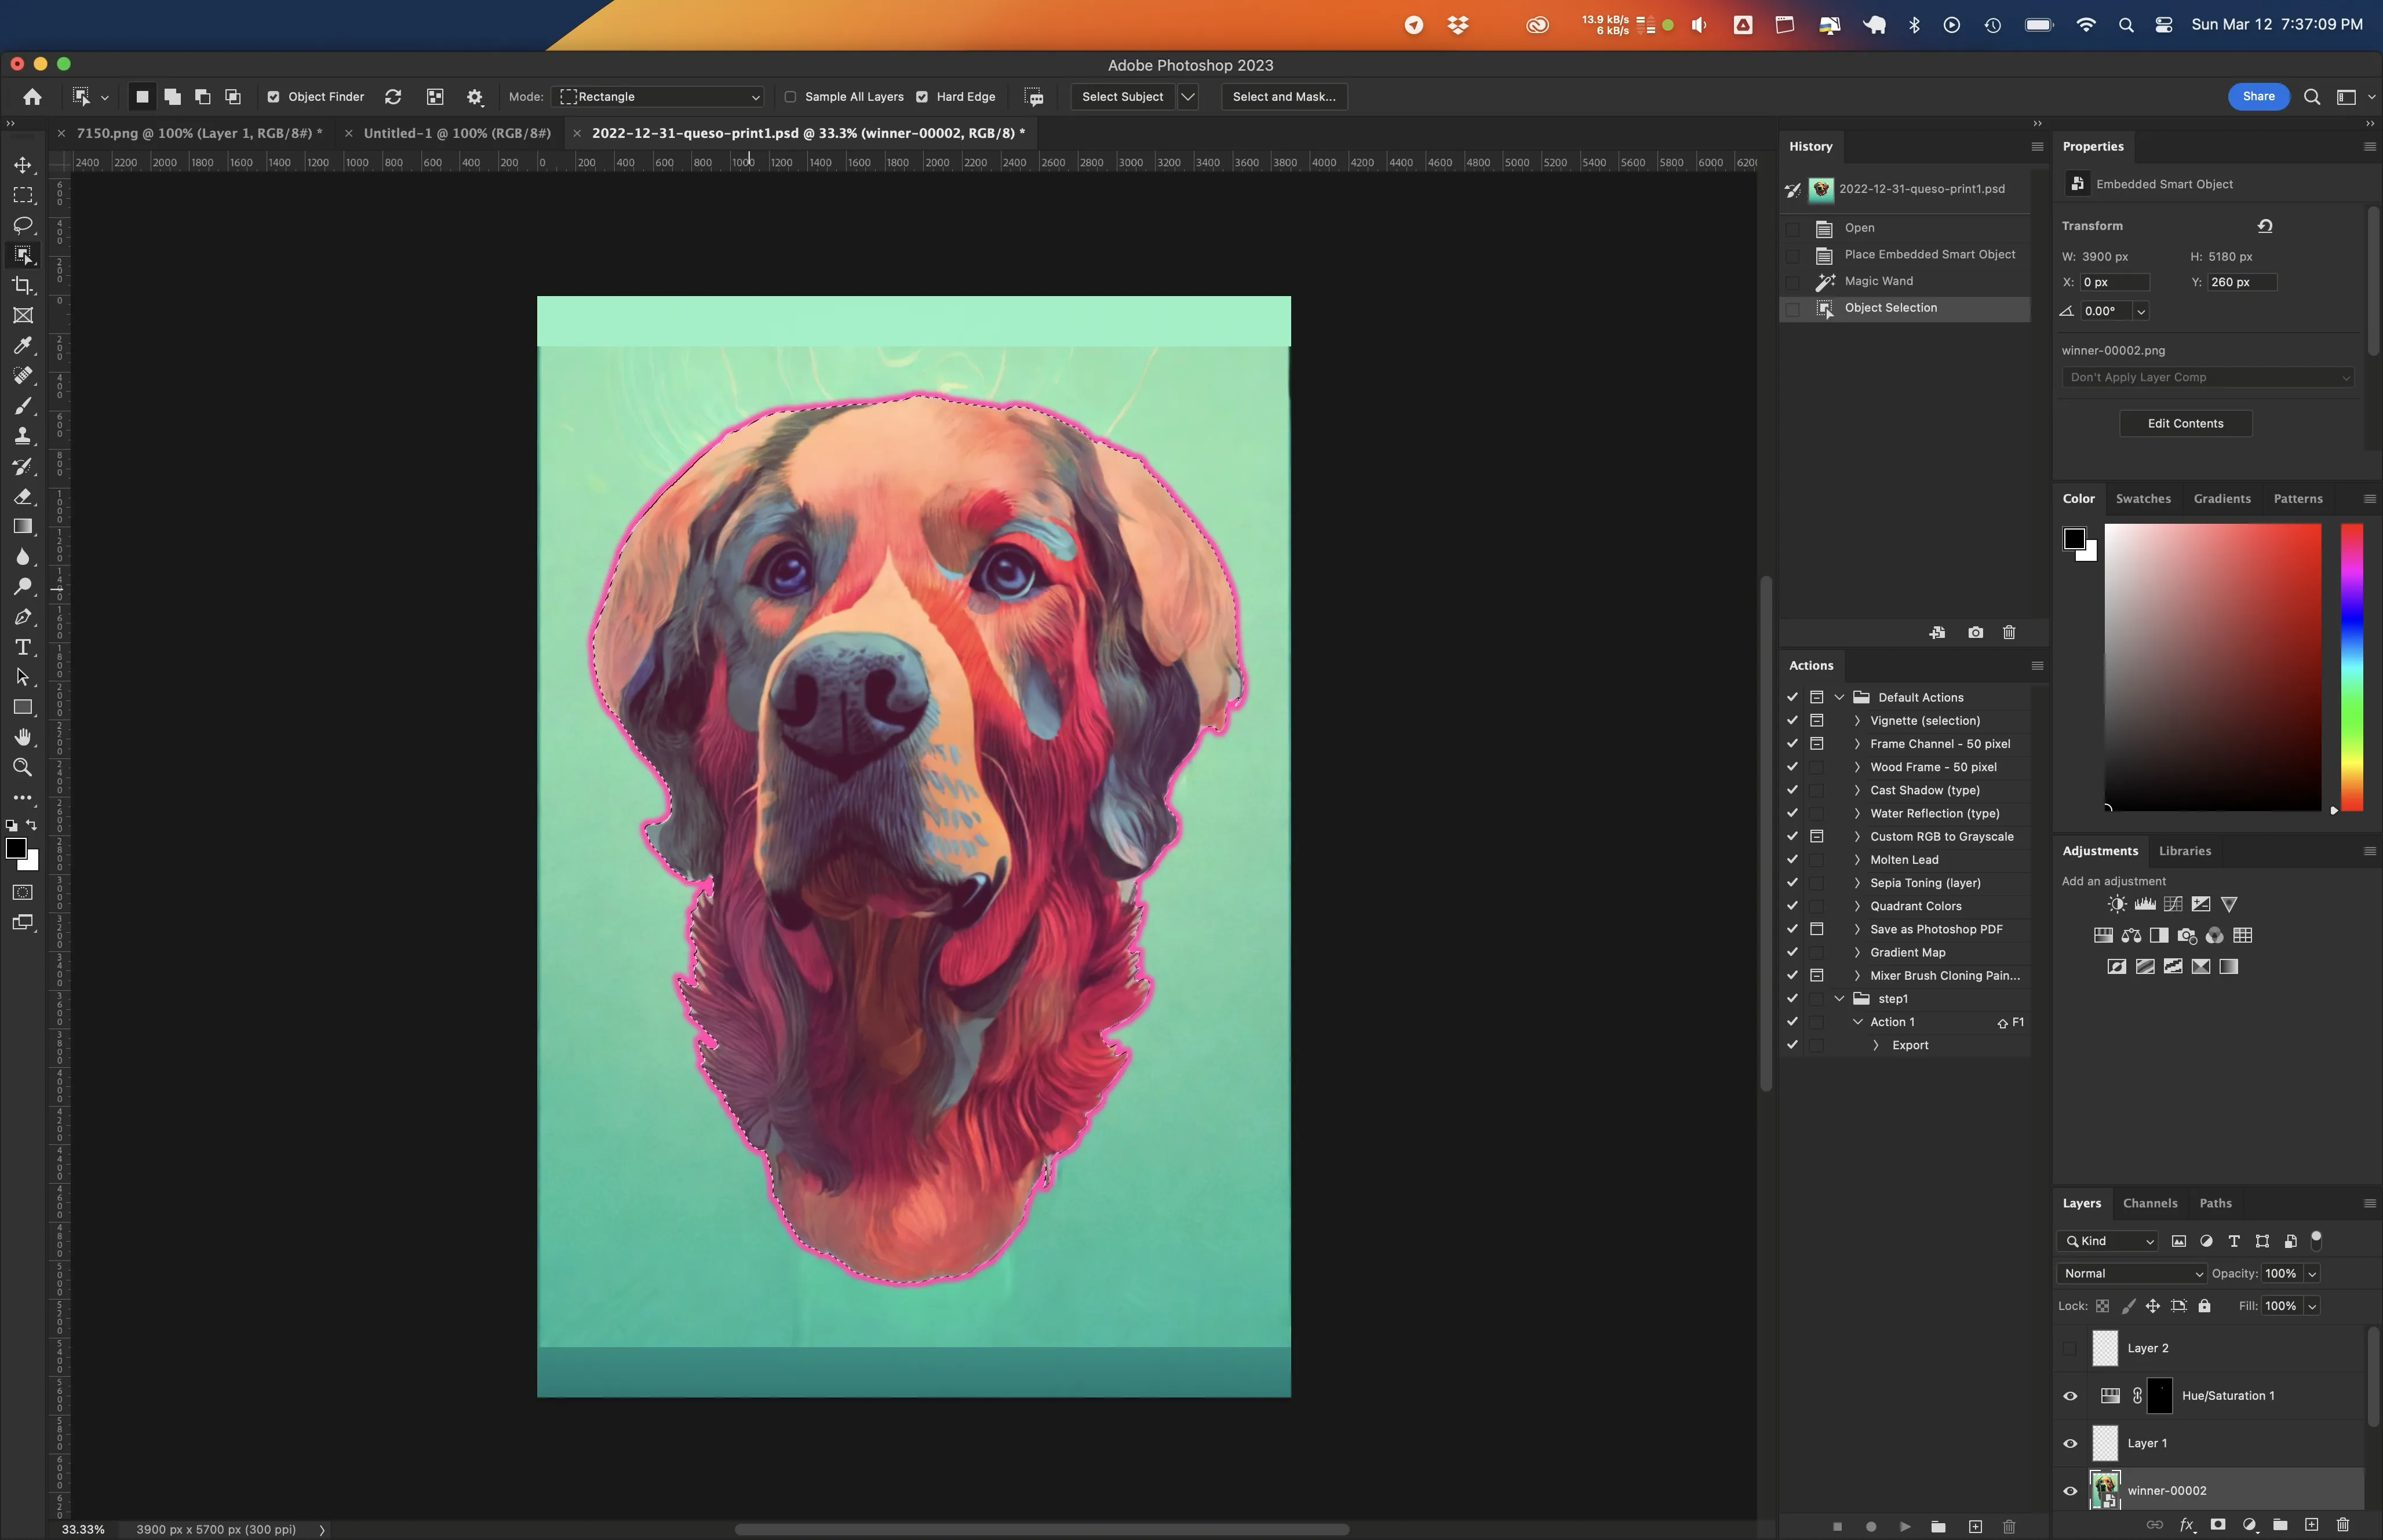
Object Selection tool to remove the messy green background behind Queso.Then I could resize and position Queso until he was perfectly positioned for the framing I had in mind.
I sent this final image to the printer, but I’ve scaled it down to ~50% size for this blog post. At full resolution, it is 13x19” @ 300dpi, which is 3900x5700px.
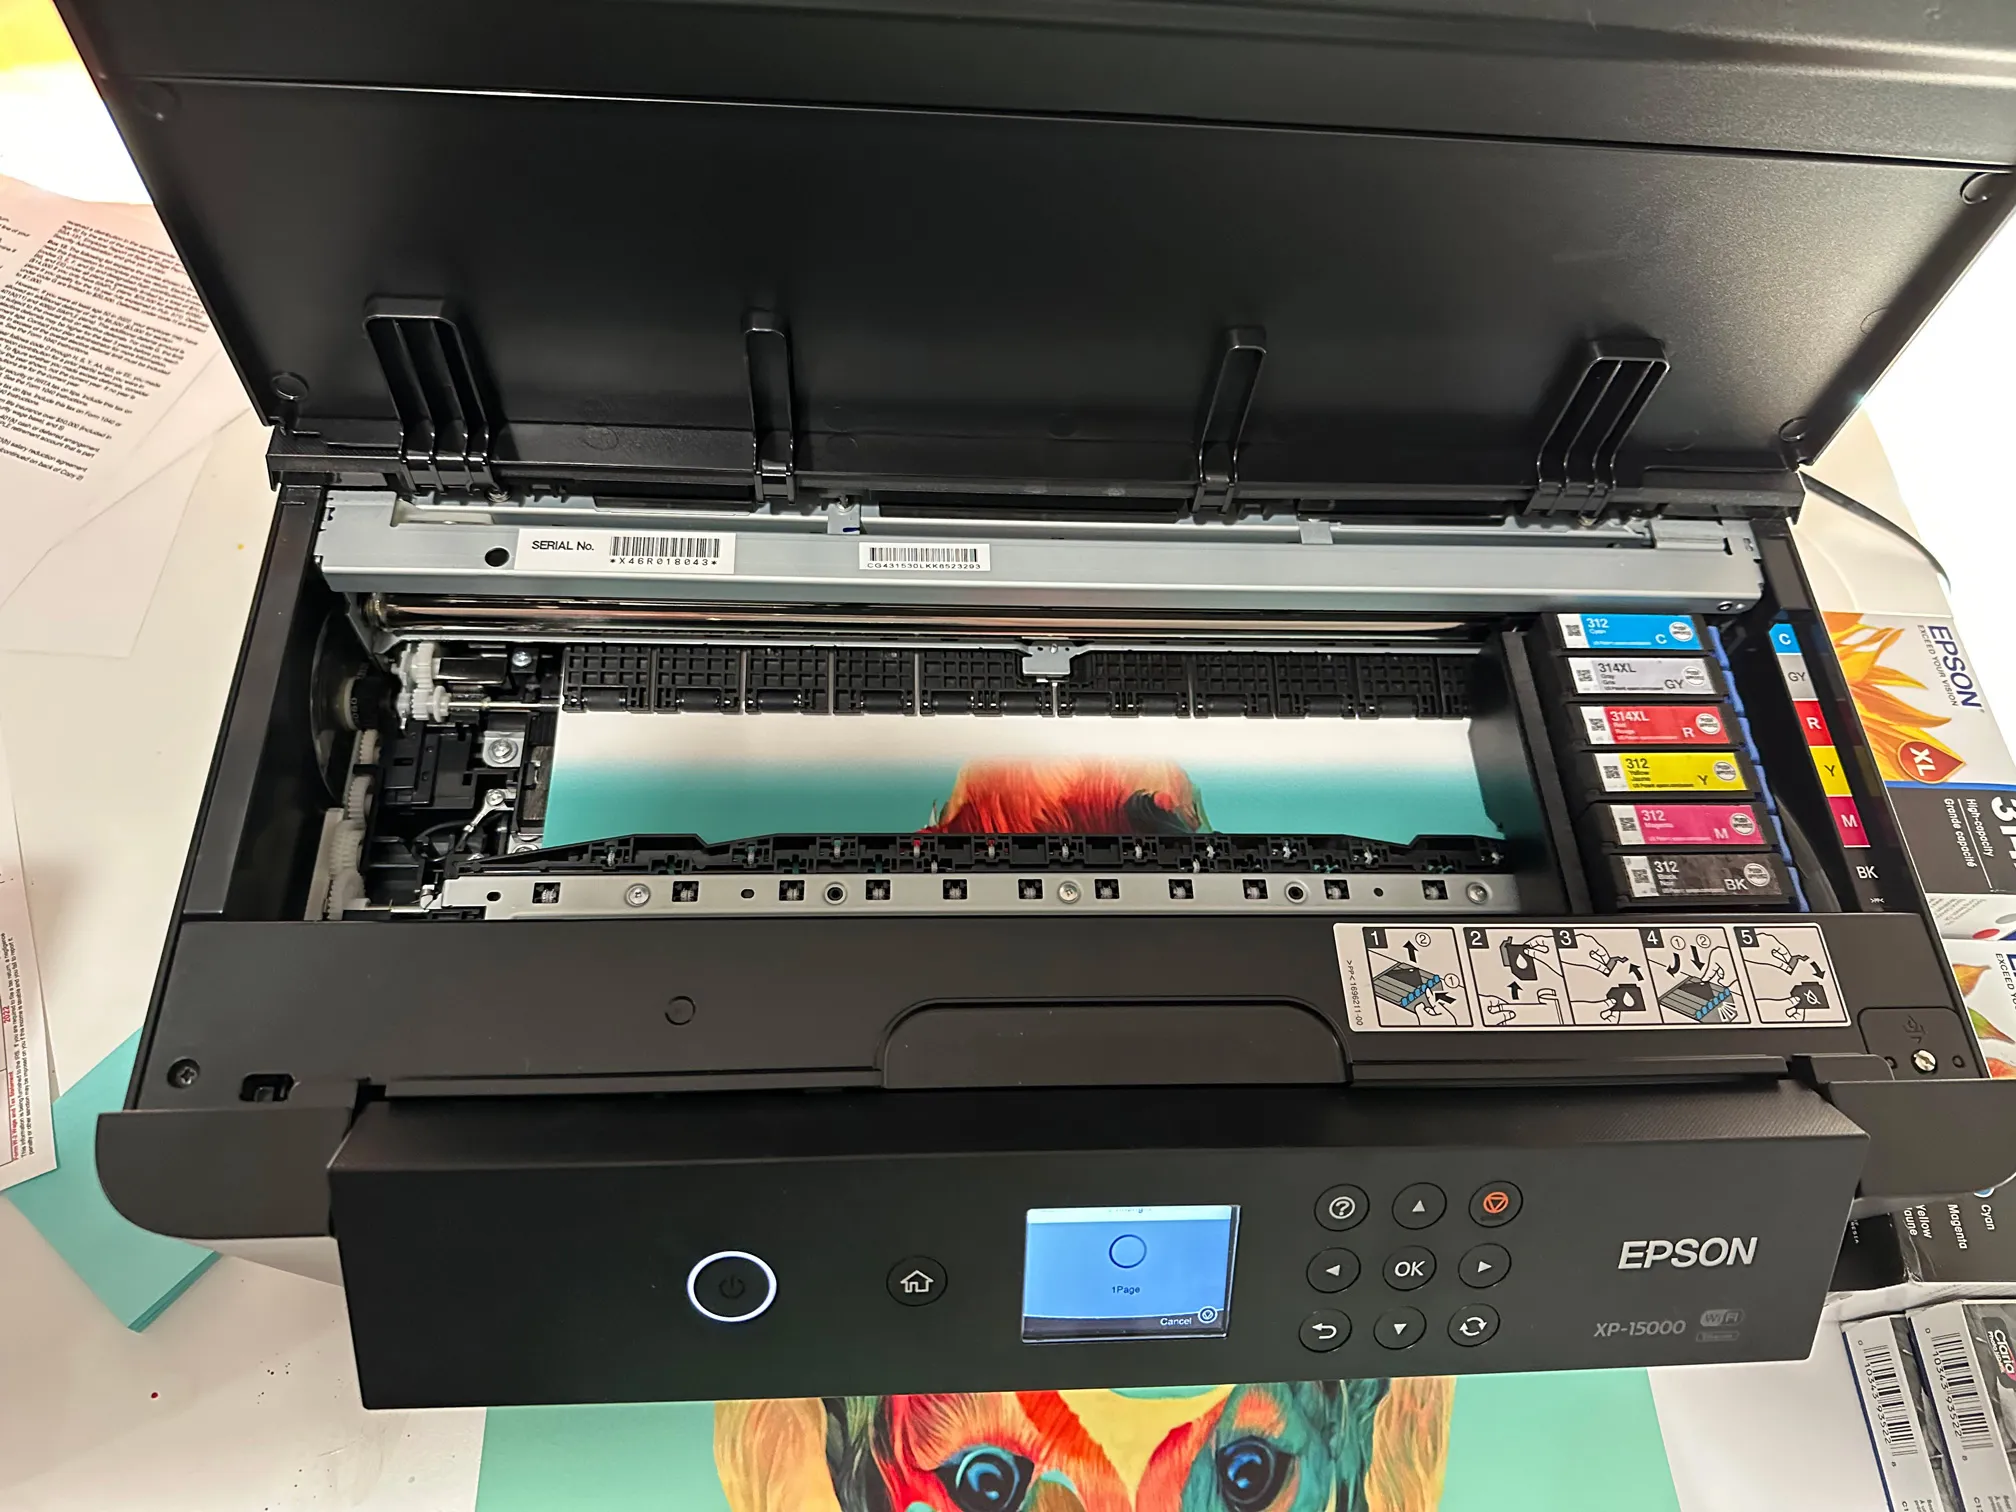
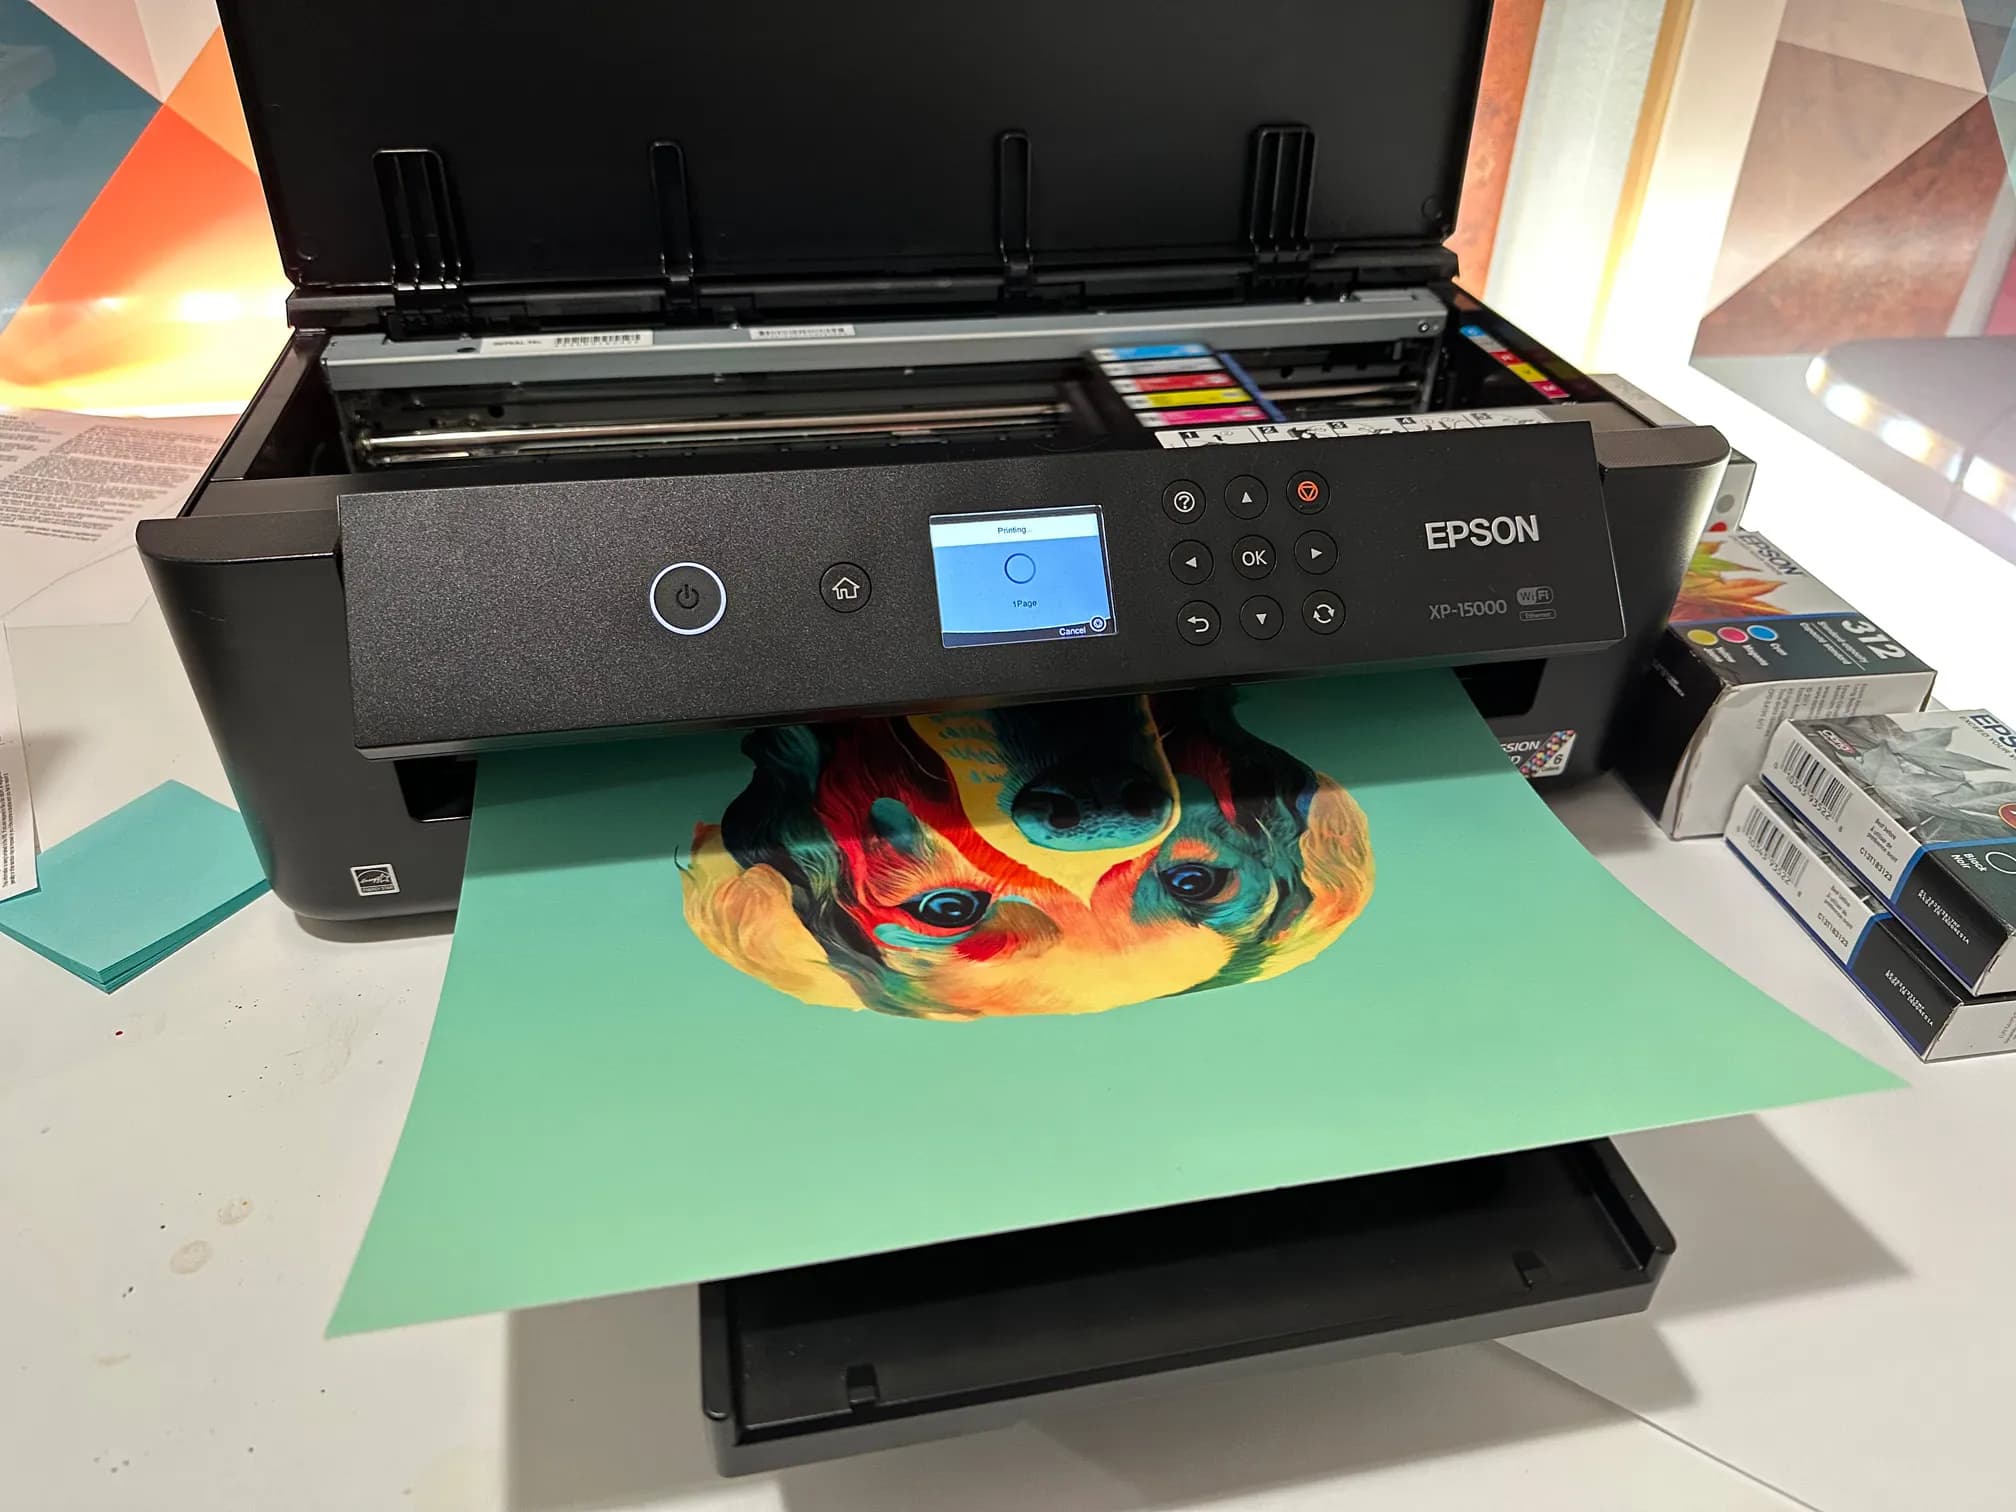
Printing
To print, I used an Epson XP-15000, the best home printer I’ve ever used. It’s ~$400 on Amazon, and the ink is expensive, but the results are professional grade.
Another critical aspect of printing a high-quality art print that is intended to be framed is the paper. Epson has super high-quality Velvet Fine Art Paper, which the printer is calibrated to print on. The results are stunning.
Closing Thoughts
This project is something I’ve wanted to do since the day I first toyed with Stable Diffusion. The pace at which the community is developing new tools and techniques is astounding.
I still feel like there is a lot of missing creative control while making art with Stable Diffusion, but the future is bright! Stable Diffusion hasn’t even been out for a full year yet, and it's becoming increasingly obvious to me, through projects like this, that it’s going to be a game-changer for artists of all backgrounds.
The more I play with it, the more excited I get about it. I can't wait to see what the future holds for Stable Diffusion, and the world of text-to-image generative art.
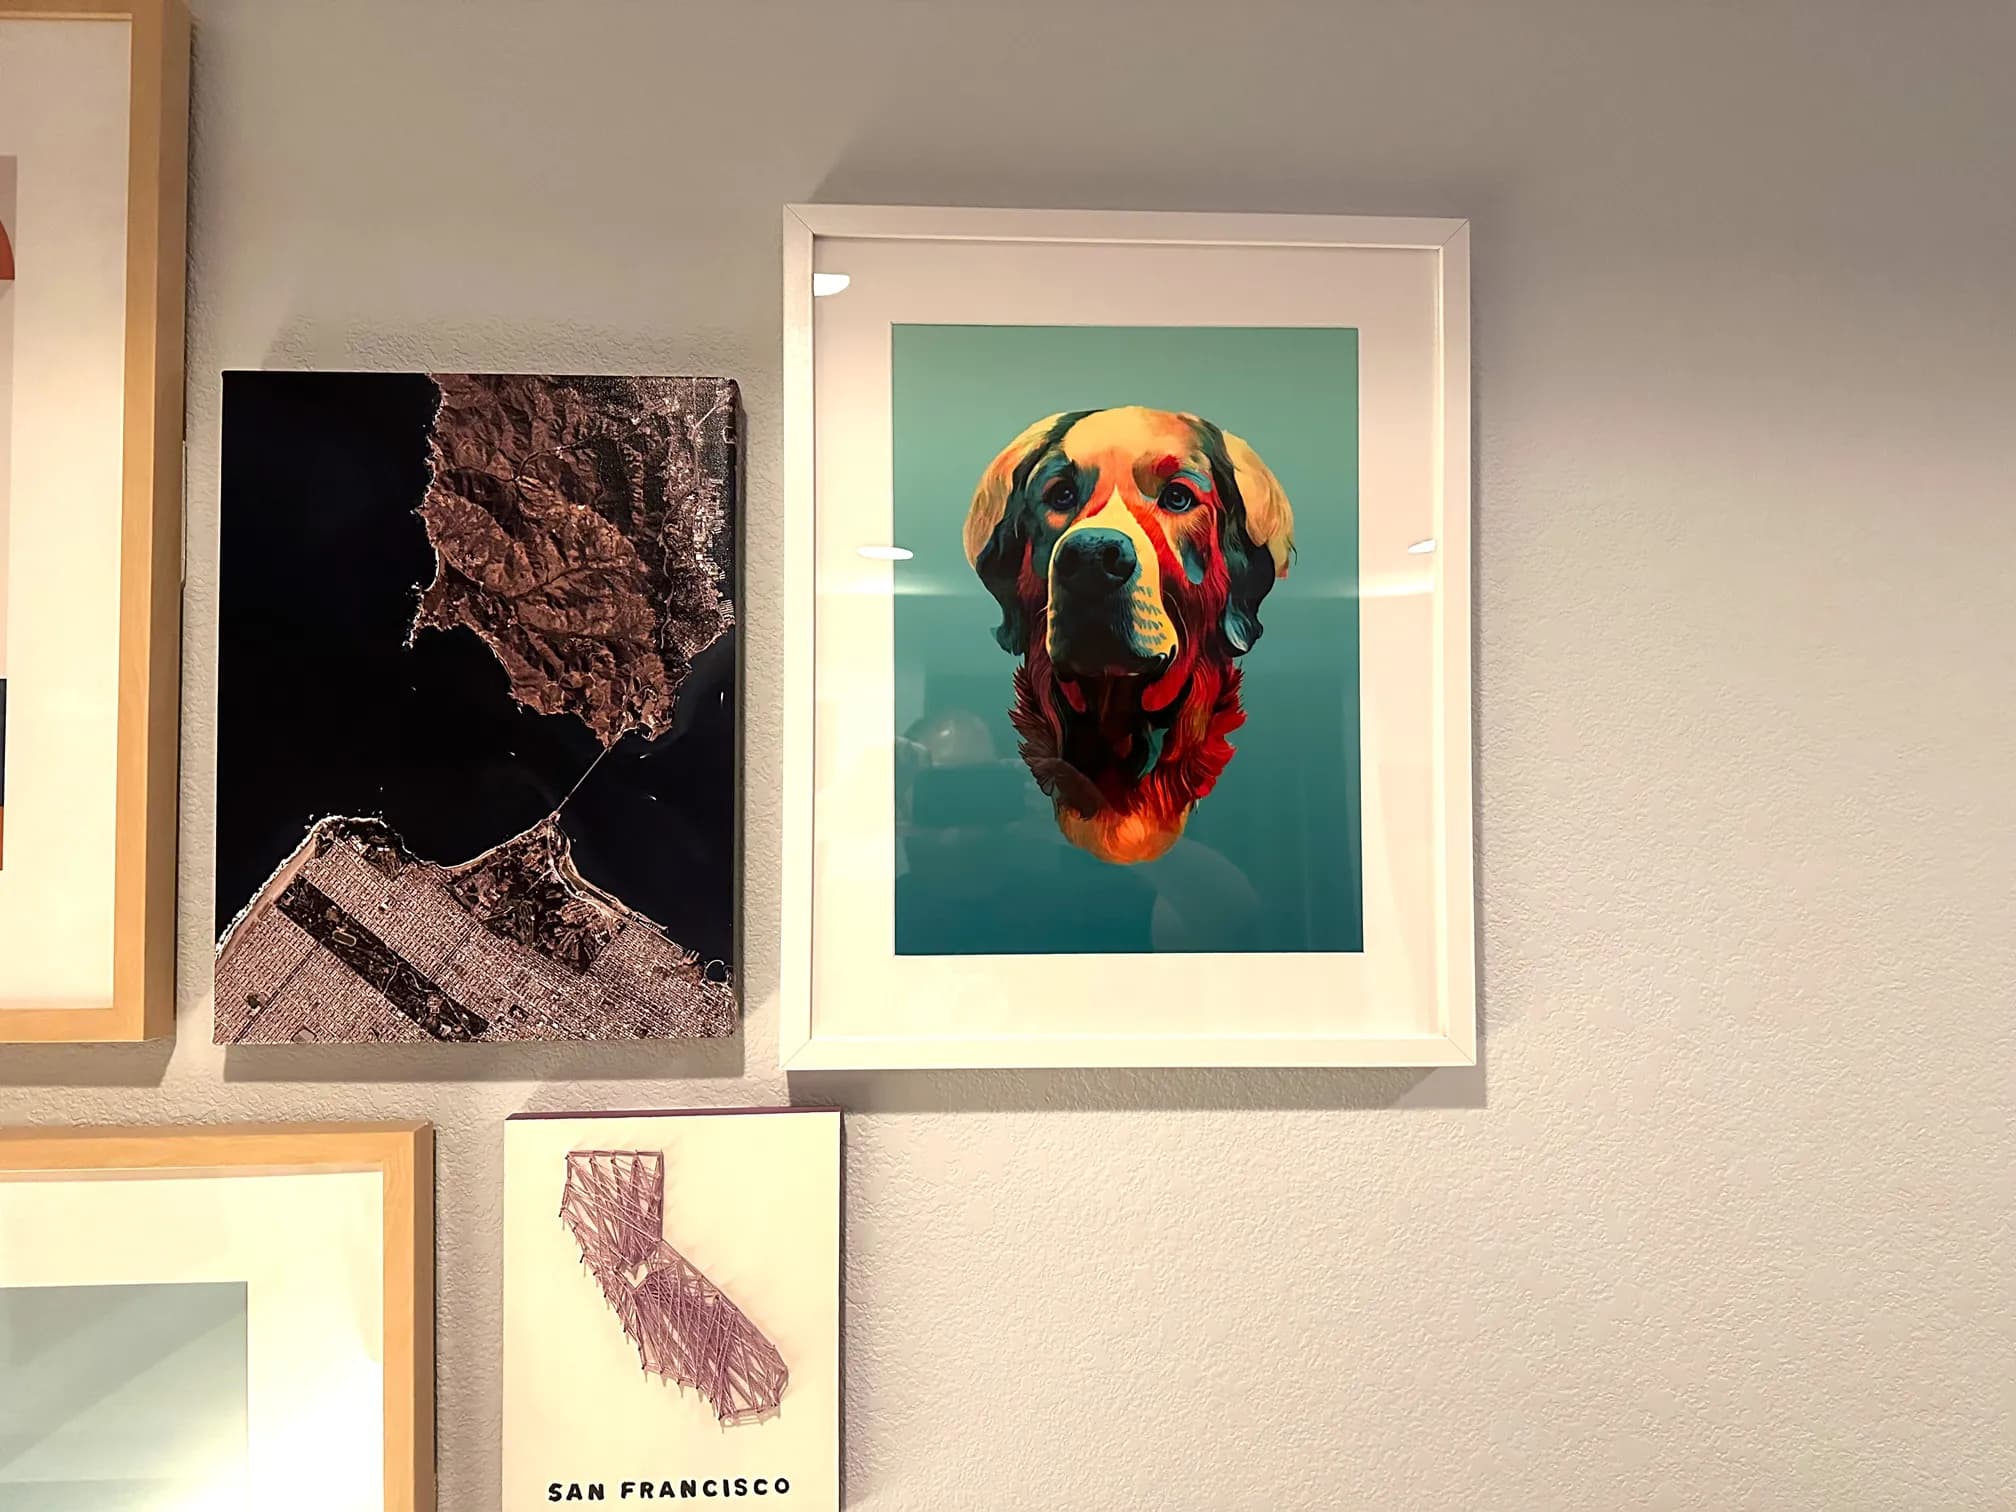
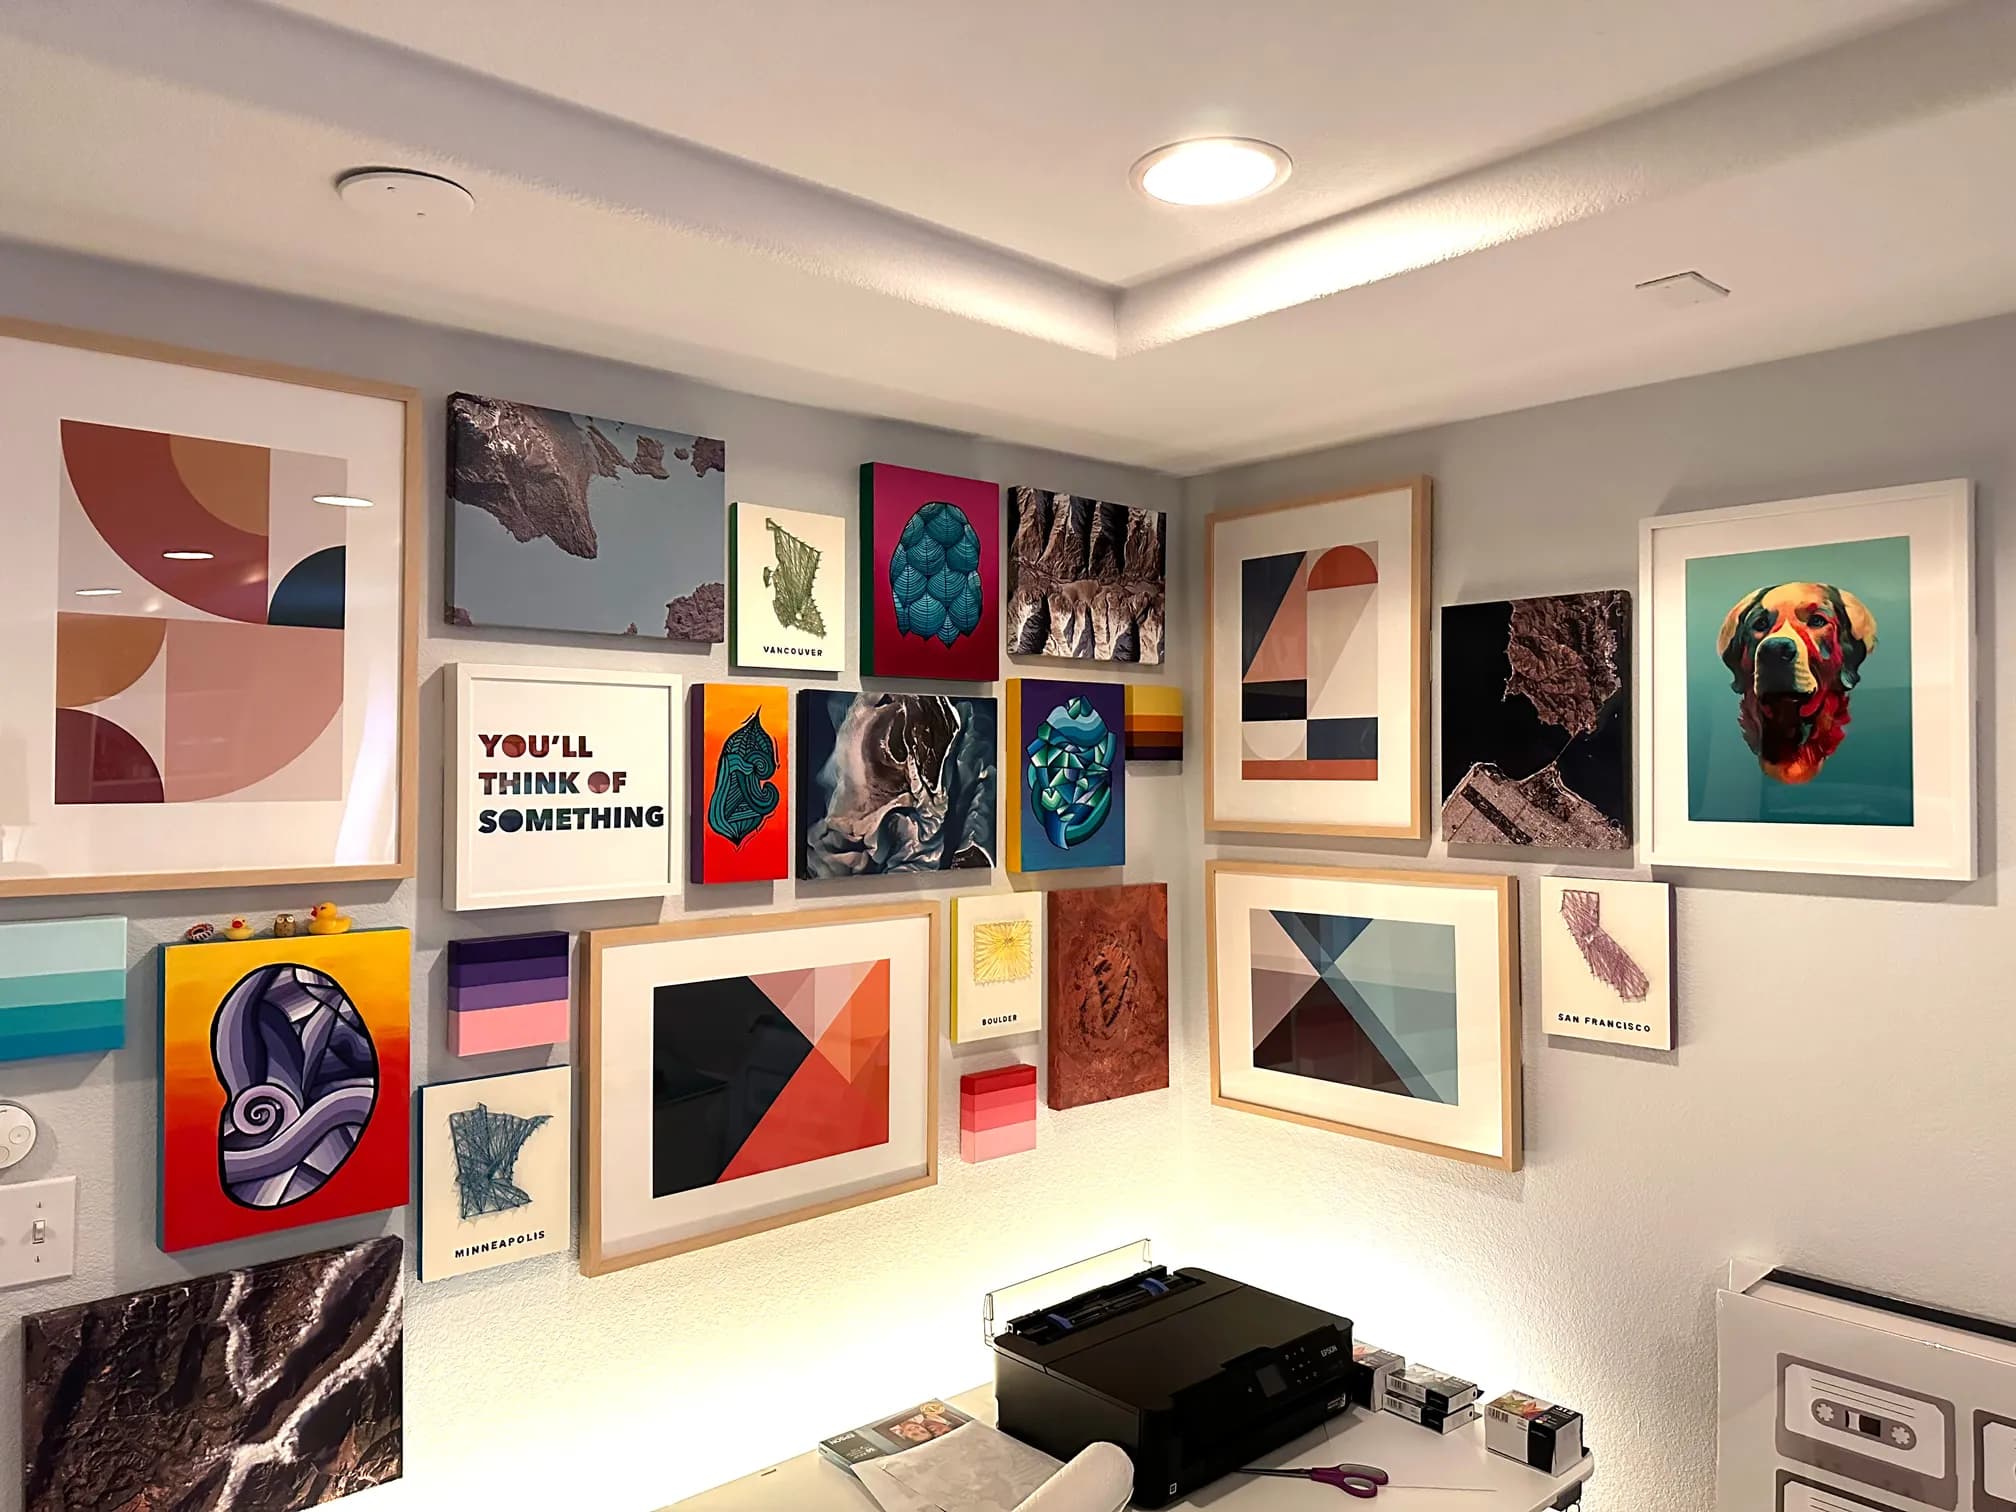
Below I’ve included expanded photos of my art wall, including my bestest pal 🧀 Queso 🤗. The photos don’t do it justice. The actual detail in print is better than I would have guessed possible.